
Installation Guide

GUIDELINES
FOR UNIT
INSTALLATION
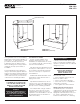
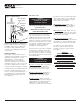
Confirm unit apron is
resting flush on floor.
1. Position Tub
in Framed Area
Wall Framing
Nailing
Flange
Figure 2a - Unit
Installation
Procedure
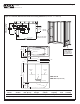
Confirm Drain Alignment
Figure 2b - Unit
Installation
Procedure
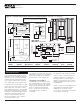
2. Level Tub
in Framed Area
Wall Framing
Wall
Framing
Confirm the tub is level
across the front and
at each end
Confirm unit is plumb
at each end.
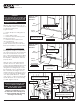
Wall
Framing
Nailing
Flange
Wall
Framing
Figure 3b - Securing Unit
Secure unit to
framing with
large headed
fasteners.
CAUTION: Protect unit surface
with a shield when fastening.
Nailing Flange
Nailing Flange
Drill 1/8 inch hole through
flange at each framing member.
Figure 3a - Securing Unit
Wall Framing
Page 4
WARNING!
IF AN OPTIONAL UNIT CAP IS USED, THE
CAP MUST BE INSTALLED ON THE UNIT
BEFORE IT IS PLACED IN THE ALCOVE!
Installation Procedure
With the unit positioned in the alcove,
several details must be checked prior to
securing the unit in place.
(Figures 2a & 2b)
✔Confirm unit apron is resting flush on
the floor.
✔Confirm drain position.
✔Confirm the unit is level along each
side and each end.
✔Confirm the unit is square in the
alcove framework.
✔Confirm the front inside corner is
plumb at each end. (This is critical for
the proper installation of an enclosure)
ON WHIRLPOOL EQUIPPED UNIT
✔Check for required modifications to
framing due to whirlpool components.
The unit must also be positioned square
in the alcove framework. The use of
shim or filler material behind the nailing
flange at each framing member may
be required to maintain the unit in the
proper position.
After the unit is confirmed level and
square in the alcove, drill a 1/8 inch
hole through the nailing flange at each
framing member and every 8 inches
along the front nailing flanges. Secure
the unit in place across the back wall
first, followed by the flanges at each
end and along the front flanges, using
1-1/4 inch long (large headed) nails or
other appropriate fasteners. Continu-
ously check to confirm the unit remains
square within the alcove as it is being
secured. (Figures 3a & 3b)
WARNING!
THE UNIT BOTTOM SHOULD BE CLEAR
OF ALL POTENTIALLY DAMAGING
DEBRIS AND THE SURFACE PROTECTED
BEFORE STEPPING INSIDE.
CAUTION: It is advisable to protect
the unit surface with a thin plywood
or cardboard shield while fastening
the flange to the framing.