
Manual
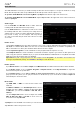
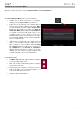
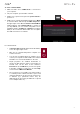
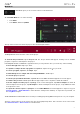
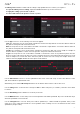
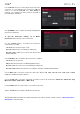
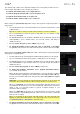
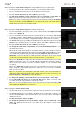
Table Of Contents
- Table of Contents
- Introduction
- Features
- Tutorial / Basic Concepts
- Operation
- General Features
- Modes
- Appendix

69
The channel strip contains some important settings for the current pad, program, track, or
master output, depending on the currently selected icon:
To view the pad channel strip, tap the single-pad icon.
To view the program channel strip, tap the four-squares icon.
To view the track channel strip, tap the bars icon.
To view the master channel strip, tap the crown icon.
When viewing the pad channel strip while using a drum program, keygroup program, or
clip program:
• The first field shows the current pad number. Press a pad or tap the field to select
a different pad.
Tip: This is useful for mixing your pads without having to enter the Pad Mixer.
• The second field shows where the pad is routed (which you can change). Usually,
this is set to Program.
• The Inserts field shows any enabled or disabled effects for that pad. Tap the area
under Inserts to open a window where you can load, change, and enable or
disable the effects.
• To solo or mute the pad, tap Solo or Mute (respectively).
• To change the panning or level of the pad, adjust the pan knob or level slider.
The green level meter next to the slider shows the pad’s current volume level in dB.
When viewing the program channel strip while using a drum program, keygroup program,
clip program, or plugin program:
• The first field shows the current program number and name (which you can change).
• The second field shows where the program is routed (which you can change).
• The Inserts field shows any enabled or disabled effects for that program. Tap the
area under Inserts to open a window where you can load, change, and enable or
disable the effects.
• To solo or mute the program, tap Solo or Mute (respectively).
• To change the program’s automation, tap the program automation button to
cycle through its three states:
When off, the program will ignore automation data. If you have already recorded or
entered automation, tapping this will switch between Read (R) and Write (W) only,
but you can override this and turn it off by pressing and holding Shift while tapping
the button.
Important: If you have already recorded automation and turn it off, the track will
still use the effect and its parameter values at the point where you turned it off.
When set to Read (R), the program will read automation data but will not record
any additional automation over it. You can still manually edit and enter automation.
(Think of this as a protective feature to prevent accidental changes to your
automation while recording.)
When set to Write (W), the program can record automation. (If you have any Q-Link
knobs assigned to automatable parameters, make sure not to touch any accidentally
while you are recording.)
Tip: You can quickly set all programs and audio tracks to the same automation by
tapping the global automation button in the upper-right corner of the touchscreen.
See General Features > Automation to learn about this.
• To change the panning or level of the program, adjust the pan knob or level slider.
The green level meter next to the slider shows the program’s current volume level in dB.