
Manual


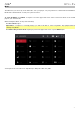
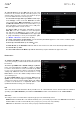
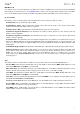
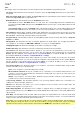
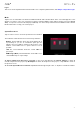
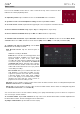
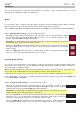
Table Of Contents
- Table of Contents
- Introduction
- Features
- Tutorial / Basic Concepts
- Operation
- General Features
- Modes
- Appendix

45
Sequencer
The settings on this screen determine how sequencing works in Grid View and in the Step Sequencer.
Display Resolution: This is the display resolution (in PPQN—pulses per quarter note) of pulse values in certain areas
of the operating system. Please note that this setting affects the display resolution, not the timing.
Instant Track Mute: When disabled, if you mute a track, its Note On messages will be ignored, and samples and
notes that are playing will finish playing their entire length (this is how legacy MPCs’ track-muting worked). This is
useful if you are using loops and want a loop to play to the end of a bar but not play the next time the sequence
loops. When enabled, if you mute a track, the MIDI track volume (0) will be sent. The loop will continue to play but
at zero volume, allowing the loop to continue playing when the track is unmuted. This is useful when you want to
have the track muted immediately.
Play Track Mute and Solo Events: When enabled, track mute and solo events are played back when you are in
Track Mute Mode. When disabled, track mute and solo events will not be played back while in Track Mute Mode.
Record Track Mute and Solo Events: When enabled, track mute and solo events are recorded when you are in
Track Mute Mode (timing correct settings will affect the recorded position events). When disabled, track mute and
solo events will not be recorded while in Track Mute Mode. This feature is useful if you want to use Track Mute
Mode to record track mutes or solos into your sequences as opposed to using Track Mute Mode for performance
or listening purposes only.
Record Pad Aftertouch Event: When enabled, pad aftertouch data (from MPC Live’s pressure-sensitive pads) will
be recorded. When disabled, pad aftertouch data will be ignored.
Place Events Recorded During Count-In at Start Point: When enabled, pressing a pad during the recording’s
pre-count will record that note event at the start of the recording (this is how the MPC3000 worked). When
disabled, no notes will be recorded until the pre-count is finished and recording has begun.
Truncate Duration: This determines if/how events are cropped if they exceed the length of the current Sequence:
To Sequence Length: If the length of an event exceeds the length of the sequence, it will be truncated. This
ensures that the event will not overlap itself when the sequence loops.
To Sequence End: If an event exceeds the length of the sequence, it will be truncated to the end of the
current sequence. In other words, the event will stop playing when the sequence ends or loops.
As Played: Events will play back exactly as they were recorded, even if they overlap themselves when the
sequence loops.
Hardware
The settings on this screen determine the behavior of MPC Live’s pads and touchscreen.
Pad Threshold: This determines how much force is required to strike the pads for them to trigger.
Pad Sensitivity: This determines how the pads respond to touch. At lower values, you need to use more force to
generate a high-velocity note. At higher values, it is easier to generate high-velocity notes, even if you do not use
much force while pressing a pad.
Pad Curve: This determines how striking the pads translates into velocity values. The A
curve is essentially linear, while the B, C, and D curves are exponential (see graphic here).
Velocity & Aftertouch: View these meters when striking and pressing the pads to help
gauge the force and pressure you are applying to them. These meters are useful when
adjusting the Pad Threshold and Pad Sensitivity parameters (above).
Footswitch 1 & Footswitch 2: These determine how connected footswitches will work.
These options are not available for MPC Live, which
does not have footswitch inputs.
MIDI Control Mode Output: This determines which MIDI port MPC Live is using to send
MIDI messages to external MIDI devices.
Screen Dimming: This determines how much time must pass before MPC Live automatically dims its touchscreen
to preserve its battery life.
Screen Brightness: This determines the brightness of the screen during normal operation: normal brightness
(Day) or dimmed (Night).
Power On Screen: This determines whether or not the power-on screen appears when you power the unit on. The
power-on screen shows a Start button that you must tap and hold in order to fully power MPC Live on. If you do
not tap and hold the Start button, MPC Live will return to its powered-off state. This feature is to prevent MPC
Live from powering on if the power button is accidentally pressed. When set to Never, this feature is disabled.
When set to When On Battery, this feature is enabled only if MPC Live is not connected to a power outlet. When
set to Always, this feature is enabled regardless of a power outlet connection.