
Manual

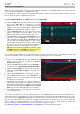

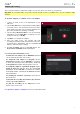

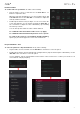

Table Of Contents
- Table of Contents
- Introduction
- Features
- Tutorial / Basic Concepts
- Operation
- General Features
- Modes
- Appendix

25
Sample Editing
You may need to edit your newly recorded samples using Sample Edit Mode.
To enter Sample Edit Mode, press Menu and then tap Sample Edit.
In Sample Edit Mode:
To switch between Trim Mode and Chop Mode, tap
the Trim/Chop tab at the bottom of the touchscreen. In
this example, use Trim Mode.
To set the sample’s start point, press Q-Link to select
the first bank of Q-Link knobs (the Start field will be
outlined gold). Use the Q-Link knobs to adjust the start
point with varying degrees of resolution. Alternatively,
tap and drag the S marker in the waveform.
To set the sample’s end point, press Q-Link to select
the second bank of Q-Link knobs (the End field will be
outlined gold). Use the Q-Link knobs to adjust the end
point with varying degrees of resolution. Alternatively,
tap and drag the E marker in the waveform.
To hear your edits, press Pad 10 to play the sample
from the start point to the end point.
Let’s apply some processing to the sample.
To open the Process Sample window, tap Process at the bottom of the touchscreen.
1. Use the data dial or –/+ buttons to select the desired
process in the Function field. Alternatively, tap
Function or double-tap the Function field, and then
tap the desired process. Let’s select Pitch Shift to
change the overall pitch of your sample. This will
transpose the sample without affecting its length.
2. To set the pitch shift amount, tap and drag the knob
in the center of the window up or down. Alternatively,
use the data dial or –/+ buttons. To make finer
adjustm
ents, double-tap the knob and adjust the
larger version that appears. Tap anywhere else to
return to the previous screen.
3. To confirm your selections, tap Do It.
To cancel the process, tap Cancel.
See Operation > Modes > Sample Edit Mode to learn more.