
Manual

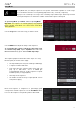
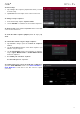
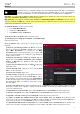
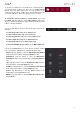
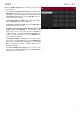
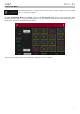
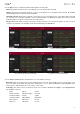
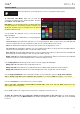
Table Of Contents
- Table of Contents
- Introduction
- Features
- Tutorial / Basic Concepts
- Operation
- General Features
- Modes
- Appendix

174
Browser
The Browser lets you navigate your MPC Live’s internal and external hard disks to load samples,
sequences, songs, etc. Using filter buttons and user-definable folders, you can easily adapt it to
your preferred workflow. You can also audition (preview) your samples before loading them.
Important: You can install an additional SATA drive in your MPC Live, allowing for even more storage space. See
Appendix > SATA Drive Installation to learn more about this.
Important: MPC Live supports read and write capability for exFAT, FAT32, NTFS, and EXT4 file systems a well as
read-only capability for HFS+ file systems. We recommend using an exFAT file system as it is the most robust one
supported by both Windows and Mac OS X.
To show the Browser, do any of the following:
• Press Shift+Menu/Browse.
• Double-press Menu/Browse.
• Press Menu and then tap Browser.
To browse for files, tap Browse in the lower-left corner.
To view the project’s sample pool and pads, tap Sample Assign
in the lower-left corner.
When the Browse tab is selected, you can do any of the
following:
To browse your files by location, tap Places on the left
side of the touchscreen. Internal is the MPC Live’s internal
drive. MPC Documents is a shortcut to the MPC
Documents folder on the internal drive. If you have USB
drives connected to MPC Live’s USB ports, they will appear
in this column, as well.
To browse your files by content, tap Content and then
tap the type of file: Drums, Instruments, Clips, Samples,
Demos, or My Files (see below to learn about these
content buttons).
To move up one folder level, tap the folder/ icon in the
upper-left corner.
To move through a list, swipe up or down, turn the data
dial or use the –/+ buttons.
To select a file or folder, tap it once.
To enter a folder, double-tap it or tap Open in the lower-
right corner. Alternatively, press the data dial to enter a
selected folder. You can also tap one of the folder buttons
(1–5) in the upper-right corner to jump immediately to those
pre-assigned file paths (see below to learn how to assign
these file paths).
To load a selected file, double-tap it, tap Load, or press the data dial. If the file is a sample, it will be loaded to
the project’s sample pool. If the file is a project, it will be loaded in its entirety (you will be asked if you want to
close your current project).
To load all files in a selected folder, press and hold Shift and then tap Load All in the lower-right corner.
To delete a selected file, press and hold Shift and then tap Delete File at the bottom of the touchscreen.
To preview a selected sound, tap and hold Play () at the bottom of the touchscreen.
To enable or disable the audition function and set its volume level, tap Audition at the bottom of the
touchscreen. In the screen that appears, tap Auto to enable or disable it, and tap and drag the level slider up or
down to set the volume level. Tap Audition once more to hide the window.
To show the information for the current drive, press and hold Shift and then tap Drive Info at the bottom of the
touchscreen. The drive’s information will appear in a new window. Tap OK to return to the previous screen.