
Manual


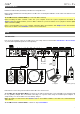
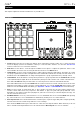

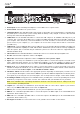
Table Of Contents
- Table of Contents
- Introduction
- Features
- Tutorial / Basic Concepts
- Operation
- General Features
- Modes
- Appendix

10
Rear Panel
1
2
3
4
5
6
7
8
9
10
11
12
13 13 13
14
15
16
17
1. Power Input: Use the included power adapter to connect MPC Live to a power outlet.
2. Power Switch: Turns MPC Live’s power on/off.
3. Charging Indicator: This light (behind the vent) will turn on when MPC Live’s internal battery is charging (when
the power input is connected to a power outlet). When the battery is fully charged or when it is disconnected
from a power outlet, then this light will turn off.
4. USB-B Port: Use the included USB cable to connect this USB 3.0 port to an available USB 3.0 port on your
computer. This connection allows MPC Live to send/receive MIDI and audio data to/from the MPC software on
your computer. It also allows any connected USB drives, SD cards, and drives connected to the internal SATA
port to mount on your computer (i.e., your computer can access these storage devices that are connected to
your MPC Live).
5. USB-A Ports: Connect USB flash drives to these USB ports to access their files directly using MPC Live. MPC Live
supports read and write capability for exFAT, FAT32, NTFS, and EXT4 file systems a well as read-only capability for
HFS+ file systems. (We recommend using an exFAT file system as it is the most robust one supported by both
Windows and Mac OS X.)
6. SD Card Slot: Insert a standard SD/SDHC card into this slot to access its files directly using MPC Live.
7. Rec Vol: Turn this knob to adjust the volume of the inputs.
8. Master Vol: Turn this knob to adjust the volume of Outputs 1/2 and the phones output.
9. Inputs (1/4” / 6.35 mm): Use standard 1/4” (6.35 mm) TRS cables to connect these inputs to an audio source
(mixer, synthesizer, drum machine, etc.). In Sample Record Mode, you can select whether you want to record
either channel or both channels in stereo or in mono. To use these inputs, set the Line/Phono switch to Line.
10. Inputs (RCA): Use a standard RCA stereo cable to connect these inputs to a phono-level audio source like a
turntable. In Sample Record Mode, you can select whether you want to record either channel or both channels in
stereo or in mono. To use these inputs, set the Line/Phono switch to Phono.
11. Line/Phono Switch: Set this switch to the appropriate position, depending on which inputs you want to use. If
you are using the RCA inputs, set this switch to Phono to provide the additional amplification needed for phono-
level signals. If you are using the 1/4” (6.35 mm) inputs, such as a keyboard or a sampler, set this switch to Line.
12. Groundi
ng Terminal: If using phono-level turntables with a grounding wire, connect the grounding wire to these
terminals. If you experience a low “hum” or “buzz”, this could mean that your turntables are not grounded.
Note: Some turntables have a grounding wire built into the RCA connection and, therefore, nothing needs to be
connected to the grounding terminal.
13. Outputs (1/4” / 6.35 mm): Use standard 1/4” (6.35 mm) TRS cables to connect these outputs to your monitors,
mixer, etc.). The Master L/R outputs are the same as Outputs 1/2.
14. Phones (1/8” / 3.5 mm): Connect standard 1/8” (3.5 mm) stereo headphones to this output.
15. MIDI In: Use a standard 5-pin MIDI cable to connect this input to the MIDI output of an external MIDI device
(synthesizer, drum machine, etc.).
16. MIDI Out: Use a standard 5-pin MIDI cable to connect this output to the MIDI input of an external MIDI device
(synthesizer, drum machine, etc.).
17. Kensington
®
Lock Slot: You can use this slot to secure your MPC Live to a table or other surface.