CT10 INSTRUCTION BOOK User Guide
CONTENTS Getting Started _01 Package Contents 02 Part Names 03 Power Management 04 Charging 05 Connections 06 Updating Firmware 10 Using the Device _02 Basic Operations 11 Home Screen 15 Notification Panel 17 Purchasing or Streaming Music from Store 19 DLNA Link 20 Listening to Music 23 Playlist Management 26 USB DAC Installation 29 How to Use USB Audio 30 Settings 31 Connecting to a Wireless Network 36 Using Bluetooth 37 Equalizer Setup 39 Miscellaneous _03 Safety Pre
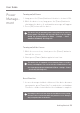
User Guide Package Contents Contents may be changed without prior notice to improve the performance or quality of the product. CT10 5-Pin Micro -USB Cable Quick Start Guide & Warranty Card 5-Pin Micro-USB Cable: Connects the product to a computer or utilize to charge the product. Quick Start Guide: Basic overview of using the product. Warranty Card: This card is required for customer service and technical support. Please keep this card.
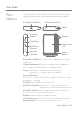
User Guide Part Names The appearance of the product, as well as the printed and engraved information, may vary depending on the model. 5-Pin Micro-USB Port 3.5mm Unbalanced Power Previous/ Rewind Play/Pause Next/FastForward microSD Card Slot Volume Touchscreen LCD Home Button 5-Pin Micro-USB Port: Connect to a computer or recharge the device. 3.5mm Unbalanced: Connects earphones or headphones with a 3.5mm unbalanced jack to output sound. Power: Short-press- Turns the screen on or off.
User Guide Power Management Turning on/off Power 1. Long-press the [Power] button of the device to turn it ON. 2. While the device is on, long-press the [Power] button to shut down the device. A confirmation message will appear. 3. Press [OK] to turn off the device. This device has an automatic power saving function to conserve battery power. The device will turn off if there is no user input during the period defined in [Menu - Settings - Power Automatic Shutdown]. (See Page 34.
User Guide Charging Charging via Computer 1. The device will charge automatically when connected to a computer via the 5-pin micro-USB cable. Depending on computer specifications, the device will charge only when the computer is turned on. When charging via computer connection, the charging time may vary depending on whether the device is turned on or off. Some computers in power-saving mode may not charge the device.
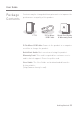
User Guide Connections Connecting to a 3.5mm Unbalance Port 1. Connect earphones or headphones to the 3.5mm unbalanced port. OR Connecting to a Computer 1. Turn on the device and your computer. 2. Connect the product to the computer with the 5-pin micro -USB cable to transfer media files. For an optimal connection, quit any unnecessary programs before connecting the device to the computer. Do not use any 5-pin micro-USB cable other than the one supplied with the device.
User Guide Disconnecting from the Computer 1. Disconnect the 5-pin micro-USB cable after the transfer between the product and computer is completed. Disconnecting the device from the computer during an operation (e.g., file transfer) may corrupt data on the device. Safely remove/eject the device from your computer, if applicable. Copy Files/Folders to the Device 1. To copy files/folders from your computer, select the desired files/folders and drag & drop them into the device folder.
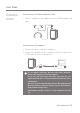
User Guide Delete Files (or Folders) from the Device via Computer 1. Right-click the desired file/folder and then select [Delete]. 2. Select [Yes] in the [Confirm File/Folder Deletion] window to delete the selected files/folders. Insert/Remove a microSD Card 1. Refer to the diagram and gently insert a microSD card into the microSD card slot. 2.
User Guide Recommended microSD cards SanDisk, Transcend Maximum Capacity: 400GB Notes on Inserting a microSD Card Do not force the microSD card into the slot.This may cause malfunction of the product and damage to the card. Do not repeatedly insert/remove the microSD card. If not inserted properly, the microSD card may cause product malfunctions and may get stuck in the product. Notes on Removing a microSD Card Be sure to safely remove the microSD card from the device.
User Guide Updating Firmware Wi-Fi Update / OTA (Over-the-Air) 1. Connect to a wireless network. 2. When a new firmware version is available, the screen will display a Firmware Update Guide window. 3. Select [Update] and choose the items for update. 4. Follow the on-screen directions to update the firmware. For Wi-Fi connections, see Page 36. The firmware update may not be successful if the battery level is too low. (A minimum battery level of 20% is required.
User Guide Basic Operations LCD Touchscreen 1. This device features a LCD touchscreen that allows you to perform operations by touch. Interact with the device by touching the screen to access various features. To prevent damage to the screen, do not use a sharp object or excessive force. Return to the Home Screen 1. Press [ ] to go to the Home Screen.
User Guide Menus 1. Swipe [Left to Right] on the Home Screen to display the menu list. Displaying the Notification Panel 1. Swipe [Up to Down] on the Home Screen to display the Notification Panel.
User Guide View Current Playlist 1. Swipe [Right to Left] on the Home Screen to display the current playlist. Moving Up/Down on the List 1. Swipe [Down to Up] / [Up to Down] on the List Screen to scroll through the list.
User Guide Displaying the Playback Control Panel 1. Swipe [Down to Up] on the Home Screen to display the playback control options and current song information. Lyrics: Lyrics for the current song. : Go to the list of menus to which the current song belongs. : Add the current song to the playlist. : Set the playback mode. : Sequential playback. : Shuffle playback. : Set repeat mode. : Repeat the entire playlist. : Repeat the current song. : Disable repeat mode.
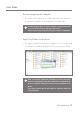
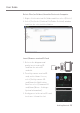
User Guide Home Screen 1 2 3 4 5 6 7 8 9 Using the Device 15
User Guide 1 Album Cover Displays album cover image. 2 Title Song title information. The file name is displayed when the title is unavailable. 3 Details 4 Progress Bar Displays current song information. Shows playback progress of current song. Drag the indicator to move to the desired track time. 5 Song Progress Indicates song duration. 6 Previous Song/ Short-press: Plays the previous Rewind song or restarts the song. Long-press: Rewinds the current song.
User Guide Notification Panel 1 2 3 4 5 6 7 8 9 10 Using the Device 17
User Guide 1 Wi-Fi Press [ 2 Bluetooth Press [ ] to turn Bluetooth on/off. 3 EQ Press [ ] to turn the EQ on/off. ] to turn Wi-Fi on/off. The most recent EQ settings are applied by default. 4 Wheel Press [ Lock on/off. The volume wheel is disabled ] to turn the screen lock when the screen is locked. 5 Gapless Press [ Playback Playback on/off. 6 Line-out Press [ ] to turn line-out on/off. 7 DLNA Link Press [ ] to turn DLNA Link on/off.
User Guide Purchasing or Streaming Music from Services Conveniently purchase music from the Services when connected to a wireless network. Purchasing or Streaming Music 1. Connect to a wireless network. 2. Select [Services] from the menu to display the Services options available. 3. Select the desired Services. 4. Check the user guide or help menu within each Services for detailed information. For Wi-Fi connections, see Page 36.
User Guide DLNA Link Hi-Res Streaming Server Installation 1. Visit the Activo website and download Hi-Res Streaming Server that corresponds to your operating system. [http://www.activostyle.com]. 2. Run the downloaded installer and follow the on-screen instructions. 3. Check the User Guide within the program for detailed information on using the Hi-Res Streaming Server. Please refer to the following Windows/Mac minimum system requirements.
User Guide 4. A list of libraries/speakers that are on the same network with CT10 will be displayed. 5. Select a library/speaker to connect. 6. After selecting a library/speaker, select a category from the menu to display the corresponding music list. For Wi-Fi connections, see Page 36.
User Guide Streaming and Downloading Music from Library 1. Select a category from the library menu to see your list of music. 2. Select a song to begin streaming. 3. Press the [ ] at the upper-right corner of the music list. 4. Select the desired music, and press [ ] on the top to download the music. A message on the Notification Panel will indicate when the download is complete. Depending on network conditions, song loading may be slow and streaming may stutter.
User Guide Listening to Music Selecting Music 1. Select a category from the menu to display the corresponding music list. 2. Select a song from the list to begin playback. Select [Folder] to search music by folder. Continuous Playing Time: Approximately 10 hours (Music: FLAC, 16-bit, 44.1 kHz, unbalanced output, volume 75, EQ off, LCD off) Supported Formats: PCM [8~384kHz], DSD [2.8/5.6/11.2MHz] Listening to Music Turn the [Volume Wheel] to adjust the volume.
User Guide Press [ ] at the top of the music list to display the Edit Mode.
User Guide Playlist Screen 3 1 4 2 1 Previous Return to the previous screen. 2 Playlist Displays the playlist for the current location. 3 Edit mode Display the editing options for the music list. 4 Play All Play all songs in the current list.
User Guide Playlist Management Creating a Playlist 1. Press [Playlists] on the menu to view the playlists. 2. Select [ + ] in the upper right corner of the screen. 3. Enter a name for the playlist, then press [Add] to create a new playlist. Adding a Song to a Playlist 1. Press [Playlists] to display a list of playlists. 2. Select a playlist and press [+ Add Song] to display a list of songs. 3. Select the desired song, then press [Add] to add the song to the selected playlist.
User Guide Removing a Song from a Playlist 1. Press [Playlists] on the menu to view playlists. 2. Select the desired playlist and press [ ] at the top of the screen. 3. Select the music to delete, and press [ ] on top to delete items from the playlist. Playing a Playlist 1. Select the desired playlist for playback. 2.
User Guide Renaming a Playlist 1. Press [Playlists] to display a list of playlists, then press [ ] at the top of the screen. 2. Select the playlist to be renamed. 3. Press [Rename] at the bottom of the screen to display a rename window. 4. Enter a name for the playlist, then press [Rename] to save the playlist under the new name. Deleting a Playlist 1. Press [Playlists] to display a list of playlists, then press [ ] at the top of the screen. 2. Select the playlist to be deleted. 3.
User Guide USB DAC Installation The USB DAC functionality allows the CT10 to be recognized as a sound card on a computer. Music from the computer is played through the device’s earphones port for an enhanced listening experience. USB DAC Specifications Supported OS Windows 7 (32/64-bit) / Windows 8 (32/64-bit) / Windows 10(32bit/64bit) OS X 10.7 (Lion) or later USB DAC Support Specifications Supported Formats: WAV, FLAC, WMA, MP3, OGG, APE (Normal, High, Fast), AAC, ALAC, AIFF, DFF, DSF Sample Rate: 44.
User Guide How to Use USB Audio You can enjoy USB audio by linking with a portable amp and DAC available in the market. How to Link Portable USB DAC 1. Connect the device’s micro USB jack with the portable USB DAC with dedicated cable. 2. Press [ 3. Once [ ] after scrolling down the notification bar. ] is activated, you can enjoy the music through the portable USB DAC’s audio output jack.
User Guide Settings Set up the device according to the user's needs. The settings menu may vary depending on the firmware version. Setup 1. Select [Menu - Settings]. 2. Select the desired item for setup. Wi-Fi Change wireless network settings and turn Wi-Fi ON/OFF. See page 36 of the manual for more information on Wi-Fi settings. Bluetooth Connect a Bluetooth device to listen to music wirelessly. See pages 37 - 38 for more information on Bluetooth settings.
User Guide Equalizer Set the equalizer according to the user's preferences. USER EQ: Adjust the frequencies left and right according to the user's preferences. Preset EQ: Select from Flat, Pop, Club, Rock, Classical or Jazz preset options. Supported Formats for EQ: PCM [8 - 192kHz (8/16/24bit)] When using the equalizer, the operation of the product may be slower than normal. See pages 39 - 41 for more information on setting the equalizer. Line-out Set the voltage value generated when Line-out is activated.
User Guide Right-left Balance Adjust the left-right balance for earphones/headphones. Playback Settings Selecting Music from the menu sets the location and way the song is loaded during playback. Device Name Set the name of the device. The maximum name length is 50 characters. Notification Panel You can add/delete Quick Settings buttons or change their order. Screen Brightness Adjust screen brightness settings. Date & Time Set the current date and time.
User Guide Language Select the display language. Supported languages: English, Korean, Japanese, Chinese (Simplified/Traditional), Russian, German, French Keyboard Select the keyboard language. Supported languages: English, Korean, Japanese, Chinese (Simplified/Traditional), Russian Supported languages may vary depending on your location. Power Auto Power Off: The device will be automatically powered off if there is no user input for a defined period.
User Guide System Information System Information: View model number, firmware version, MAC address and memory usage information. The microSD card can be mounted/dismounted, and data can be deleted. Legal information: Check open source licenses and regulations. Formatting the microSD card will delete all data on the memory card. Be sure to backup any important files before formatting. When formatting the microSD card from a computer, be sure to select the FAT32 system.
User Guide Connecting to Wi-Fi Connecting to a Network 1. Long-press [ ] from the Notification Panel or [Menu Settings - Wi-Fi] to turn on and display a list of Access Points (AP). 2. Select the desired AP to connect to the wireless network. Additional information such as key index and network key may be required depending on AP settings. Networks requiring browser or other additional certifications are not supported. Channels 1 through 13 are supported.
User Guide Using Bluetooth Connect a Bluetooth device to listen to music wirelessly. Turning Bluetooth on/off A Bluetooth device must be paired with the device prior to use. Refer to the Bluetooth device's instruction manual for details. 1. Select [ ] from the Notification Panel, or select [ON] from [Menu Settings - Bluetooth]. Bluetooth Pairing 1. Select the appropriate Bluetooth device from the list of available devices. Terminating a Bluetooth Connection 1.
User Guide Removing a Bluetooth Pairing 1. Press [ ] to the right of the paired device to go to the settings screen. 2. Select [Remove] to complete the process. Bluetooth Support Specifications Profile: A2DP, aptX HD, AVRCP Device performance may be affected during Hi-Fi playback. Do not turn off the device while connected to Bluetooth. Power cycle the Bluetooth device in case of malfunction. Pairing methods may differ for each individual Bluetooth device.
User Guide Equalizer Setup Equalizer Setup 1. Long-press [ ] from the Notification Panel or [Menu Settings - Equalizer] to turn on or change settings. 2. Select the current EQ and press [+]. 3. Enter a name for the custom EQ settings and select [Save].
User Guide 4. Move the sliders to adjust the frequencies according to your preferences. Resetting the Equalizer 1. Select the user EQ to initialize and press [ ] at the top of the screen to revert the EQ to its default settings.
User Guide Deleting Equalizer 1. Select the current EQ to display the EQ list. 2. Press [ ] next to the desired item to delete the selected equalizer. Renaming an Equalizer 1. Select the current EQ to display the EQ list. 2. Press [ ] next to the desired item and enter a new name for the selected equalizer. 3. Press [Rename] to apply the changes.
User Guide Safety Precautions Device When a plug is inserted into the earphone or USB port, do not apply any force or impact to the plug. Do not insert any metal objects (coins, hairpins, etc.) or flammable debris into the device. Do not place heavy objects on the device. In case the device gets wet (rain, water, chemicals, medicine, cosmetics, sweat, moisture, etc.), do not power on the device and allow it to dry thoroughly. Contact the Customer Support Center.
User Guide When connecting the 5-pin micro-USB cable, use a USB port on the back of the computer. Connecting to a poorly assembled or defective USB port may damage the product. Displaying one image for an extended period may cause screen burn-in (after image). Using poor quality protective films or adhesive stickers on the screen may cause damage. Do not insert any foreign objects into the earphone port. Playing and charging the device may generate heat, so handle carefully.
User Guide Troubleshooting Check for solutions to common problems. 1. The device won't turn on. The battery may need to be recharged. Charge the device for at least one hour and try again. Reset the device and try again. (See Page 4.) 2. The device will not charge when connected to a computer via 5-pin micro-USB cable. Connect to the computer using the 5-pin micro-USB cable. Connecting to the computer via a micro USB cable will not charge the product. Use the 5-pin micro-USB cable to connect the adapter.
User Guide 7. A file does not play or the product is unstable when a certain file is used. The following may occur due to the condition of the file: Playback is unstable or difficult. The product may not work normally. The file may sound different from a computer. There may be a difference in the performance of playback or other functions. There may be differences in the playable specifications. A file conversion or use of a different file is recommended.
User Guide Certifications FCCID: 2AOLDAPP11 This device complies with Part 15 of the FCC Rules, Operation is subject to the following two conditions: (1) this device may not cause harmful interference, and (2) this device must accept any interference received, including interference that may cause undesired operation. Registered Trademarks Windows 7, Windows 8, Windows 10 and Windows Media Player are trademarks of Microsoft Corp.
User Guide Specifications General Specifications Model CT10 Body Color Cool White Body Material Polycarbonate CPU Quad-Core Display 3.3inch WQVGA (480x854) / Touchscreen Supported Audio WAV, FLAC, WMA, MP3, OGG, APE, AAC, ALAC, AIFF, Formats DFF, DSF Sampling Rate FLAC, WAV, ALAC, AIFF: 8kHz - 192kHz (8/16/24-bits per sample) DSD: DSD64/128/256, Stereo (DSD to PCM) Output Level 1.