4-247-459-21 030108AMI-H-B Micro Hi-Fi Component System XR-FA500
PRECAUTIONS WARNING To prevent fire or shock hazard, do not expose the unit to rain or moisture. To avoid electrical shock, do not open the cabinet. Refer servicing to qualified personnel only. On operating voltage Before operating the system, check that the operating voltage of your system is identical with the voltage of your local power supply. Do not install the appliance in a confined space, such as a bookcase or built-in cabinet.
TABLE OF CONTENTS On heat buildup •Although the unit heats up during operation, this is not malfunction. •Place the unit in a location with adequate ventilation to prevent heat build-up in the unit. If you continuously use this unit at a large volume, the cabinet temperature of the top, side and bottom rises considerable. To avoid burning yourself, do no touch the cabinet.
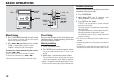
PREPARATIONS Connection Plug in the AC power cord to the AC power socket after all other connections are made. 3 Connect the supplied antennas. Connect the FM antenna to the FM 75 Ω terminal and the AM antenna to the AM LOOP terminal. 1 Connect the speaker cords to the speakers. Remote commander Detach the battery compartment lid at the rear of the remote commander and insert two R6 (size AA) batteries with correct polarity.
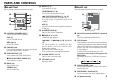
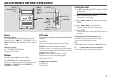
PARTS AND CONTROLS Main unit: front Refer to the pages indicated in parentheses for details. 1 2 3 4 TUNER/BAND (7, 10) Selects tuner function and the tuner band. 5 6 7 8 9 1 POWER 6STANDBY/ON (7) Switches the unit on and off (standby). ECO (7) Sets the ECO mode on or off. RDS (10-12) Activates RDS features. 2 PHONES jack Plug in optional headphones set with a stereo mini plug (ø3.5 mm). Speaker output is cancelled. 3 SYNCHRO REC (15) Starts recording and CD play simultaneously.
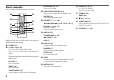
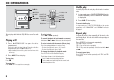
Remote commander Refer to the pages indicated in parentheses for details. 1 8 3 SHUFFLE/PROGRAM (8, 9) Selects shuffle or programmed CD playback mode. REPEAT (8) Selects repeat CD playback mode. 2 9 3 4 5 6 7 REV MODE (14, 15) Selects a reverse mode. 0 ! @ # 4 PRESETN,M (10) f/r,t/g (8, 10, 12-14, 16, 17) ENTER (7, 10, 16, 17) Determines the mode. Stores the received station to preset.
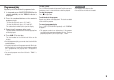
ADJUSTMENTS BEFORE OPERATION POWER 6STANDBY/ON ECO Setting the clock ECD, POWER TUNER/ BAND, dTAPE, CLOCK AUX 1 In stop mode, hold down SHIFT and press CLOCK on the remote. Go to step 3 when the hour of the clock display flashes. ENTER f,g ECD, TUNER/ BAND, dTAPE, AUX f,g SHIFT DIMMER Power ECO mode Turning the unit on Press POWER 6STANDBY/ON (POWER on the remote ). Alternatively, press d TAPE, TUNER/BAND, AUX or ECD. Playback will start automatically if a disc or tape is loaded.
CD OPERATIONS Shuffle play ECD zOPEN/ CLOSE SHUFFLE/ PROGRAM s f,g REPEAT ECD 1–10/0, >10 CLEAR ENTER f,g s DISPLAY This unit plays back finalized CD-R/RW discs as well as audio CDs. To select a track Press f or g repeatedly . Playing a CD To search (playback in fast forward or reverse) Hold down f or g. Release at the desired point. 1 Press z OPEN/CLOSE to open the disc compartment. To select a track with the remote (Direct play) Press the numbered buttons to select a track.
Programmed play Plays back up to 30 selected tracks in programmed order. To clear a track Press CLEAR on the remote in stop mode. Each time you press the button, a track is cleared from the end of the program. 1 In stop mode, press SHUFFLE/PROGRAM on the remote repeatedly so that "PRGM" indicator is displayed. To clear the program Press s in stop mode. 2 Press the numbered buttons on the remote to program a track. To add tracks to the program Repeat step 2 before starting playback.
RADIO OPERATIONS Automatic presetting RDS TUNER/ BAND Scans the receivable frequency range and stores tuned stations automatically with the preset number. TUNER MODE f,g TUNER/ BAND 1–10/0, >10 CLEAR PRESET N,M, f,g, ENTER SHIFT Manual tuning Preset tuning 1 Press TUNER/BAND repeatedly to select a band. Preset your favourite stations by either of the following ways ("Manual presetting" or "Automatic presetting") and tune them in directly by using preset numbers.
Tuning in preset stations RDS features Program Type (PTY) 1 Select the band. RDS (Radio Data System) is a broadcasting service which allows FM stations to send additional information along with the regular radio signal. The additional information is derived from the features of RDS described below. This is an identification to specify the program being broadcast currently. 2 Press PRESET N ,M on the remote repeatedly.
PTY Search INFO Search The unit can search for a station broadcasting your desired PTY easily. To do so, you need to preset every available station in advance since the unit searches only the preset stations. The unit can leap to a station which has just started broadcasting your desired PTY. In INFO Search, the unit is in standby mode until the desired PTY begins. As soon as it begins, the unit "leaps to" another station with the PTY and returns to the previously tuned station when it ends.
SOUND ADJUSTMENTS Adjustments To switch to monaural FM reception Hold down SHIFT and press TUNER MODE on the remote so that "MONO" is displayed. To cancel, repeat the above so that "STEREO" is displayed. Tip: When FM stereo reception is poor, switching to monaural reduces noise. MUTING f,g BASS, TREBLE VOLUME f,g TREBLE, BASS VOLUME +,- Volume Bass and treble Turn VOLUME (press VOLUME +,- on the remote). Adjust from 0 (minimum) to 30 and MAX (maximum). Turn BASS or TREBLE.
TAPE PLAYBACK Notes on cassettes dTAPE (REC MUTING) SYNCHRO REC REC START/ REC PAUSE REV MODE AUX s f,g zPUSH EJECT Playback Use only type I (normal) tapes. 1 Press zPUSH EJECT to open the cassette holder. 2 Insert the tape. Insert with the exposed side down, and press zPUSH EJECT to close the cassette holder. dTAPE SHIFT f,g s FUNCTION To select a reverse mode Hold down SHIFT and press REV MODE on the remote repeatedly.
TAPE RECORDING To record a CD Use only type I (normal) tapes. To record radio programs and external equipment 1 Press zPUSH EJECT to open the cassette holder. Use only type I (normal) tapes. 2 Insert the recordable tape. 1 Press zPUSH EJECT to open the cassette holder. Insert with the exposed side down, and the side to be recorded on first facing out from the unit. Press zPUSH EJECT to close the cassette holder. 3 Hold down SHIFT and press REV MODE on the remote repeatedly to select the reverse mode.
TIMER OPERATIONS 7 Press f or g to select the source (CD, TAPE and TUNER), and press ENTER. POWER POWER 6STANDBY/ON 8 Prepare the source. TIMER CLEAR ENTER f,g f,g SHIFT SLEEP Sleep timer Timer playback Turns off the unit automatically after a specified time. Turns on the unit at a specified time for the specified duration. Make sure the clock is set correctly. Press SLEEP on the remote. "SLEEP" flashes in the display.
Timer recording Timer recording is available only for TUNER sources. 1 Hold down SHIFT and press TIMER on the remote repeatedly so that "5" and "REC" are displayed. 2 Within 6 seconds, press ENTER. "ON TIME" is displayed. 3 Press f or g to set the timer start hour, and press ENTER. 4 Press f or g to set the minute, and press ENTER. "OFF TIME" is displayed. 5 Set the time to stop recording by following the same procedures as steps 3 and 4.
REFERENCE Care and maintenance Troubleshooting Occasional care and maintenance of the unit and the software are needed to optimize the performance of your unit. If your unit fails to perform properly, check the following guide and the relevant sections of the Operating Instructions. First check that the AC power cord and the speakers are connected correctly and firmly. Should any problem persist, consult your nearest Aiwa dealer. To clean the cabinet Use a soft and dry cloth.
CD player Speakers The sound drops out. •The lens is dirty. Clean it with a commercially available blower. Sound comes from one channel or unbalanced left and right volume occurs. •Check the speaker connection and speaker placement. The CD does not play. •The CD is not lying flat in the disc compartment. •The CD is dirty. •The CD is inserted label side down. •Moisture condensation has built up. Remove the CD and leave the system turned on for about an hour until the moisture evaporates.
SPEAKER SYSTEM SX-LFA500 Specifications Speakers system MAIN UNIT CX-LFA500 Speaker units TUNER FM tuning range FM usable sensitivity (IHF) FM antenna terminal AM tuning range AM usable sensitivity AM antenna 87.5 MHz to 108 MHz 16.8 dBf 75 Ω (unbalanced) 531 kHz to 1602 kHz 350 µV/m Loop antenna AMPLIFIER Power output Input Outputs Rated: 16 W + 16 W(6 ohms, T.H.D. 1 %, 1 kHz/DIN 45500) Reference: 20 W + 20 W(6 ohms, T.H.D.
Sony Corporation Printed in China http://www.aiwa.