INSTRUCTION MANUAL AIR 75 AIR 76 www.aivituvin.
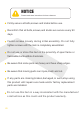
NOTICE Please retain these instructions for future reference. Firmly secure all bolts,screws and knobs before use. Reconfirm that all bolts,screws,and knobs are secure every 90 days. Fasten screws loosely during initial assembly. Do not fully tighten screws until the item is completely assembled. Do not use or store this item in the proximity of open flame or flammable/combustible chemicals. Be aware that some parts are heavy and have sharp edges. Be aware that moving parts can injure,crush and cut.
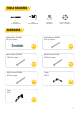
TOOLS REQUIRED PHILLIPS SCREWDRIVER DRILL (RECOMMENDED) 2PERSON ASSEMBLY APPROXIMATELY 30MIN. ASSEMBLY HARDWARE M3.5x45mm SCREW M6.0x30mm SCREW 8PCS+1spare 6PCS+1spare P1 P2 M3.0x18mm SCREW M3.0x14mm SCREW 10PCS+1spare 10PCS+1spare P3 P4 M3.
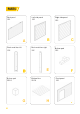
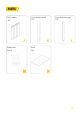
PARTS Back panel 1PC Left side panel Right side panel 1PC 1PC B A C Back metal bar-left Back metal bar-right Bottom pad 1PC 1PC 1PC E D Bottom pad 2PCS Bottom floor 2PCS G 03 F Front panel 1PC H I
PARTS Front metal bar-right Front metal bar-left 1PC PVC curtain 1PC J 1PC K L Roof 1PC Plastic feet 4PCS M N 04
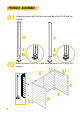
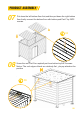
PRODUCT ASSEMBLY 01 02 Attach the plastic feet Part M to the metal bars Part D & E with the buckle. D E M M Attach the panel Part A, B, C with the metal bars Part D & E by 4xP1 screws.
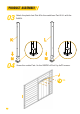
PRODUCT ASSEMBLY 03 Attach the plastic feet Part M to the metal bars Part K & L with the buckle. K L M M 04 Screw the curtain Part J to the INSIDE of Part I by 4xP3 screws.
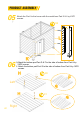
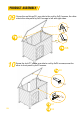
PRODUCT ASSEMBLY 05 Attach the Part I to the house with the metal bars Part K & L by 4XP1 screws. P1 X4 L K 06 ①Attach the bottom pad Part G & F to the side of bottom floor Part H by 3XP2 screws.
PRODUCT ASSEMBLY 07 Put down the left bottom floor first,and then put down the right bottom floor,finally connect the bottom floor with bottom pad Part F by 2XP2 screws. P2 X2 08 Screw the roof Part N on asphalt part from bottom by 6xP3 screws.
PRODUCT ASSEMBLY 09 Screw the roof hinge P6, one side to the roof by 2xP4 screws, the other side to the side panel by 2xP4 screws in left and right sides. P6 X2 P4 X8 10 09 Screw the lock P7, screw one side to roof by 2xP4 screws,screw the other to front panel by 4xP5 screws.
PRODUCT ASSEMBLY 11 Finish Complete.
WARNING Manufacturer and seller expressly disclaim any and all liability for personal injury,property damage or loss,whether direct,indirect,or incidental,resulting from the incorrect attachment,improper use,inadequate miantenance,or neglect of this product.