KDC400 User Manual November, 2011
COPYRIGHT, LICENSE, and WARNING PAGE Copyright 2011 by KoamTac, Inc. All rights reserved. No part of this publication may be reproduced or used in any form, or by any electrical or mechanical means, without permission in writing from KoamTac, Inc. The material in this manual is subject to change without notices. KoamTac reserves the right to make changes to any product to improve reliability, function, or design.
1. INTRODUCTION Congratulations on purchasing KoamTac’s revolutionary barcode scanner and data collector. Lightweight and compact, with a user-friendly design and superior functionality, KoamTac’s KDC works in a variety of portable applications. Use it independently or as an accessory to your PC, PDA, or smartphone. To find out more about KoamTac, Inc. and our family of products, visit us at www.koamtac.com.
1.1 KDC Package The standard KDC package contains: 1. One KDC Barcode Data Collector 2. One USB Cable 3. One Lanyard (KDC100/200/250/300) or One Hand Strap (KDC400) 4. KoamTac Installation CD with KTSync© for Microsoft Windows XP, Vista, 7 and Mobile 5.0+ KDC Device Driver User Manual 5. One Protective KDC Rubber Case (KDC100/200/250/300) or One Smartphone Protective Rubber Case (KDC400) NOTE: Depending on your region or distributor, package contents may vary.
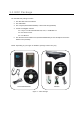
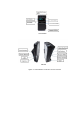
1.2 KDC Characteristics Before you use your KDC, please become familiar with its physical characteristics. Refer to Figure 2 and Figure 3 below which indicate placement of scan and scroll buttons, OLED display, LEDs, and ports on your KDC. All KDC models are similar except for the KDC100 which includes an additional USB connector.
KDC250/300 KDC400 Figure 3 - Characteristics of KDC200 / KDC250 / KDC300
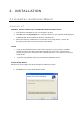
2. INSTALLATION 2.1 KoamTac Installation Wizard Windows XP WARNING: DO NOT CONNECT KDC TO USB PORT PRIOR TO INSTALLATION 1. Insert KoamTac Installation CD into your computer’s CD drive. 2. Click Start icon then My Computer icon. A listing of devices on your computer will be displayed including the disk drive containing the KoamTac Installation CD. 3. Click on the KoamTac Installation CD icon then click on the Setup directory. Click on the PC_Setup.exe file which executes the KTSync Setup Wizard.
Click Next icon in KTSync Confirm Installation window Within a few minutes, installation of KTSync will be complete. Click Close icon and wait for the Device Driver Installation Wizard to load.
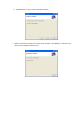
Device Driver Installation Wizard Below are the screen images you will see during the installation of the KDC Device Driver.
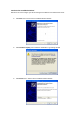
Connect KDC to Computer Using the USB cable included with the KDC, follow the directions below. Connect the cable’s ultra mini USB connector to the KDC. Connect the cable’s Type A USB connector to your PC. Wait until your computer beeps and/or displays the message Found New Hardware. Found New Hardware Wizard Select “No, not this time” option in Found New Hardware Wizard and click Next if your PC pops up the following Found New Hardware Wizard.
Click Continue Anyway icon in Software Installation Logo testing window Click Finish icon in Found New Hardware Wizard window Verify COM Port Address User can verify installed COM Port in Device Manager
Vista and Windows 7 WARNING: DO NOT CONNECT KDC TO USB PORT PRIOR TO INSTALLATION 1. Insert KoamTac Installation CD into your computer’s CD drive. 2. Click Start icon then My Computer icon. A listing of devices on your computer will be displayed including the disk drive containing the KoamTac Installation CD. 3. Click on the KoamTac Installation CD icon then click on the Setup directory. Click on the PC_Setup.exe file which executes the KTSync Setup Wizard.
Click Next icon in KTSync Confirm Installation window Click Close icon in KTSync Installation Complete window and wait for Device Driver Installation Wizard Click Install this driver software anyway in Windows Security window
Click Finish icon in Device Driver Installation Wizard window Connect KDC to Computer Using the USB cable included with the KDC, follow the directions below. Connect ultra mini USB connector to the KDC. Connect Type A USB connector to your PC. Wait until your computer beeps and/or displays the message Found New Hardware.
Windows Mobile 5.0+ WARNING: PLEASE CONNECT PDA TO PC PRIOR TO INSTALLATION 1. PC_Setup.exe creates Mobile_Setup.exe file under C:\Program Files\KoamTac\KTSync\Windows.Mobile directory 2. Execute Mobile_Setup.exe Select Windows Mobile version to install. Click Next icon.
Click OK icon in Pending Application Install window Follow the instructions on PDA screen COM port Assignment User should assign a COM port for KDC before using pKTSync.
Android Download and install aKTSync from the Android Market. http://www.androidzoom.com/android_applications/productivity/ktsync_luxv.html Blackberry Download and install bKTSync from the Blackberry App World. http://appworld.blackberry.com/webstore/content/16861?lang=en iPad/iPhone/iPod touch Download and install iKTSync from the Apple App Store. http://itunes.apple.
2.2 Manual Installation NOTE: If you have the KDC100, it has two ports, Ultra Mini and standard Type A which swings out. See Figure 2 for more details. Windows XP, Vista, and 7 1. Insert the KoamTac Installation CD into your computer’s disk drive. 2. Create a directory called KoamTac on your computer. 3. Copy XP.Vista.7 directory from KoamTac CD to KoamTac directory. The XP.Vista.7 directory contains KTSync® programs for Microsoft® Windows XP, Vista, Windows 7 and user manuals. 4.
3. OPERATING THE KDC 3.1 Getting Started Attach Hand Strap to KDC To prevent possible damage to the KDC, we strongly recommend wearing it around your hand by the included hand strap. Also, please don’t swing KDC by the hand strap because contact with another object may cause it to malfunction or become damaged. To attach the hand strap: 1. Fit the thin end of hand strap through the pillar of the KDC. 2. Loop the thick end of strap through the thin loop 3.
Configure KDC The KDC is designed to meet the data collection requirements of many different industries in a variety of dynamic situations. To perform well in these diverse environments, the KDC is designed to be configured easily and quickly. But, to perform at its maximum level, the KDC must be configured properly. Until you are familiar with configuring the KDC, it is recommended that you DO NOT modify the KDC settings.
3.2 Basics Reading Barcodes Reading a barcode is simple. Point the KDC at a barcode and press the scan button. Be sure to point the scan engine at the barcode, not at your face, and make sure to position the light beam on the barcode. If the barcode is scanned successfully, you will hear one beep and the LEDs will illuminate in green. If the scan was unsuccessful, you will hear two beeps and the LEDs will illuminate in red.
3.
2D Symbology AztecCode N/A N/A Enabled Enabled N/A AztecRunes N/A N/A Enabled Enabled N/A CodablockF N/A N/A Enabled Enabled N/A Code16K N/A N/A Enabled Enabled N/A Code49 N/A N/A Enabled Enabled N/A DataMatrix N/A N/A Enabled Enabled N/A MaxiCode N/A N/A Enabled Enabled N/A MicroPDF N/A N/A Enabled Enabled N/A PDF417 N/A N/A Enabled Enabled N/A QRCode N/A N/A Enabled Enabled N/A HanXin Code N/A N/A Enabled Enabled N/A Postnet N/A N/A Ena
Check Digit(DoNotVerify/VerfyDONotTX/Verify DoTx) N/A N/A DoNotVerify DoNotVerify N/A Append(Enable/Disable) N/A N/A Disabled Disabled N/A Full ASCII(Enable/Disable) N/A N/A Disabled Disabled N/A I2of5 Check Digit(DoNotVerify/VerfyDONotTX/Verify DoTx) N/A N/A DoNotVerify DoNotVerify N/A Code11 Check Digit(2 digits/1 digit) N/A N/A 2 digits 2 digits N/A Code128 Concatenate(Disable/Enable) N/A N/A Disabled Disabled N/A Telepen Output(Original/AIM) N/A N/A AIM AIM N
Scan Options PlanetCode Tx CheckChar(Enabled/Disabled) N/A N/A Disabled Disabled N/A Scan Angle Narrow/Wide Wide Wide N/A N/A N/A Filter Normal/High Normal Normal N/A N/A N/A Time Out .5 seconds to 10 seconds 2 second(s) 2 second(s) 2 second(s) 2 second(s) N/A Min.
HID iOS iPhone Default(410i) Default(415i) Default(420i) Default(425i) Default(430i) SPP2.
Menu Barcode Enabled/Disabled N/A N/A Disabled Disabled N/A Scrolling Enabled/Disabled N/A N/A N/A N/A N/A Brightness 1 to 15 level(8 level) N/A N/A N/A N/A N/A Factory Default Restores Default Settings Default Default Default Default N/A Track Separator N/A CR+LF N/A CR+LF CR+LF Use Track1 N/A Yes N/A Yes Yes Use Track2 N/A Yes N/A Yes Yes Use Track3 N/A Yes N/A Yes Yes MSR Data Only Data Format Packet Data MSR Config Beep on error reading Enabled/Disab