
User's Manual


AirSynergy 2000 Installation Guide
Page 46 Commercial in Confidence UGD-D01001 Rev A
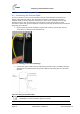
Figure 36 - waterproof connector separated
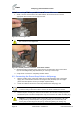
4. Thread the prepared cable end through the gland, washer, sealing ring and body of the
connector.
Figure 37 - gland and connector on cable
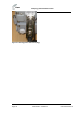
5. Secure the prepared ends of the power cable into the head part of the connector (male
part with visible pins).
Figure 38 - secure cable to connector
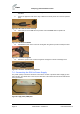
6. Insert and secure the black wire into position 1and the blue wire into position 2.
Figure 39 – power cable wires assembled
Note: Individual connection numbers are marked on each part of the connector.
Figure 40 - numbered connector contacts
7. Assemble the parts of the connector and tighten the gland to provide a waterproof seal.
Figure 41 - assemble and tighten