
User's Manual


AirSynergy 2000 Installation Guide
Page 44 Commercial in Confidence UGD-D01001 Rev A
7 Power System Connection
Hazardous voltage! Before working, ensure that the power is removed from the
power connection cables. When the system is powered on, do not touch the
power terminals.
7.1 Required Tools
The tools required for the connection of the PSU are:
knife
small flat blade screw driver (electrical insulated shaft recommended)
medium Philips head screwdriver
pliers
small side cutters
tweezers (or fine blade long nose pliers)
Figure 32 - required tools
7.2 Cable Connections
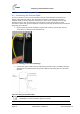
7.2.1 Power Drop Cable Installation
When the power drop cable is to be passed through glands and/or down the center of a lamp post
or other structure, the power drop cable can be cut leaving sufficient length for ease of termination.
With the power supply placed at the selected installation location, trim the cable to the length for
proper installation while allowing sufficient length to strip and prepare the cable ends.
Note: Standard cable supplied is 30m in length, other length options are
available.
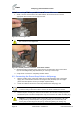
Advice: It is good practice to label both ends of the cable to identify which
AirSynergy unit it is connected to. This is especially important where numerous
AirSynergy units are installed on the same pole/tower.
Advice: It is good practice to leave a spare loop of cable (approximately 0.5m).
This will allow for easier wiring to the power supply and will allow the cable to be
re-terminated if necessary in the future.
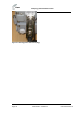
7.2.2 Network Cable Installation
For installations that require a network connection a separate cable must be run to the network
Ethernet switch. The standard length of pre-made cable is 30m. For other lengths up to a
maximum of 100m cables can be made up on site.