
User's Manual
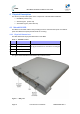

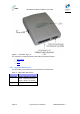
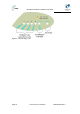

Table Of Contents
- 1.1 Purpose
- 1.4 Referenced Documentation
- 2.1 MicroMAX Frequency Ranges
- 2.2 System Components
- 2.3 Customer Benefits
- 2.4 Architecture
- 2.5 Power
- 2.6 Models
- 3.1 Package Contents
- 3.2 Required Tools
- 3.3 Radio Site Planning
- 4.1 MicroMAX BSR
- 4.2 SDA-4S Type II
- 4.3 SDA-4SDC Type II
- 5.1 Physical Dimensions
- 5.2 Ports
- 6.1 Physical Dimensions
- 6.2 Ports
- 6.3 LEDs
- 6.4 Mounting the GPSD
- 6.5 GPSD Architecture
- 7.1 Physical Dimensions
- 7.2 Ports
- 7.3 Crimping GPS Cable
- 7.4 Contact Socket Crimping
- 8.2 Redundant PS Unit
- 9.1 Pole-Mounting the BSR
- 9.2 Wall-Mounting the BSR (Optional)
- 9.3 Installing the SDA-4S
- 10.1 Desktop mounting
- 10.2 Rack mounting
- 12.1 Rack Mounting
- 12.2 Connecting Redundant PS Unit
- 13.1 Connecting the BSR to the SDA-4S
- 13.2 SDA-4S Type II
- 13.3 Connecting the BSR to BSDU
- 13.4 Connecting BSDU to Network
- 13.5 Connecting BSDUs
- 13.6 Connecting BSDU for SNMP Management
- 14.1 Connecting the SDA-4S Type II
- 14.2 Connecting the SDA-4SDC Type II
- 14.3 Connecting SDA-4S to Ethernet Network
- 15.1 Housing the Connectors
- 15.2 Connecting to the SDA-4SDC
- 16.1 Connections
- 16.2 Power Cable Assembly
- 16.3 Housing the Connectors
- 16.4 Cable Connection
- 17.1 Lightning Protection
- 17.2 Cable Preparation (for grounding)
- 17.3 FM Interference & ESD Protection Recommendations
- 17.4 Connecting Lightning and Surge Protector
- 17.5 Lightning and Surge Protection Connection Scenarios
- 18.1 Connecting GPS Antenna to BSDU
- 19.1 Environmental
- 19.2 Glossary of Terms
- 19.3 Revision History
- 19.4 Contact Information

MicroMAX Hardware Installation User Guide
Page 22 Commercial in Confidence UWB-D00068 Rev J
Note: The standard MicroMAX kit does not include wall-mounting
accessories. For pricing and ordering of wall-mounting accessories, please
contact your nearest Airspan dealer.
3.2 Required Tools
The following tools are required to install the MicroMAX unit:
¾ Torque wrench for N-type connectors (only relevant when implementing external
antenna)
¾ Cable stripping tool
¾ 10-mm, 13-mm, and 17-mm A/F open ended spanners
3.3 Radio Site Planning
Proper site selection and planning before installing your MicroMAX will ensure a successful
deployment of your AIRSPAN WIMAX system. A summary of the main site planning
considerations is provided below:
¾ Minimum obstructions (e.g. buildings) in the radio path between base station and the
subscriber terminals.
¾ Mount radio as high as possible to avoid obstructions in the wireless path.
¾ Check possibility of future obstructions such as plans to erect buildings and trees that
may grow tall enough to obstruct the wireless path.
¾ Align radio for maximizing received signal strength (RSS).
¾ Consider nearby sources of interference that could degrade performance of radio.
¾ Mount radio as far from sources of interference as possible.
¾ Ensure base station and subscriber terminals (i.e ProST/EasyST) are within maximum
coverage range of reception.
¾ Maximum standard CAT-5e cable length connecting the MicroMAX to the indoor SDA-4S
or BSDU is 100 meters.
¾ Ensure that you have sufficient wiring conduit and cable ties to channel and protect the
CAT-5e cable connecting the outdoor MicroMAX to the indoor SDA-4S.
3.3.1 Radio Antenna Alignment
ProST
Once the subscriber unit (i.e. ProST) is installed and aimed in the general direction of the BSR, it
is recommended to measure the received signal strength (RSS) to determine the signal strength
received from the BSR, and to precisely align the ProST for maximum signal strength.
You need to orientate (up/down, left/right) the ProST until the maximum RSSI levels are achieved,
and then secure the ProST.
EasyST
Once the subscriber unit (i.e. EasyST) is installed and aimed in the general direction of the BSR,
simply move the EasyST to the position that gives optimal reception.