
User's Manual


AirHarmony-4000 (External Cavity Filters) Installation Guide
UGD-D01019 Airspan Commercial and Internal Use 27
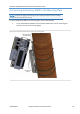
11. Slide the second filter to align it with its RF connector and fit together, then tighten the
connector.
Caution: Take care not to over tighten the RF connector. The connector nut should be
tightened to a nominal torque of no more than 2.0 Nm (1.47 lb-ft). Using either 23mm or
29/32” open end torque wrench.
Figure 15: Align and fit second filter to connector
12. Tighten the four (4) screws which fasten the second filter to the filter bridge, see Figure
14.
13. Tighten the four (4) screws which fasten the filter bridge to the Sun-Shield, see Figure 16.
14. Airspan recommends weather-proofing the RF connections.
Note: Weather-proofing of all the connections is recommended. This is done with a layer
of self-amalgamating tape followed by an over layer of PVC tape. The weather-proofing
is best done at this stage to give easier access to the connections.
Figure 16: Tighten filter bridge screws on Sun-Shield