
User's Manual
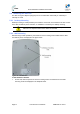
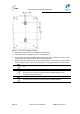


Table Of Contents
- 1.1 0BPurpose
- 1.4 1BReferenced Documentation
- 2.1 2BProST Frequency Ranges
- 2.2 3BProST-2 Frequency Ranges
- 2.3 4BArchitecture
- 2.4 5BModels
- 3.1 6BPackage Contents
- 3.2 7BMinimum PC Requirements
- 3.3 8BRequired Tools
- 3.4 9BRadio Site Planning
- 4.1 10BProST Physical Description
- 4.2 11BSDA-1 Physical Description
- 4.3 12BSDA-4S Type II and SDA-4S/VL Type II (Optional)
- 4.4 13BSDA-4SDC Type II (Optional DC power supply)
- 5.1 14BWall Mounting
- 5.2 15BPole-Mounting
- 5.3 16BMounting the SDA-4S
- 6.1 17BConnecting to IDU
- 6.2 18BConnecting to LAN Network
- 7.1 19BDC Power Source
- 7.2 20BConnecting the SDA-4SDC Type II (Optional DC adapter)
- 7.3 21BAC Power Source
- 8.1 22BHousing the Connectors
- 8.2 23BConnecting to the SDA-4SDC
- 9.1 24BPolyPhaser Wiring Diagram
- 9.2 25BLightning and Surge Protection Connection Scenarios
- 10.1 26BLED Status
- 12.1 27BTroubleshooting
- 12.2 28BGlossary of Terms
- 12.3 29BRevision History
- 12.4 30BContact Information

ProST Hardware Installation User Guide
Page 41 Commercial in Confidence UWB-D00111 Rev K
5.3 Mounting the SDA-4S
The SDA-4S Type II adapters (all types) can be mounted either horizontally on a desktop or
vertically on a wall.
5.3.1 Desktop Mounting
Desktop mounting is made possible by the existence of four feet, each located on the four corners
of the SDA-4S bottom panel. Therefore, no installation is necessary for desktop mounting.
Caution: To prevent a fire hazard caused by overheating, do not place the
SDA-4S on a carpeted surface where airflow is restricted.
5.3.2 Wall Mounting
Wall mounting is made possible by the existence of two mounting hooks molded into the SDA-
4S's bottom panel, as displayed in the figure below.
Figure 30 - Wall mount
To wall mount the SDA-4S:
1. On the wall, mark the position of the two mounting hooks. The dimensions of the wall-
mounting hooks are displayed in the template below.