
User's Manual


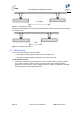


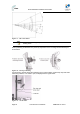
Table Of Contents
- 1.1 0BPurpose
- 1.4 1BReferenced Documentation
- 2.1 2BProST Frequency Ranges
- 2.2 3BProST-2 Frequency Ranges
- 2.3 4BArchitecture
- 2.4 5BModels
- 3.1 6BPackage Contents
- 3.2 7BMinimum PC Requirements
- 3.3 8BRequired Tools
- 3.4 9BRadio Site Planning
- 4.1 10BProST Physical Description
- 4.2 11BSDA-1 Physical Description
- 4.3 12BSDA-4S Type II and SDA-4S/VL Type II (Optional)
- 4.4 13BSDA-4SDC Type II (Optional DC power supply)
- 5.1 14BWall Mounting
- 5.2 15BPole-Mounting
- 5.3 16BMounting the SDA-4S
- 6.1 17BConnecting to IDU
- 6.2 18BConnecting to LAN Network
- 7.1 19BDC Power Source
- 7.2 20BConnecting the SDA-4SDC Type II (Optional DC adapter)
- 7.3 21BAC Power Source
- 8.1 22BHousing the Connectors
- 8.2 23BConnecting to the SDA-4SDC
- 9.1 24BPolyPhaser Wiring Diagram
- 9.2 25BLightning and Surge Protection Connection Scenarios
- 10.1 26BLED Status
- 12.1 27BTroubleshooting
- 12.2 28BGlossary of Terms
- 12.3 29BRevision History
- 12.4 30BContact Information

ProST Hardware Installation User Guide
Page 39 Commercial in Confidence UWB-D00111 Rev K
Figure 25 - Pole mount clamping bracket
3. Attach the U-bolt to the pole:
a. Place one U-bolt around the pole, and then insert the U-bolt screw side through the two
corresponding holes (horizontally parallel) on the clamping bracket. Slide an M8-flat
washer and M8-spring lock washer onto each U-bolt screw side (ensure that the flat
washer is adjacent to the clamping bracket). Fasten each U-bolt side with the two M8-
hex nuts.
b. Attach the second U-bolt as described above.
Figure 26 - Pole mount U-bolts
4. Perform final MicroMAX orientation:
a. Adjust the vertical position of the ProST by choosing a final elevation hole as described
in Step 2. Lock the ProST at the desired position by inserting the locking bolt in the
desired position and fastening it tightly. Fasten tightly the bolt in the pivot hole. The
figure below illustrates the angles (in degrees) of each elevation hole. As shown, the
ProST pole-mounting bracket allows elevation between -18.5° and 26.3°.
b. Adjust the horizontal position of the ProST by rotating it about the pole, and then
tightening the nuts of the U-bolts.