
User's Manual
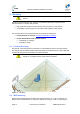
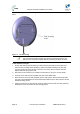
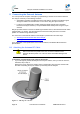
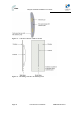

Table Of Contents
- 1.1 Purpose
- 1.4 Referenced Documentation
- 2.1 EasyST Frequency Ranges
- 2.2 Main Features
- 2.3 EasyST-2 Frequency Ranges
- 2.4 Main Features
- 2.5 Architecture
- 2.6 EasyST Protocol Stack
- 2.7 Theory of Operation
- 3.1 Package Contents
- 3.2 Minimum PC Requirements
- 3.3 Required Tools
- 4.1 Physical Dimensions
- 4.2 Ports
- 4.3 LEDs
- 4.4 LED Button
- 5.1 Connecting EasyST to a Computer
- 5.2 Connecting EasyST to Power
- 5.3 Verifying Correct Cabling
- 6.1 Desktop Mounting
- 6.2 Wall Mounting
- 8.1 Attaching the Antenna RF Cable
- 8.2 Mounting the External Antenna
- 13.1 Glossary of Terms
- 13.2 Revision History
- 13.3 Contact Information

EasyST Hardware Installation User Guide
Page 31 Commercial in Confidence UWB-D00128 Rev K
6 Mounting
Caution: EasyST is an indoor unit and therefore, must be mounted only
indoors.
EasyST is a self-install indoor unit, requiring no professional technician. EasyST must be
mounted indoors in a location that provides:
¾ High quality RF reception with the Internet service provider (i.e. base station)
¾ Accessibility to power supply and LAN network with regards to cable lengths
The mounting options of the EasyST depend on the antenna configuration:
¾ EasyST with clip-on antenna: mounted horizontally on a desktop
¾ EasyST with window-mount external antenna:
• Horizontally on a desktop
• Vertically on a wall
6.1 Desktop Mounting
The EasyST can be simply placed horizontally on a desk/table (as shown in the figure below).
The EasyST radio provides integrated rubber feet (pads) on the bottom panel. These rubber feet
provide cushioning as well as insulation from static electricity.
Caution: To prevent a fire hazard caused by overheating, do not place the
EasyST on a carpeted surface where airflow is restricted.
Figure 12 - Desktop
6.2 Wall Mounting
When EasyST implements the window-mount external antenna (i.e. no clip-on antenna), the
EasyST can be mounted either on a desk (i.e. desktop mounting) or a wall. For mounting to a