
User's Manual
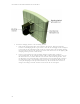


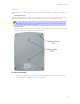
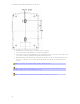
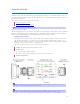
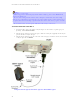
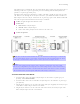
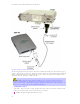
Table Of Contents
- INTRODUCTION
- WARNINGS AND CAUTIONS
- DECLARATION OF CONFORMITY
- FCC INTERFERENCE STATEMENT
- SYSTEM OVERVIEW
- PHYSICAL DESCRIPTION
- MOUNTING THE PROST
- NETWORK CABLING
- CONNECTING TO POWER
- CONNECTING POWER CABLE FOR SDA-4SDC
- CONNECTING LIGHTNING AND SURGE PROTECTOR
- RSSI LED PLUG ADAPTER
- CONNECTING EXTERNAL ANTENNA
- TROUBLESHOOTING
- TRADEMARKS AND COPYRIGHTS
- CONTACT INFORMATION
- REVISIONS
- WARNINGS
- GLOSSARY
- INDEX

605-0000-706 ProST Installation User Guide-Rev I
32
2. Drill holes for each hole that you marked in the step above.
3. Insert wall anchors (supplied) into each of the drilled holes.
4. Insert the 9-inch screws (supplied) into the wall anchors. Ensure at least 2 mm of the screw
is exposed to allow insertion into the SDA-4S mounting holes.
5. Hold the SDA-4S with both hands, and align the entrance to the two mounting hooks with
the screws. Slide the screws into the mounting hooks, by lowering the SDA-4S onto the
screws.
Note: For safety, use both mounting hooks to mount the unit.
Note: The SDA-4S is supplied with a 1 meter AC power lead assembly. Ensure the unit
is mounted within 1 meter of the main power outlet.
Note: The maximum cable run between SDA-4S and ProST is 100 meters.