
User's Manual


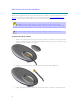
Table Of Contents
- INTRODUCTION
- WARNINGS AND CAUTIONS
- DECLARATION OF CONFORMITY
- FCC INTERFERENCE STATEMENT
- SYSTEM OVERVIEW
- INSTALLATION PREREQUISITES
- PHYSICAL DESCRIPTION
- CABLING
- MOUNTING
- OPTIMIZING RF RECEPTION
- CONNECTING THE EXTERNAL ANTENNA
- REPLACING THE CLIP-ON ANTENNA
- EASYST SMART CARD
- RESETTING EASYST TO DEFAULT SETTINGS
- TROUBLESHOOTING
- TRADEMARKS AND COPYRIGHTS
- CONTACT INFORMATION
- REVISIONS
- WARNINGS
- GLOSSARY
- INDEX

40
REPLACING THE CLIP-ON ANTENNA
The EasyST is supplied with the clip-on antenna already attached to the EasyST. However, in cases
where you may have previously removed it to connect EasyST to an external window-mount
antenna, you may want to discontinue using the external antenna and replace it with the clip-on
antenna.
Warning: Before disconnecting the external antenna and replacing the clip-on
antenna, ensure that the EasyST is not connected to the power source. Do not connect and
disconnect antennas while the power is on. This can cause irreversible damage to the EasyST.
Note: Later EasyST models provide a screw for securing the clip-on antenna to the
EasyST.
To replace the clip-on antenna:
1. Remove the plastic protection cap protecting the antenna connectors, by inserting a flat-
head screw driver between the cap and the EasyST, and then gently leveraging the cap's
guides out of the EasyST's cover pins.
2. Unplug the external antenna's MCX connector from the EasyST's MCX jack.
3. Align the clip-on antenna's knob with the EasyST's notch, as shown in the figure below.