
Installation Guide


AirSpeed 2900 gNB 5G OD Installation Guide
© Copyright Airspan Networks Ltd., 2021 P/N DUG01085 Rev. A, Nov 2021
26
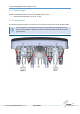
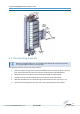
3.4 Wall Mount Assembly
The following describes the wall mounting procedure:
1. Select the location on the wall to mount the AirSpeed 2900 mounting bracket.
2. Remove the upper two (2) screws from the Pole/Wall bracket and set them aside to be used
later. Loosen the lower two (2) screws so they protrude from the Pole/Wall bracket.
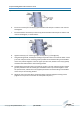
3. Position the Pole/Wall bracket onto the wall at the required height and mark where to drill
the holes.
4. Insert screws and appropriate wall anchors (not provided) and tighten in place.
5. Assemble the 2 SEMS screws (M6 x 16) into the lower threaded holes on the mounting (base)
bracket, do not tighten.
Wall anchors (x4) and necessary hardware are not supplied by Airspan and are the
responsibility of the installer. Use appropriate wall anchors according to field conditions.
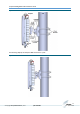
6. Carefully align and position the unit so that the screws (1 on each side) fit into the notched
grooves provided on the Tilt bracket (pre-assembled on the unit) and hand tighten. Insert the
1/4-20 screws, washers and nuts (supplied) and fasten the Tilt bracket (pre-assembled on the
unit) to the mounting bracket.
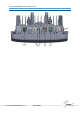
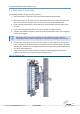
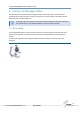
7. Adjust the unit so that the GPS is positioned upright. Check and tighten all fixing screws.
(Tighten to a torque of no more than 12.5 Nm (9.22 ft-lb) max.)
Figure 10: AirSpeed on Wall