
Installation Guide


AirSpeed 2900 gNB 5G OD Installation Guide
© Copyright Airspan Networks Ltd., 2021 P/N DUG01085 Rev. A, Nov 2021
22
3 AirSpeed 2900 Installation
AirSpeed 2900 can be installed outdoors on either a pole or a wall.
The Mounting Kit - includes a Tilt bracket and pole/wall mounting bracket for fastening the unit to a
pole or on a wall. Prior to installation the Tilt bracket must be assembled on the AirSpeed unit and
then the mounting bracket must be affixed in place on either the pole or a wall.
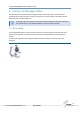
3.1 Connecting the GPS Antenna
Prior to installation, the GPS antenna should be connected to the unit. The connection is water-proof.
Additional weatherproofing is required, see below.
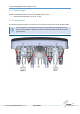
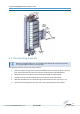
The following describes the connection of the GPS antenna which is installed directly to the top of the
unit.
1. Unscrew the protective dust cap from the GPS antenna jack prior to mounting on the AirSpeed
2900.
2. Align the GPS jack with the plug attached to the top panel on the AirSpeed 2900 and screw on.
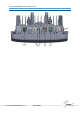
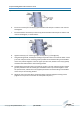
3.1.1 Weather-proofing the GPS Antenna Connection
Weather-proofing of the GPS antenna connection is required. This is done with a layer of self-
amalgamating tape followed by an over layer of PVC tape. Verify the RF connector is completely
weather-sealed.
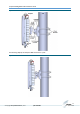
3.2 Tilt bracket Assembly
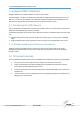
Prior to installation the Tilt bracket must be assembled on the AirSpeed unit, (unless pre-assembled).
1. Lie the unit on its face to expose the back. Careful to protect the surface cover.
2. Orient the Tilt bracket so the lifting handle will be assembled in the direction of the top
panel, where the GPS and RF ports are located.
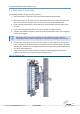
3. Line up the four (4) holes on the Tilt bracket with four (4) threaded holes on the back of the
AirSpeed unit.
4. Insert and screw in the four (4) (M6 X 16) screws to tighten (fastening torque of 40 [Lib*in] =
46 [Kgf*cm], as shown below.