
Service Manual


SERVICE AND MAINTENANCE FAN COILS
26 496 08 8001 02
Specifications subject to change without notice.
equalizer tube to underside of diaphragm, with which
the pin carrier spring pressure closes valve. The
refrigerant flow is effectively stabilized to load demand
with negligible change in superheat.
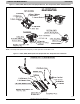
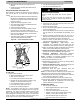
ALUMINUM COIL UNIT TXV’s
The distributor used on the all−aluminum coils is also made of
aluminum. The TXV connection to the distributor is
accomplished with a 3/4−in. Chatleff nut. (See Figure 21) The
threads are coated with Loctite Heavy Duty Anti−Seize which
is a graphite/calcium fluoride formulation, for applications that
is free from copper, lead and sulfur. This product is typically
used in applications with an operating range of −20°F to
+2400°F. When replacing a TXV it is recommended to reapply
with the same thread sealer.
Extra care should be taken during brazing of copper equalizer
on the aluminum coils to prevent the braze material from
splattering on the aluminum. Also, route the copper equalizer
so that it does not touch the aluminum components.
Figure 21 − Aluminum Coil Unit TXV’s
Loctite
Washer
Thermal
Expansion Valve
Thermal
Expansion Valve
A14212
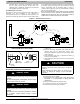
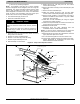
Figure 22 − Refrigerant Flow−Control Device
FEM4P, WAPM, WAPT, WAPL, REM4P
PISTON
PISTON
RETAINER
BRASS
HEX NUT
BRASS
HEX BODY
TEFLON SEAL
A93530
Piston Body Cleaning and Replacement
ENVIRONMENTAL HAZARD
Failure to follow this caution may result in environmental
damage.
Do not vent refrigerant to atmosphere. Recover during
system repair or final unit disposal.
CAUTION
!
UNIT DAMAGE HAZARD
Failure to follow this caution could result in equipment
damage.
Damage may occur to the scroll compressor if operated
at a negative suction pressure during a system
pumpdown.
CAUTION
!
1. Pump down outdoor unit. Close service valves at
outdoor unit.
2. Recover remaining refrigerant from tubing and coil
through gage port on vapor−tube service valve.
Disconnect refrigerant (liquid) tube from piston body.
(See Figure 22.)
3. Avoid damaging seal ring or machined surfaces on
piston, bore, and retainer.
4. Using small wire with a hook on end of it, remove piston
from body.
UNIT DAMAGE HAZARD
Failure to follow this caution could result in equipment
damage.
When cleaning the piston orifice, be careful not to
scratch or enlarge the opening, as this will affect
operation.
CAUTION
!
5. Install new or cleaned piston into body.
6. Replace seal ring on retainer.
7. The threads are coasted with Loctite Heavy Duty
Anti−Seize, it is recommended to reapply with the
thread sealer.
8. Reconnect refrigerant tube to piston body.
9. Pressurize tubing and coil, then leak check.
10. Evacuate tubing and coil as necessary.