
Natural Gas to Propane Conversion Instructions

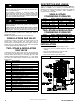

10 AG--KC019SNP--02
Specifications subject to change wi thout notice.
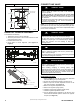
female threads face point to the male threads of the 2--in
brass nipple.
9. With a small back--up wrench on the brass street elbow,
tighten the brass street tee with a small wrench until the
fittings are tight and the male portion of the threads point
away from you.
10. Apply pipe dope sparingly to the male threads of the
1/8--in. brass street elbow. Install the Low Gas Pressure
Switch on the male threads of the street elbow. Tighten
switch at hex fitting at base of switch. Do not use switch
body to tighten switch. Do not over--tighten switch.
11. The remaining opening on the brass street tee is the new
gas valve inlet pressure tap (optional on some models).
Apply pipe dope to inlet pressure plug from gas valve and
install in open end of brass street tee.
12. Check all fittings for leaks after gas supply has been
turned on.
INSTALL LOW GAS PRESSURE
SWITCH WIRES
1. Locate the orange wire in the kit with an insulated straight
female spade terminal and an insulated straight male
terminal on the other end.
2. Connect the female terminal to a terminal on the Low Gas
Pressure Switch.
3. Locate the orange wire in kit with an insulated straight
female spade terminal and an insulated female flag
terminal on the other end.
4. Connect both straight female terminals of the orange
wires to the terminals on the Low Gas Pressure Switch.
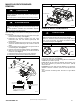
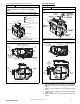
INSTALL MANIFOLD
1. Refer to Figure 2 and Figure 3.
2. Align the orifices in the manifold assembly with the
support rings on the end of the burner.
3. Insert the orifices in the support rings of the burners.
Manifold mounting tabs should fit flush against the burner
box.
NOTE:If manifold does not fit flush against the burner box, the
burners are not fully seated forward. Remove the manifold and
check burner positioning in the burner box assembly.
4. Attach the green/yellow wire and ground terminal to one
of the manifold mounting screws. (See Figure 2)
5. Install the remaining manifold mounting screws.
6. Connect the wires to the flame sensor and hot surface
igniter.
7. Connect the connector harness to gas valve.
NOTE:Use only propane-resistant pipe dope. Do not use PTFE
thread--seal tape.
8. Insert the gas pipe through the grommet in the casing.
Apply a thin layer of pipe dope to the threads of the pipe
and thread the pipe by into the gas valve.
NOTE:Use a back-up wrench on the gas valve to prevent the
valve from rotating on the manifold or damaging the mounting to
the burner box.
9. With a back-up wrench on the inlet boss of the gas valve,
finish tightening the gas pipe to the gas valve.
10. Turn gas on at electric switch on gas valve.
MODIFY PRESSURE SWITCH WIRING
! CAUTION
UNIT OPERATION HAZARD
Failure to follow this caution may result in unit damage or
improper operation.
Label all wires prior to disconnection when servicing controls.
! PRUDENCE
D’EQUIPEMENT D’OPERATION
Toute erreur de câblage peut être une source de danger et de
panne.
Lors des opérations d’entretien des commandes, étiqueter
tous les fils avant de les déconnecter.
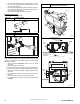
1. Disconnect orange wire from Low Heat Pressure Switch
LPS on inducer housing. (See Figure 1)
2. Connect the orange wire from the Low Heat Pressure
Switch to the orange wire with the insulated male spade
terminal. (See Figure 17)
3. Connect the orange wire from the Low Gas Pressure
Switch to the terminal on the Low Heat Pressure Switch.
4. Route orange wires along wire harness. If possible,
secure with wire tie provided in kit.
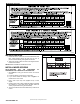
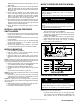
Figure 17 Pressure Switch Wiring
L13F016
SINGLE & TWO--STAGE
A190143
MODULATING
CHECK INLET GAS PRESSURE
! CAUTION
UNIT DAMAGE HAZARD
Failure to follow this caution may result in unit damage.
DO NOT operate furnace more than one minute to check inlet
gas pressure, as conversion is not complete at this time.
NOTE:This kit is to be used only when inlet gas pressure is
between 12.0--in. w.c. and 13.6 --in. w.c.
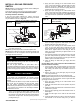
1. On some models, remove 1/8-in. (3 mm) pipe plug from
inlet pressure tap (see Figure 15 and Figure 16 ) and
insert pressure tap. Or, on some models, loosen set