
Zone Board Installation Manual


5 616 01 1301 02
Specifications subject to change without notice.
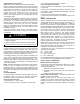
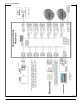
Fig. 3 − Damper 24 VAC Connections
SET SCREW
MOUNTING HUB
ANTI-ROTATION
MOUNTING SCREW
3/16"
GAP
DAMPER
3/16"
GAP
SET SCREW
MOUNTING HUB
ACTUATOR
HOUSING
QUICK BLADE
RELEASE
(CLS) CLOSED
(COM) COMMON
(OPN) OPEN
ANTI-ROTATION
MOUNTING SCREW (5/16")
PLASTIC COVER
CLS
COM
OPN
CLS
COM
OPN
If duct system requires multiple dampers for a single zone, up to
3 dampers (maximum) may be wired in parallel. For all
applications, including retrofit, it is recommended to use only
current dampers with direct-drive style actuators. DO NOT use
older damper with crank-arm style actuators.
If an actuator is removed from a damper for any reason, it must
be properly aligned when it is reinstalled. This can be done by
rotating the actuator and the blade to their closed positions and
then tightening the actuator (set screw) to the shaft. This assures
alignment at the closed position. (Pressing the quick blade
release button allows the actuator to be manually turned).
ELECTRICAL OPERATION HAZARD
Failure to follow this caution may result in damage to the unit
or improper operation.
Condensation can damage the actuator. When dampers are
located in an unconditioned space, condensation is likely to
occur in cooling. To prevent condensation and losses, all
dampers and ductwork in unconditioned space must be
insulated or otherwise protected.
!
CAUTION
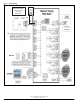
For specific duct types, follow instructions below:
NOTE: All zone dampers and ductwork must be properly
supported according to local codes or SMACNA standards.
ROUND METAL DUCTWORK
1. Crimp end of branch duct.
2. Slip end of zone damper over end of ductwork. Use
selftapping sheet metal screw to secure.
3. Properly seal joint using duct tape, mastic, or other
approved method. Do not allow mastic to come in contact
with actuator.
4. If dampers are applied in an unconditioned space, insulate
damper using 1-1/2 inch to 2 inch insulation (See Fig. 4).
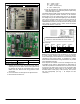
Fig. 4 − Insulated Round Metal Ductwork
/ ≤ STEEL STRAP
1
2
RECTANGULAR DUCTWORK
1. Make connections using S-lock and drives (See Fig.5).
2. Properly seal joint using duct tape, mastic, or other
approved method. Do not allow mastic to come in contact
with actuator.
3. If dampers are applied in an unconditioned space, insulate
damper using 1-1/2 inch to 2 inch insulation (See Fig. 6).
Fig. 5 − Rectangular Ductwork
DRIVE
ZONE
DAMPER
S-LOCK
SUPPLY
A
IR DUCT