
Operation Manual


AIRIS POWER SERVER
User Manual Rev 1.0
26
connected to the LAN port of SA.
1. Select Disable radio button.
2. Assign a static IP address to each device connected to the LAN
port.
For example, you have four PCs, PC1, PC2, PC3 and PC4 connected to
the LAN port. You have to assign a UNIQUE static IP address i.e.
“192.168.0.34”, “192.168.0.25”, “192.168.0.18”, “192.168.0.108” to PC1,
PC2, PC3 and PC4 respectively. Note: The static IP addresses
assigned are all in the same subnet with SA. In Basic Settings, we set
“192.168.0.1” as private IP address ofAIRIS Power Serverwith a
255.255.255.0 subnet. Therefore, the networked PCs need to belong to
“192.168.0.x”.
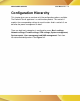
IP Alias
In Basic Settings, we’ve set the private IP address ofAIRIS Power
Serveras “192.168.0.1”. We will assign the LAN ports ofAIRIS Power
Serverto the network of “192.168.0.x”. In DHCP server settings, we’ve set
the IP addresses of the LAN as “192.168.0.x”. “192.168.0.x” includes
“192.168.0.x”, and therefore is considered to be in the same network.
There is no problem if the network interface contains only one IP address
range, but if you want to assign another IP addresses like “192.168.1.x” to
the LAN, then there is an issue. “192.168.1.x” and “192.168.0.x” are not in
the same network. We need IP Aliasing to resolve this issue. IP alias
allows one network interface to contain more than one network. It allows
the additional network “192.168.1.x” to be recognized by the SA.
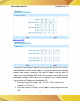
Please follow the steps to add another network:
1. Enter “192.168.1.1” in IP Alias 1.
2. Enter “255.255.255.0” in Netmask of IP Alias 1.
3. Click the apply button.
Note that the IP Alias 1, 192.168.1.1 is assigned toAIRIS Power
Serverand the network is “192.168.1.x”.
For additional IP addresses of the internal network interface to be
accepted, enter the other IP address in IP Alias 2 and IP Alias 3. Enter “0”
in each field if none.