
User's Manual
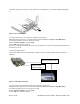
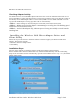
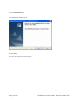
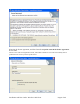
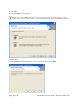
Table Of Contents
- Device Types
- Shipping Package Contents
- System Requirements
- Inserting and Removing the Wireless LAN Client Adapter
- Installing the Wireless LAN Client Adapter Driver and Client Utility
- Custom Installation
- Uninstalling the Client Utility and Drivers
- Service Set Identifiers
- Wireless Bands and Channels
- Client Utility Overview
- Accessing the Client Utility
- Navigating the User Interface
- Scanning for Available Networks
- Working with Profiles
- Wireless Security

5 Remove the USB cable from the PC.
Checking Adapter Activity
The LEDs on the PC Card and USB Adapter indicate the state of current communications. LED 1 is on
the left and LED 2 is on the right when the PC Card is facing up (thick section on top, metallic contact on
the bottom). On the USB Adapter LED 1 is on the bottom, LED 2 is in the middle and LED 3 is on the
top when the USB Adapter is facing up (Cable to PC is on the bottom):
•
LED 1 — Shows solid green when the adapter is associated (connected) to the network.
• LED 2 — Blinks green when the adapter is transmitting or receiving data. The blinking speed
reflects the level of network activity.
• LED 3 — On the USB Adapter only, indicates power is being successfully received from the
attaching host.
Installing the Wireless LAN Client Adapter Driver and
Client Utility
Follow the steps in this section to install the software needed to support your Wireless LAN Client
Adapter. The software includes:
• Wireless LAN Client Adapter driver
• Client Utility
Installation Steps
1 Power up the computer in which the Wireless LAN Client Adapter will be installed.
2 Insert the Wireless LAN Client distribution CD, which should automatically start the Client Utility
Setup. If the wizard does not start automatically, open the CD and double-click Setup.exe
, the Client
Utility Setup opens.
Installation and User Guide: Wireless LAN Client Page 7 of 46