
User's Manual


F5D8230-4 user draft.doc Page 33 of 89
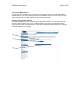
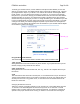
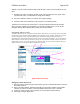
Changing LAN Settings
All settings for the internal LAN setup of the Router can be viewed and changed here.
[LAN Settings.tif]
1. IP Address
The “IP address” is the internal IP address of the Router. The default IP address is
“192.168.2.1”. To access the advanced setup interface, type this IP address into the address
bar of your browser. This address can be changed if needed. To change the IP address, type
in the new IP address and click “Apply Changes”. The IP address you choose should be a
non-routable IP. Examples of a non-routable IP are:
192.168.x.x (where x is anything between 0 and 255)
10.x.x.x (where x is anything between 0 and 255)
2. Subnet Mask
There is no need to change the subnet mask. This is a unique, advanced feature of your
Belkin Router. It is possible to change the subnet mask if necessary; however, do NOT make
changes to the subnet mask unless you have a specific reason to do so. The default setting
is “255.255.255.0”.
3. DHCP Server
The DHCP server function makes setting up a network very easy by assigning IP addresses
to each computer on the network automatically. The default setting is “On”. The DHCP server
can be turned OFF if necessary; however, in order to do so you must manually set a static IP
address for each computer on your network. To turn off the DHCP server, select “Off” and
click “Apply Changes”.
4. IP Pool
The range of IP addresses set aside for dynamic assignment to the computers on your
network. The default is 2–100 (99 computers). If you want to change this number, you can do
so by entering a new starting and ending IP address and clicking on “Apply Changes”. The
DHCP server can assign 100 IP addresses automatically. This means that you cannot specify
an IP address pool larger than 100 computers. For example, starting at 50 means you have
to end at 150 or lower so as not to exceed the 100-client limit. The starting IP address must
be lower in number than the ending IP address.
(2)
(3)
(4)
(5)
(6)
(1)