
User's Manual


F5D8230-4 user draft.doc Page 18 of 89
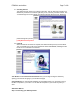
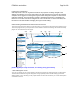
1.1 Turn off the power to your modem by unplugging the power supply from the modem.
1.2 Locate the network cable that is connected between your modem and your computer and
unplug it from your computer, leaving the other end connected to your modem.
1.3 Plug the loose end of the cable you just unplugged into the port on the back of the Router
labeled “Internet/WAN”.
1.4 Connect the included network cable from the back of the computer to one of the ports
labeled “1–4”. Note: It does not matter which numbered port you choose.
1.5 Turn your cable or DSL modem on by reconnecting the power supply to the modem.
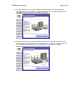
1.6 Before plugging the power cord into the Router, plug the cord into the wall, then plug the
cord into the Router’s power jack.
[Need correct illustration]
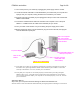
1.7 Verify that your modem is connected to the Router by checking the lights on the TOP of
the Router. The green light labeled “WAN” should be ON if your modem is connected
correctly to the Router. If it is not, recheck your connections.
1.8 Verify that your computer is connected properly to the Router by checking the lights
labeled “LAN 1,2,3,4”. The light which corresponds to the numbered port connected to
your computer should be ON, if your computer is connected properly. If it is not, recheck
your connections.
Alternative Method
Step 2: Set your Computer’s Network Settings to Work with a DHCP Server
See the section in this User Manual called “Manually Configuring Network Settings” for directions.
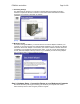
To power adapter
Cable or DSL
modem
Existing network
cable (that came
with modem)
Supplied Blue Ethernet
cable (to computer)
Mac or PC computer
that was originally
connected to the cable
or DSL modem