
User's Manual


Configuring Guest Access
Installation and Configuration Guide: Airgo Access Point 157
Create or confirm
existence of a corporate
VLAN. This can be the
default untagged VLAN
or a specially created
VLAN.
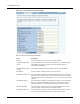
1 Choose VLAN Configuration from the Networking Services menu to
open the VLAN table (“VLAN Table” on page 106).
2 Confirm that the corporate VLAN is listed in the table, or click Add to
create a new VLAN:
a Enter the corporate VLAN name and a numeric VLAN ID in the Add
VLAN entry panel.
b Enter the IP address and maskbits of the captive portal server, or select
the DHCP option. The guest portal must have a valid IP address for the
authentication process to work.
c Select the eth0 interface, and mark it as tagged. (Only eth0 should be
tagged.)
d Click Add.
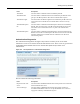
Create the guest VLAN. 1 Choose VLAN Configuration from the Networking Services menu to
open the VLAN table (“VLAN Table” on page 106).
2 Click Add.
3 Enter the VLAN name (Guest VLAN) and a numeric VLAN ID in the Add
VLAN entry panel. It is not recommended to use the default VLAN.
4 Enter the IP address and maskbits of the captive portal server, or select the
DHCP option.
5 Select the eth0 interface, and mark it as tagged. (Only eth0 should be
tagged.)
6 Click Add. For additional information on configuring VLANS, see
“Configuring VLANs” on page 105.
Create or confirm
definition of a corporate
service profile.
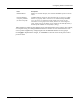
1 Choose SSID Configuration from the Wireless Services menu to open
the SSID table (“SSIDs and Service Profiles” on page 79).
2 Click Profile Table.
3 Add a corporate profile, or confirm that one exists with the desired WPA
security option and the corporate VLAN specified. Make sure that the
corporate profile is bound to the SSID.
Create a guest service
profile which specifies
the guest VLAN and
desired COS and security
options.
1 Choose SSID Configuration from the Wireless Services menu to open
the SSID table.
2 Select SSID Details (“SSID Details” on page 82).
3 Confirm the SSID name, or enter a new SSID name for the Guest Portal,
and then click Apply.
4 Click Profile Table to display the current list of service profiles.
5 Click Add to create the guest service profile. Select the VLAN ID for the
guest VLAN previously defined. Enter the COS value and make sure that
no-encryption is selected.
6 Click Apply.
Task (continued) Steps