
User's Manual

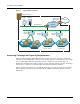


Example Deployment Scenarios
Installation and Configuration Guide: Airgo Access Point 17
The following table lists the tasks required for configuration and provides pointers to the detailed
instructions in this guide.
Table 3: Example 1 Configuration Tasks
Task Process
Bring up the first (or
only) Airgo AP
1 Make sure a DHCP server is available on the network, and create a DHCP
reservation for the MAC address of this AP.
2 Have the information sheet shipped with the AP available.
3 Bootstrap the AP as an NM Portal. Defaults are acceptable for most
settings.
4 Choose an SSID (wireless network name).
5 Choose an administrative password and WPA pre-shared key.
6 Configure clients with compatible WPA security using the same pre-
shared key.
References: “Initializing a Normal AP” on page 33, “Initializing the Portal
AP” on page 36
Confirm that the
network is up
• Open the IP Topology panel in NM Portal to confirm that the AP is listed
as discovered.
• Open the Station Management panel at any time to view a list of client
stations associated to the AP.
References: “Viewing IP Topology” on page 169 and “Managing Client
Stations” on page 86.