
User's Manual

8 Configuring Guest Access
174 Installation and User Guide: Airgo Access Point
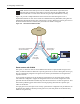
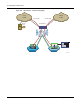
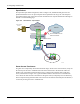
Guest access is now configured. When guests attempt to access the network, they are directed to an
external landing page or to a standard user login screen. Upon entering the correct guest password
or server secret code, they are granted access to the guest VLAN. They are also given the COS and
encryption characteristics specified in the guest service profile.
See also “Guest Access Wizard” on page 53.
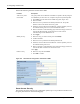
Guest Access Services Panel
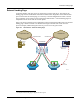
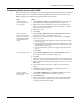
For summary information about guest access, use the Guest Access Configuration panel. The panel
opens to the Guest table
(Figure 123), which lists currently defined guest service profiles. If guest
access is enabled, you can also open the Guest table by clicking the Guest Access Enabled link on
Create a guest service
profile which specifies
the guest VLAN and
desired COS and security
options.
1 Choose SSID Configuration from the Wireless Services menu to open
the SSID table.
2 Select SSID Details (“SSID Details” on page 87).
3 Confirm the SSID name, or enter a new SSID name for the Guest Portal,
and then click Apply.
4 Click Profile Table to display the current list of service profiles.
5 Click Add to create the guest service profile. Select the VLAN ID for the
guest VLAN previously defined. Enter the COS value and make sure that
no-encryption is selected.
6 Click Apply.
Add guest access to the
SSID and specify an
internal or external
landing page for guest
users who attempt to
access the network.
1 Choose Guest Access Configuration from the Guest Access Services
menu to open the Guest table.
2 Click Add.
3 Confirm selection of the SSID and guest profile, as defined in the previous
task.
4 Select whether the landing page will be internal or external. If external,
enter a URL and an external web server secret code, which is the shared
secret code for communication between the AP and web server.
5 Click Apply.
For the internal landing
page, set a guest
password; for an external
landing page use the
RADIUS shared secret
code.
1 If Internal is selected as the landing page type, click Security to enter the
guest password.
2 Enter and confirm the password, and click Apply.
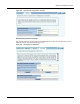
Set up optional auto-
generation of guest
passwords
1 From NM Portal Network Management Explorer window, select User
Management from the Security Portal menu.
2 On the Guest User tab (Figure 126), select Yes to enable auto-password
generation.
3 Select an interval from the Generate Auto Guest Password pull-down list.
4 Click Apply.
NOTE: If static and auto-generated passwords are configured, then a guest
user can enter either password to be authenticated.
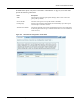
Task (continued) Steps