
User's Manual
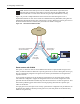
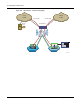
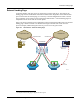
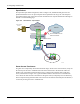

Configuring Guest Access with VLANs
Installation and User Guide: Airgo Access Point 173
Configuring Guest Access with VLANs
This section describes the complete process of setting up guest access with VLANs. Use the Guest
Access wizard for easy configuration of the major guest access parameters. See “Guest Access
Wizard” on page 53 for instructions on using the Guest Access wizard.
Task Steps
Confirm that Open
access is supported as a
security option.
1 Choose Wireless Security from the Security Services menu to open the
Security Mode tab (“Configuring Wireless Security” on page 150).
2 Enable WPA security if mixed mode security (encrypted and Open) is
desired. Only WPA can be enabled in conjunction with Open. The WPA
Security mode is for non-guests only.
3 Enable Open Access.
4 Click Apply.
Create or confirm
existence of a corporate
VLAN. This can be the
default untagged VLAN
or a specially created
VLAN.
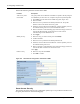
1 Choose VLAN Configuration from the Networking Services menu to
open the VLAN table (“VLAN Table” on page 112).
2 Confirm that the corporate VLAN is listed in the table, or click Add to
create a new VLAN:
a Enter the corporate VLAN name and a numeric VLAN ID in the Add
VLAN entry panel.
b Enter the IP address and maskbits of the captive portal server, or select
the DHCP option. The guest portal must have a valid IP address for the
authentication process to work.
c Select the eth0 interface, and mark it as tagged. (Only eth0 should be
tagged.)
d Click Add.
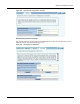
Create the guest VLAN. 1 Choose VLAN Configuration from the Networking Services menu to
open the VLAN table (“VLAN Table” on page 112).
2 Click Add.
3 Enter the VLAN name (Guest VLAN) and a numeric VLAN ID in the Add
VLAN entry panel. It is not recommended that you use the default VLAN.
4 Enter the IP address and maskbits of the captive portal server, or select the
DHCP option.
5 Select the eth0 interface, and mark it as tagged. (Only eth0 should be
tagged.)
6 Click Add. For additional information on configuring VLANs, see
“Configuring VLANs” on page 111.
Create or confirm
definition of a corporate
service profile.
1 Choose SSID Configuration from the Wireless Services menu to open
the SSID table (“SSIDs and Service Profiles” on page 84).
2 Click Profile Table.
3 Add a corporate profile or confirm that one exists with the desired WPA
security option and the corporate VLAN specified. Make sure that the
corporate profile is bound to the SSID.