
User's Manual
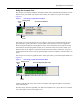
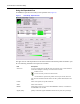

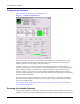
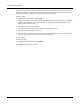
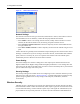
Table Of Contents

Working with Profiles
Installation and User Guide: Wireless LAN Client Adapter 21
access point it finds for which it can establish radio communications. Association normally
happens automatically; however, it is recommended that you start the Client Utility once you are
connected. This enables you to verify the configuration and confirm that the access point to which
you are connected is a trusted component of your network.
Whenever you open the Client Utility, the system performs an automatic scan. You can also scan
for networks at any time, upon demand.
To scan for available networks:
1 Choose Start > Programs > Airgo Networks > Client Utility.
This displays the application icon in the system tray.
2 Click More to open the Expanded View.
3 Click Scan.
A scanning box opens (Figure 11) to show that the scan is taking place. When the scan is complete,
the Network List area (Figure 10) displays all the discovered networks.
Figure 11: Scanning Icon
The results of the scan are presented near the top of the expanded Client Utility window
(Figure 10). If a profile already exists for the discovered SSID, it appears in the network list with its
name in the Profile column with a disk icon to the left. If a profile does not exist, the Profile column
is blank.
Working with Profiles
This section provides instructions on the tasks used in managing profiles:
To create a new profile:
1 Click Create to open the Profile window.
2 Enter a new name in the Profile Name field.
3 Enter the SSID of the network. For more information, see “Service Set Identifiers” on page 12.
4 Drag the sliding bar to select an output power level.
5 Select a security level and details. For more information, see “Security Settings” on page 24.
6 Click Save. The Profile window closes and the newly created profile appears in the Network
List in the Client Utility window.
To make an existing profile active (use the profile to control wireless communications from your
PC):
1 Double-click on the entry in the Network List.
2 Click Save & Activate.