
Owner's Manual
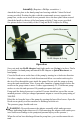

Assembly (Requires a Phillips screwdriver.)
Attach the base plate to the hand pump base housing with the 2 short flat head
screws provided. Position the plate with the countersunk recesses opposite the
pump base, so the screw heads do not protrude above the base plate when secured.
Attach the handle to the top of the hand pump with the 2 long screws provided.
See picture below for assembly of the O-ring and Refill Adaptor for filling.
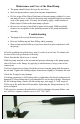
Operation
Screw air tank into Refill Adaptor hand tight, make sure O-ring is in place. Find a
level surface for hand pump and attach Refill Adaptor to Quick-Disconnect on
hand pump.
Close the bleed screw on the base of the pump by turning in a clockwise direction.
Use slow complete strokes in both directions and allow a second at each stop for
the air to flow through the ports inside the pump. Do not rock the pump as it may
stress the tank connections. Note: It may take a number of pump strokes before the
needle on the gauge starts to move. It takes approximately 12-13 deliberate pump
strokes to raise the tank pressure 100 pounds per square inch (psi).
Pump until the desired pressure is reached. Pressure should not exceed the recom-
mended pressure of the pre-charged pneumatic airgun or exceed the pump rating of
3000 PSI.
Bleed the air from the base of the pump by opening the brass bleed screw. Open the
bleed screw quickly to allow moisture to discharge with the air.
The pressure gauge should read zero.
! WARNING: Do not disconnect the adaptor assembly while under pressure.
(Gauge indicating higher than zero (0). Disconnecting the adaptor while under pres-
sure could cause damage to the pump and personal injury to the operator.)
When the air has been discharged from the pump base, you can disconnect the air
tank.
Refill Adaptor & O-ring
Quick-Disconnect