
Installation manual

6
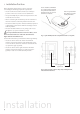
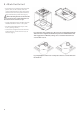
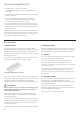
Connection block
at air conditioner
Rigid cable minimum area
1.5 mm
2
minimum 7 strand
15 Amp 2 pole RCD
Minumum contact
gap of 3mm in OFF
position
15 Amp
power inlet
Brown
Y & G
Blue
N A
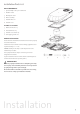
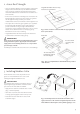
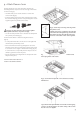
4. Position Sparrow on roof
• Remove the air conditioner from the carton and move
to installation position.
• Put a circle of sealant around each bolt hole in the
weather collar.
• Position the unit over the weather collar. The unit will
engage with the collar and self-align (Fig 6).
The unit weights approximately 28kg. Ensure a two
person lift or use a mechanical hoist to avoid the risk of
injury.
• DO NOT slide the unit on the roof, this may damage
the weather collar and result in leaks.
• Four M8 mounting holes on the chassis underneath
the air conditioner will line up with the corresponding
holes on the weather collar.
Fig 6: Apply sealant around bolt holes and then position unit
over the weather collar and set down gently.
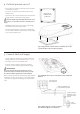
5. Connect Electrical Supply
• This unit MUST be installed in accordance with SAA
Wiring regulations and in particular AS3001 – 2008.
• Refer Fig 7 for position of terminal block.
• Connect electrical supply to terminal strip. Note
position of active, neutral and ground wires (Fig 8).
WARNING
This work should only be performed by a licenced
electrical tradesperson. Ensure that power is properly
disconnected at the supply (mains and/or battery).
When connecting wires into terminal strip apply suitable
clamping pressure to ensure wire is secure while taking
care not to over tighten and damage the exposed wire
ends.
Fig 7: Highlights the position of the terminal strip underneath
the unit.
Fig 8: Wiring diagram of power connection
from external supply to air conditioner.
Apply circle of
sealant around
4 bolt holes.