
Instruction Manual
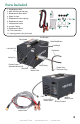


1) Using the included jumper cables, connect the red
clamp to the positive post on the battery. Then connect
the black clamp to the negative post on the battery (g. 1).
2) Connect the cables to the compressor by inserting the
yellow plug into the outlet on the compressor (g. 2).
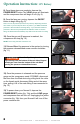
3) Set the desired ll pressure via the dial on the top of
the pressure gauge (g. 3).
4) Make sure the connection between the female quick
disconnect on the hose and the male connection on the
compressor are tight (g. 4).
5) Close the bleed/pressure release valve by turning it
clockwise until it is tight (g. 5).
6) On the underside of the unit, locate the “Moisture
Release Valve” and turn clockwise until tight (g. 6).
7) Connect the output hose to the device you wish to ll
via the female quick disconnect tting (g. 7).
7
Operation Instruction: 12V Battery
© Air Venturi
®
2018 / www.airventuri.com / 216-292-2570
!
CAUTION:
Always check and make sure
the collar on the female quick disconnect is in the
forward position and secure on the male tting you are
connecting it to. It is recommended that you check the
connection by attempting to pull the female and male
ends apart while the collar on the female tting is in the
forward position.
PLEASE NOTE: If you are lling a PCP airgun from empty, you may need to cock the gun before
starting the ll process. Consult the owner's manual of your rie for further instructions.
1
3
4
2
5
6
7
DO NOT OVERFILL AIR
CYLINDERS OR AIR GUN
TANKS, AS THIS CAN CAUSE SERIOUS INJURY OR
DEATH. NEVER SET THE OUTPUT PRESSURE/AUTO
SHUT OFF ABOVE 4500 PSI (310 BAR).
WARNING
!