
Instruction Manual


4
© Air Venturi
®
2018 / www.airventuri.com / 216-292-2570
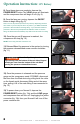
Setting up your Nomad II Compressor
1) The cover must be removed. Before removing,
make sure the compressor is not connected to an
active electrical outlet. Start by removing each of
the 12 phillips head screws, with a phillips head
screwdriver turning them counter-clockwise (g. 1).
2) Carefully lift the cover off of the unit, taking
extra care not to disconnect any of the wiring that
is attached to the ON/OFF and POWER/RESET
switches or the LOAD gauge (g. 2)
3) Locate the adjustment window on the power
converter (g. 3a) . It will be located behind wires,
take care not to dislodge or disconnect any of the
wires while adjusting. Using an allen key, move the
switch to the right. This will select the 220V input
power setting (g. 3b) .
4) Replace the cover on the unit, and reinstall the
12 phillips head screws (g. 4)
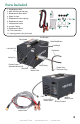
5) Attach the hose and output lter to the compressor
via the female quick disconnect tting. The end with
the lter should be closest to the compressor (see
image for proper conguration) - (g. 5).
4
1
2
3a
3b
5
Your Nomad II comes pre-set to operate from an 110V outlet. Should you choose
to use the unit with a 220V outlet, complete the following steps.