User Instruction Manual NOMAD 4500 PSI Portable Air Compressor AV-MCOMP4500 Ver 1, 7/18
Contents Parts Included.............................................................3 Setting up your Nomad Compressor........................... 4 Operation Instructions: 110V or 220V outlet.............5-6 Operation Instruction: 12V Battery...........................7-8 Lubricating your Nomad Compressor.......................... 9 Output Air Filter Replacement..................................... 9 Purging the Lubrication System................................ 10 Basic Maintenance.........................
Parts Included 1. Replacement fuse 2. Male QD fitting 6 1 3. Replacement burst disks 5 4. Spare O-rings 5. Replacement valve springs 2 6. Replacement seals 4 3 7. Oil applicator bottle (not pictured) 8.
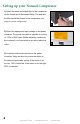
Setting up your Nomad Compressor 1) Attach the hose and output filter to the compressor via the female quick disconnect fitting. The end with the filter should be closest to the compressor (see image for proper configuration). 1 2) Select the appropriate input voltage on the power converter. The power converter is capable of running on 110V or 220V input. Before adjusting, make sure the converter is not connected to an active electrical outlet. 2 3) Locate the adjustment window on the power converter.
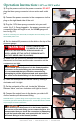
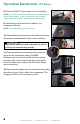
Operation Instruction: 110V or 220V outlet 1) Plug the power cord into the power converter. DO NOT plug the three prong connector into an active wall outlet yet. 2) Connect the power converter to the compressor via the plug on the right hand side of the unit. 1 3) Plug the 110V three prong connector into your wall outlet. (fig 3.1) Once plugged in, the power converter and compressor fans will begin to run, the LOAD gauge will turn on.(fig 3.
Operation Instruction: 110V or 220V outlet 9) Press the ON/OFF button down once to start filling. NOTE: You can stop the fill process at any time by pressing the ON/OFF button down. If you do stop the fill for any reason, simply depress the ON/OFF button again to restart. 9 10) Once the pre-set fill pressure is reached, the compressor will stop. NOTE: The cooling fans will continue to run. 11) Release/Bleed the pressure in the system by turning the pressure release/bleed screw counter-clockwise.
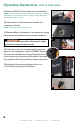
Operation Instruction: 12V Battery 1) Using the included jumper cables, connect the red clamp to the positive post on the battery. Then connect the black clamp to the negative post on the battery. 1 2) Connect the cables to the compressor by inserting the yellow plug into the outlet on the compressor. 3) Set the desired fill pressure via the dial on the top of the pressure gauge. 2 ! WARNING DO NOT OVERFILL AIR CYLINDERS OR AIR GUN TANKS, AS THIS CAN CAUSE SERIOUS INJURY OR DEATH.
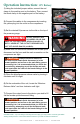
Operation Instruction: 12V Battery 8 8) Press the ON/OFF button down once to start filling. NOTE: You can stop the fill process at any time by pressing the ON/OFF button down. If you do stop the fill for any reason, simply depress the ON/OFF button again to resume filling. 9) Once the pre-set fill pressure is reached, the compressor will stop. NOTE: The cooling fans will continue to run. 10) Release/Bleed the pressure in the system by turning the pressure release/bleed screw counter-clockwise.
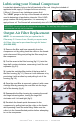
Lubricating your Nomad Compressor Locate the lubrication hole on the left hand side of the unit. Using the included oil applicator bottle, apply 2-3 drops of silicone oil every 5 fills or 1.5 hours of use (whichever comes first). The “LOAD” gauge on the top of the Nomad can also be used to determine oil application intervals. If the LOAD gauge reaches 28 during operation, it is necessary to apply silicone oil. The Nomad will automatically shut off if the LOAD gauge exceeds 29.
Purging the Lubrication System Every 20 fills it is important to purge the Nomad of excess silicone oil and moisture. Once you have completed the 20th fill with your Nomad, before opening the Pressure Release Valve, locate the Moisture Release Valve on the underside of the unit. Turn the Moisture Release Valve counter-clockwise to purge the system. (fig 1) ! IMPORTANT 1 AIR AND / OR LIQUID MAY BE RELEASED AT HIGH VELOCITY.
Troubleshooting Issue - Compressor will not start - Resolution - Make sure power converter is plugged into a functional electrical outlet and make sure power converter is properly plugged into the compressor. If using a 12V battery, make sure the jumper cables are properly connected as detailed in the instructions. Issue - Compressor is not building pressure - Resolution - Make sure the moisture release valve and the pressure release valve are closed. They should be hand tightened.
Warranty One Year Limited Warranty Your Air Venturi Compressor is manufactured to the highest possible standards, using quality materials to give a lifetime of service. In the unlikely event that there are any defects in materials or workmanship in the first twelve (12) months after retail purchase, we will repair or replace the defective items under warranty. What is covered? • Replacement Parts and labor. • Transportation charges to consumer for repaired product.
Notes 13 © Air Venturi® 2018 / www.airventuri.
Notes 14 © Air Venturi® 2018 / www.airventuri.
Notes 15 © Air Venturi® 2018 / www.airventuri.
AIR VENTURI® 5135 Naiman Parkway, Cleveland, OH 44139 Ph: 216-292-2570 • fax: 216-373-0086