Foreword Many thanks for buying this product. We have invested much time and effort in its development in order that you may enjoy many years trouble-free with your digital photo frame. Safety Notice 1. Do not drop, puncture or disassemble the digital photo frame, otherwise the warranty will be voided. 2. Avoid all contact with water and dry hands before using. 3. Do not expose the photo frame to high temperature or leave it in direct sunlight. Doing so may damage it. 4. Use the photo frame with care.
Getting Started Monet is an easy-to-use digital photo frame. It makes it possible to show high resolution photos and films, play MP3 as mood music and combine different photos to a slideshow. It supports USB Flash drive, CF, SD, MMC and MS Pro.
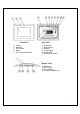
Front Panel 1. 2. 3. 4. 5. Screen Adorning Front frame Stand Front-rear frame button Rear Panel 6. Esc button 7. Enter button 8. Speaker 9. Circle button 10. Power LED 11. Power/LED switch Bottom Panel 12. USB port 13. DC 5V jack 14. CF card port 15.
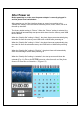
After Power on Before powering on, make sure the power adapter is correctly plugged in and the photo frame switched on. After powering on, the Start interface shown on screen is according to the “StartUp Set” setting. User can choose calendar, picture, music, movie, file list in the start up interface. The factory default setting is “Picture”. When the “Picture” setting is selected, the photo frame will automatically start picture slide show from the memory card /USB stick or NAND.
Figure 6.
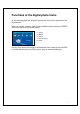
Functions of the digital photo frame On the following pages the different functions and menus of the photo frame will be presented. When you choose a memory card or USB or NAND memory and press “ENTER”, the function selection screen will display. (1). Image (2) Music (3). Movie (4). File manager (5) Setup Use the Circle button (left & right) to shift between items, and then press ENTER to confirm the selection. Use ESC button to stop an automatic slideshow.
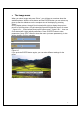
z The Setup Next you should make yourselves familiar with the possible settings. Select the Item "Setup" and confirm your choice with the ENTER button. The following window will appear now and you can see the options mentioned below. At the function select interface, press the Circle button leftward to select the “Setup” item, and then press the ENTER button to enter the system setup menu. (figure 6.20). Figure 6.20 At the Setup interface use below buttons’ definition to operate.
includes “Fast” “Middle” and “Slow”. In the item “t picture play mode”, it includes 13 effects of the slide show. : Clock set: Circle button (left & right) to shift between items; Circle button (Up & Down) to change digits. : Alarm setup: The photo frame has 3 rings in system, in alarm setup, it has two modes, “once” and “every day” : Start Up Set: Up start interface. User could setup image, music, movie, file list and calendar as start interface, default setting is picture.
z The image menu When you select Image and press “Enter”, you will have an overview about the available photos. With the circle button and the ENTER button you can select any photo to start the slideshow on the complete size of the display by pressing “Enter”. During display picture, through Circle button(left & right) to display the previous picture or the next picture; Circle button(Up) open the brightness menus of screen (figure 6.5a), Circle button(Down) open volume menu(figure 6.
The functions of picture control bar are shown as below figure 6.7. Rotate Zoom Previous Stop Status Show file info Picture resolution Next View 3×3 Figure 6.7 Press STOP key at control bar back to function select interface;Press “ESC” button at picture view menu back to 9-picture thumbnail. While picture control bar shown, Press Circle button(Up and down)to switch music control bar and picture control bar , user could press “ENTER” to play back music when display pictures.
z The music menu The next icon you see is the music part. To listen to your favorite music in a media player, select the icon with the circle button and confirm your selection with the ENTER button. You will see the following window. System search music files in the current memory equipment and play them automatically. During music playing, uses the control bar to perform control operation, the functions are shown as figure 6.9.
Figure 6.10 Press “ESC” button or press STOP key back to function select interface at control bar.
z The movie menu To get to this menu choose the icon movie and confirm with the ENTER button. The system will search the video files in the current memory equipment and play them automatically. During movie playing, press Circle button(Up) to open the volume menu(Operation as same as 1-1). Press “ENTER/ESC” button to open/close video control bar(figure 6.11). Figure 6.11 The video control bar is shown as figure 6.12.
z The Filemanager The item before last is the Filemanager item. After use Circle button (Right) to choose memory equipment, press “ENTER” button or Circle button (Right to view the content(figure 6.14), picture files could preview on the right side. If a folder has both picture and music, when display picture, the music will play. Figure 6.14 You can select files at the files for delete or copy .files at the list.
Select files : Use Circle button (up & Down) to shift cursor to target file,press Circle button (right) the left of file name will appear the selected symbol“ " (figure6.15) ,press Circle button (right) again to cancel the selection. User can choose multi-files to operate. (Figure 6.16) Figure 6.16 Delete : After you select file, long press “ENTER” button to open operation menu.(Figure 6.17).
Figure 6.17 Figure 6.18 Copy file: After you select file, shift to the target folder and press “ENTER” button to open file management menu, long press “ENTER” button to open operation menu. and Press Circle button (up & Down) to shift icon,the selected file will be copy to the target folder cursor to (figure 6.19). If the space of the memory device is not enough, error information will be shown, copy operation unsuccessful.
Technische Daten / Specifications Model Code LCD Display LCD Display 8-inch TFT LCD, 158 x 99.36mm Resolution 800RGB x 480 Aspect ratio 16:9 Format Photo Playback function Video Playback 12M Auto slide show Yes function With time, calendar & alarm clock Alarm voice Can use MP3 music to set up (in May FW) Calendar picture Can change by user (in May FW) Format Max. resolution Audio Playback MP3, WMA Supported Speaker Stereo Flash 16MB Yes CF Card Max.
Einleitung Vielen Dank für den Kauf dieses Produktes. Wir haben viel Zeit und Mühe in die Entwicklung gesteckt, damit Sie viele Jahre lang Freude an Ihrem digitalen Fotorahmen haben werden. Sicherheitshinweise 1. Lassen Sie den Fotorahmen nicht fallen, beschädigen und zerlegen Sie das Gerät nicht, andernfalls erlischt die Gewährleistung. 2. Vermeiden Sie jeglichen Kontakt des Gerätes mit Wasser und trocknen Sie sich die Hände ab, bevor Sie es verwenden. 3.
Erste Schritte Monet ist ein einfach zu bedienender digitaler Bilderrahmen. Er ermöglicht die Anzeige von hochauflösenden Fotos und Videos, die Wiedergabe von MP3-Dateien (z. B. als Hintergrundmusik) und kann verschiedene Fotos zu einer Diaschau zusammenstellen und anzeigen. Das Gerät unterstützt USB-Flash-Laufwerke und CF-, SD-, MMC- und MS Pro-Speicherkarten.
Vorderseite 1. 2. 3. 4. 5. Bildschirm Zierrahmen Äußerer Rahmen Aufsteller Rahmenfreigabetaste Rückseite 6. 7. 8. 9. Esc-Taste Eingabetaste Lautsprecher Richtungstasten (Aufwärts/Abwärts/Links/Rec hts) 10. Betrieb-LED 11. Ein-/Aus- und LED-Schalter Unterseite 12. USB-Port 13. Netzteilanschluss (Gleichspannung, 5 V) 14. CF-Kartensteckplatz 15.
Nach dem Einschalten Achten Sie vor dem Einschalten darauf, dass das Netzteil korrekt an den Fotorahmen angeschlossen wurde. Nach dem Einschalten werden die unter Start-Einstellungen gewählten Inhalte angezeigt. Sie können auswählen, ob nach dem Einschalten ein Kalender, Bilder, Musik, Videos oder eine Dateiliste angezeigt werden. Die Werksvorgabe lautet „Bild“. Wenn „Bild“ ausgewählt ist, startet der Fotorahmen automatisch eine Diaschau mit Bildern von Speicherkarte, USB-Stick oder NAND.
Abbildung 6.
Funktionen Ihres digitalen Fotorahmens Auf den folgenden Seiten werden die verschiedenen Funktionen und Menüs des Fotorahmens vorgestellt. Wenn Sie eine Speicherkarte, USB- oder NAND-Speicher wählen und die Eingabetaste drücken, wird der Funktionsauswahl-Bildschirm angezeigt. (1) Bild (2) Musik (3) Video (4) Dateimanager (5) Einstellungen Mit den Richtungstasten, der Eingabe- und der Esc-Taste können Sie sich durch die Menüs und Menüoptionen bewegen.
z Einrichtung Nun sollten Sie sich mit den möglichen Einstellungen vertraut machen. Wählen Sie den Menüpunkt „Einstellungen“ und bestätigen Sie Ihre Auswahl mit der Eingabetaste. Das folgende Fenster wird eingeblendet, die nachstehend aufgeführten Optionen werden angezeigt. Wählen Sie den Menüpunkt „Einstellungen“ mit der Linkstaste aus, drücken Sie dann die Eingabetaste zur Bestätigung. (Abbildung 6.20) Abbildung 6.20 Im Einstellungsbildschirm können Sie die nachstehenden Tasten benutzen.
Unter „Bildwiedergabemodus“ können Sie unter 13 Effekten für Ihre Diaschau auswählen. : Uhrzeiteinstellung: Mit den Links-/Rechtstasten springen Sie zu den einzelnen Einstellungen, mit den Aufwärts-/Abwärtstasten stellen Sie die Ziffern ein. : Alarmeinstellungen: Ihr Fotorahmen bietet Ihnen drei Signaltöne. Mit diesen Signaltönen können Sie sich „Einmal“ oder „Täglich“ erinnern lassen. : Starteinstellungen: Hier legen Sie fest, was beim Einschalten des Gerätes angezeigt werden soll.
z Bild-Menü Wenn Sie ein Bild auswählen und die Eingabetaste drücken, wird eine Übersicht über die vorhandenen Bilder angezeigt. Anschließend können Sie mit den Richtungstasten das Bild auswählen, mit dem die Diaschau beginnen soll. Zum Starten drücken Sie die Eingabetaste. Während der Bildanzeige können Sie mit den Links-/Rechtstasten zum vorherigen und zum nächsten Bild springen. Mit der Aufwärtstaste öffnen Sie die Helligkeitseinstellung (Abbildung 6.
Die nachstehende Abbildung 6.7 zeigt Ihnen die Funktionen der Bildsteuerungsleiste. Drehen Status Zoom Stopp Rückwärts Dateiinfo zeigen Bildauflösung Vorwärts 3 x 3-Ansicht Abbildung 6.7 Mit der Stopp-Schaltfläche der Steuerungsleiste gelangen Sie wieder zur Funktionsauswahl zurück. Wenn Sie bei der Bildanzeige die Esc-Taste drücken, werden 9 (3 x 3) Miniaturansichten der Bilder angezeigt.
z Musik-Menü Mit dem nächsten Symbol können Sie die Musikwiedergabe steuern. Hierbei können Sie sich Ihre Lieblingsmusik über einen Media Player anhören. Wählen Sie das Symbol mit den Richtungstasten aus, bestätigen Sie Ihre Auswahl mit der Eingabetaste. Der folgende Bildschirm wird angezeigt. Das System sucht nach Musikdateien auf dem angeschlossenen Speichermedium und spielt diese automatisch ab. Über die Steuerungsleiste können Sie die Musikwiedergabe steuern; die Funktionen werden in Abbildung 6.
Aufwärtstaste noch einmal betätigen. Mit der Aufwärtstaste öffnen Sie die Lautstärkeeinstellung (Abbildung 6.10). Mit den Links-/Rechtstasten stellen Sie die gewünschte Lautstärke ein, mit der Eingabetaste speichern Sie die Einstellung, mit der Esc-Taste schließen Sie das Menü, ohne die Einstellung zu speichern. Abbildung 6.10 Mit der Esc-Taste oder der Stopp-Taste gelangen Sie wieder zur Funktionsauswahl zurück.
z Video-Menü In dieses Menü gelangen Sie, wenn Sie das Videosymbol auswählen und die Auswahl mit der Eingabetaste bestätigen. Das System sucht nach Videodateien auf dem angeschlossenen Speichermedium und spielt diese automatisch ab. Bei laufender Videowiedergabe können Sie mit der Aufwärtstaste das Lautstärke-Menü öffnen; die Bedienung erfolgt wie weiter oben beschrieben. Mit der Eingabe-/Esc-Taste können Sie die Videosteuerungsleiste (Abbildung 6.11) ein- und ausblenden. Abbildung 6.
z Dateimanager Der vorletzte Menüpunkt ist der Dateimanager. Mit der Rechtstaste wählen Sie das gewünschte Speichermedium, anschließend drücken Sie die Eingabetaste oder die Rechtstaste zum Anzeigen der jeweiligen Inhalte (Abbildung 6.14). Eine Vorschau von Bilddateien wird auf der rechten Seite angezeigt. Wenn sich in einem Ordner Bilder und Musikdateien befinden, werden Bilder angezeigt, die Musik wird abgespielt. Abbildung 6.14 In der Dateiliste können Sie Dateien löschen und kopieren.
Dateien auswählen: Wählen Sie die gewünschte Datei mit den Links-/Rechtstasten aus. Drücken Sie die Rechtstaste: Links neben dem Dateinamen wird das Auswahlsymbol “ angezeigt (Abbildung 6.15). Falls Sie die Auswahl wieder aufheben möchten, „ drücken Sie die Rechtstaste noch einmal. Sie können auch mehrere Dateien auf einmal auswählen. (Abbildung 6.16) Abbildung 6.
Abbildung 6.17 Abbildung 6.18 Datei kopieren: Nachdem Sie die gewünschte Datei ausgewählt haben, wechseln Sie zum Zielordner und öffnen das Dateimanager-Menü mit der Eingabetaste. Anschließend blenden Sie das Funktionsmenü ein, indem Sie die Eingabetaste mit den länger gedrückt halten. Wählen Sie nun das Symbol Aufwärts-/Abwärtstasten aus. Die ausgewählte Datei wird in den Zielordner kopiert (Abbildung 6.19).
Technische Daten Modellcode LC-Display Fotowiedergabe Funktion Videowiedergabe Audiowiedergabe Speicherunterstützung LC-Display 20 cm-TFT-LCD, 158 x 99,36 mm Auflösung RGB, 800 x 480 Anzeigeformat 16:9 Format JPEG (YUV-Codierung) Max. Auflösung 12 M Auto-Diaschau Ja Funktion Mit Uhrzeit, Kalender und Wecker Alarmsignal MP3s können (ab Mai-Firmware) verwendet werden Kalenderbild Kann (ab Mai-Firmware) vom Anwender geändert werden Format MJPEG, MPEG-1 (*.mpg, *.mpeg, *.
Avant-propos Merci beaucoup pour l'achat ce de produit. Nous avons investi beaucoup de temps et d'efforts dans son développement afin de vous assurer des années d'utilisation sans problème pour votre cadre photo numérique. Avis de Sécurité 1. Ne faites pas tomber, ne perforez pas et ne démontez pas le cadre photo numérique, autrement la garantie serait annulée. 2. Évitez tout contact avec de l'eau et séchez les mains avant utilisation. 3.
Démarrage Monet est un cadre photo numérique facile à utiliser. Il permet d'afficher photos et films en haute résolution, de lire des MP3 comme musique d'ambiance et de combiner différentes photos en un diaporama. Il prend en charge les lecteurs flash USB, CF, SD, MMC et MS Pro.
Panneau avant 1. 2. 3. 4. 5. Écran Décoration Cadre avant Support Bouton de verrouillage cadre avant-arrière Panneau arrière 6. Bouton Echap 7. Bouton Entrée 8. Haut-parleur 9. Bouton circulaire 10. LED d'alimentation 11. Alimentation/Interrupteur LED Panneau inférieur 12. Port USB 13. Prise 5V DC 14. Port pour carte SD 15.
Après mise sous tension Avant de mettre sous tension, assurez-vous que l'adaptateur est correctement connecté et que le cadre photo est allumé. Après mise sous tension, l'interface de démarrage affichée à l'écran dépend du réglage "Config. de démarrage". L'utilisateur peut également choisir entre calendrier, image, musique, film et liste de fichiers dans l'interface de démarrage. Le réglage d'usine par défaut est "Image".
Figure 6.
Fonctions du cadre photo numérique Les pages suivantes présentent les différentes fonctions et menus du cadre photo. Lorsque vous choisissez une carte mémoire ou une mémoire USB ou NAND et appuyez sur "ENTRÉE", l'écran Sélection fonct s'affiche. (1) Image (2) Musiq (3) Film (4) Gestionnaire de fichier (5) Setup En utilisant le bouton circulaire et les boutons ENTRÉE et ECHAP, vous pouvez naviguer entre les éléments du menu affiché, et arrêter le diaporama en cas de diaporama automatique.
z La configuration Ensuite vous devez vous familiariser avec les réglages possibles. Sélectionnez l'élément "Setup" et confirmez votre choix avec le bouton ENTRÉE. La fenêtre suivante apparaît alors et vous pouvez y voir les options mentionnées ci-dessous. Dans l'interface de Sélection fonct., utilisez le bouton circulaire (Haut & Bas) pour changer de sélection.
: Setup image, comprenant les deux éléments "mode diaporama", "Mode de lecture d'image". Dans l'élément "mode diaporama" l'utilisateur peut régler la vitesse du diaporama, les choix comprennent "Rapide" "Moyen" et "Lent". Dans l'élément "Mode de lecture d'image", sont inclus 13 effets de diaporama. : Réglage horloge: Bouton circulaire (gauche & droite) pour commuter entre les éléments; Bouton circulaire (haut & bas) pour modifier les chiffres. : Config.
z Le menu image Lorsque vous choisissez Image et appuyez sur " Entrée", vous obtenez une vue d'ensemble des photos disponibles. Avec le bouton circulaire et le bouton ENTRÉE, vous pouvez sélectionner toute photo pour démarrer le diaporama sur la surface complète de l'écran en appuyant sur "Entrée". Pendant l'affichage de l'image, utilisez le bouton circulaire (gauche & droite) pour afficher l'image précédente ou suivante ; le bouton circulaire (haut) pour ouvrir le menu luminosité de l'écran (figure 6.
Les fonctions de la barre de commande image sont affichées ci-dessous à la figure 6.7. Rotation État Zoom Stop Précédent Affichage infos fichier Résolution image Suivant Vue 3×3 Figure 6.7 Appuyez sur la touche STOP de la barre de commande pour l'interface de sélection fonct. ; appuyez sur le bouton "ECHAP" dans le menu de visualisation image pour revenir aux miniatures 9 images.
z Le menu musique L'icône suivante que vous voyez concerne la partie musique. Pour écouter votre musique préférée dans le lecteur de médias. Sélectionnez l'icône avec le bouton circulaire et confirmez votre sélection avec le bouton ENTRÉE. Vous voyez la fenêtre suivante. Le système recherche les fichiers de musique dans la mémoire actuelle de l'appareil et les lit automatiquement.
Appuyez sur le bouton circulaire (bas) pour ouvrir le menu Volume. Le bouton circulaire (Gauche & Droite) sert à régler le volume, appuyez sur le bouton "ENTRÉE" pour enregistrer les paramètres, appuyez sur le bouton "ECHAP" pour fermer le menu (sans enregistrer les paramètres). Figure 6.10 Appuyez sur le bouton "ECHAP" ou sur la touche STOP pour revenir à l'interface de sélection fonct. de la barre de commande.
z Le menu film Pour atteindre ce menu, choisissez l'icône de film et confirmez avec le bouton ENTRÉE. Le système recherche les fichiers films dans la mémoire actuelle de l'appareil et les lit automatiquement. Pendant la lecture d'un film, appuyez sur le bouton circulaire (haut) pour ouvrir le menu volume (utilisation identique au 1-1). Appuyez sur le bouton "ENTRÉE/ECHAP" pour ouvrir/fermer la barre de commande vidéo (figure 6.11). Figure 6.
z Le gestionnaire de fichiers L'avant dernier élément est le gestionnaire de fichiers. Après avoir utilisé le bouton circulaire (droite) pour choisir le périphérique de mémoire, appuyez sur le bouton "ENTRÉE" ou sur le bouton circulaire (droite) pour visualiser le contenu (figure 6.14), les fichiers images peuvent se prévisualiser sur le côté droit. Si un dossier comprend à la fois des images et de la musique, la musique est lue pendant l'affichage de l'image. Figure 6.
Sélectionner des fichiers: Utilisez le bouton circulaire (haut & bas) pour basculer le curseur sur le fichier cible, appuyez sur le bouton circulaire (droite), à gauche du nom de fichier " (figure 6.15), appuyez de nouveau sur le apparaît le symbole sélectionné " bouton circulaire (droite) pour annuler la sélection. L'utilisateur peut choisir plusieurs fichiers à manipuler. (Figure 6.16) Figure 6.
Figure 6.17 Figure 6.18 Copier des fichiers : Après avoir sélectionné le fichier, basculez sur le dossier cible, et appuyez sur le bouton "ENTRÉE" pour ouvrir le menu du gestionnaire de fichiers, appuyez longuement sur le bouton "ENTRÉE" pour ouvrir le menu des opérations ; et appuyez sur le bouton circulaire (haut & bas) pour déplacer le , le fichier sélectionné est copié vers le dossier cible curseur sur l'icône (figure 6.19).
Données techniques / Spécifications Code modèle Affichage LCD Lecture photo Fonction Lecture de vidéo Lecture audio Prise en charge mémoire Affichage LCD LCD TFT 8 pouces, 158 x 99.
Prefazione Congratulazioni per l’acquisto di questo prodotto. Abbiamo investito molto tempo ed energie nel suo sviluppo per far sì che vi godiate per molti anni senza problemi la vostra cornice digitale. Avviso per la sicurezza 1. Non far cadere, forare o smontare la cornice digitale, diversamente la garanzia sarà annullata. 2. Evitare tutti i tipi di contatto con l’acqua ed asciugarsi le mani prima dell’uso. 3. Non esporre la cornice digitale ad alte temperature o lasciarla alla luce diretta del sole.
Preparazione Monet è una cornice digitale facile da usare. Rende possibile mostrare foto e film ad alta risoluzione, eseguire MP3 come musica di sottofondo e combinare foto diverse in una presentazione. Supporta unità Flash USB, schede CF, SD, MMC e MS Pro.
Pannello frontale 1. 2. 3. 4. 5. Schermo Cornice decorativa Cornice frontale Base Tasto di sblocco cornice decorativa frontale Pannello posteriore 6. Tasto Esc 7. Tasto Enter 8. Altoparlante 9. Tasto di navigazione 10. LED alimentazione 11. Interruttore alimentazione/LED Pannello inferiore 12. Porta USB 13. Connettore CC 5V 14. Porta scheda CF 15.
Dopo l’accensione Prima dell’accensione, assicurasi che l'adattatore di corrente sia collegato correttamente e che la cornice sia accesa. Dopo l’accensione, sullo schermo è mostrata l’interfaccia d’avvio che dipende dall’impostazione eseguita nel menu “Imp. accensione”. Si può anche scegliere di mostrare il calendario, immagini, musica, film o l’elenco file nell’interfaccia d’avvio. L’impostazione predefinita è “Immagini”.
Figura 6.
Funzioni della cornice digitale Nelle pagine che seguono sono presentate le diverse funzioni ed i vari menu della cornice digitale. Quando si sceglie una scheda memoria o una memoria USB o NAND e si premere “ENTER”, sarà visualizzata la schermata di selezione funzione. (1) Immagine (2) Musica (3) Film (4) Gestione file (5) Configurazione Usare il tasto di navigazione ed il tasto ENTER per spostarsi tra le voci del menu e selezionarle. Usare il tasto ESC per terminare la presentazione automatica.
Configurazione È bene familiarizzare con tutte le impostazioni possibili. Selezionare la voce "Configurazione" e confermare premendo il tasto ENTER. Apparirà la seguente finestra e si vedranno le opzioni descritte di seguito. Nell’interfaccia Selezione funzione, usare il tasto di navigazione (su e giù) per spostarsi tra le voci. Usare il tasto di navigazione (sinistra) per confermare la selezione, premere il tasto “ENTER” per accedere al menu di configurazione del sistema. (Figura 6.20). Figura 6.
permette di impostare la velocità della presentazione; include le voci: “Veloce” “Medio” e “Lento”. La voce “Modalità riproduz. immagini” include 13 effetti per la presentazione. : Impostazione orologio: tasto di navigazione (sinistra e destra) per spostarsi tra le voci; tasto di navigazione (su e giù) per cambiare le cifre. : Impostazione sveglia: la cornice digitale ha 3 suonerie predefinite, la configurazione allarme ha due modalità: “Una volta” e “Giornaliera”. : Impostazione avvio: interfaccia d’avvio.
z Menu Immagine Quando si seleziona Immagine e si preme “Enter”, sarà mostrata una panoramica di tutte le foto disponibili. Con il tasto di navigazione ed ENTER si può selezionare qualsiasi foto, premere “Enter” per avviare la presentazione delle immagini a schermo intero. Durante la visualizzazione dell’immagine, usare il tasto di navigazione (sinistra e destra) per visualizzare l’immagine precedente o successiva; il tasto di navigazione (su) apre il menu luminosità dello schermo (Figura 6.
Le funzioni della barra di controllo immagine sono mostrate nella Figura 6.7 che segue. Zoom Rotazione Stato Precedente Stop Mostra info file Risoluzione immagine Successivo Visualizza 3x3 Figura 6.7 Premere il tasto STOP della barra di controllo per tornare all’interfaccia selezione funzione; premere il tasto “ESC” nel menu di visualizzazione immagini per tornare alla schermata di 9 miniature.
z Menu Musica L’icona successiva è relativa alla parte musicale. Permette di ascoltare la musica col lettore multimediale. Selezionare l’icona usando il tasto d navigazione e confermare la selezione usando il tasto ENTER. Si vedrà la finestra che segue. Il sistema cercherà i file musicali nel corrente dispositivo d’archiviazione e la eseguirà automaticamente. Durante l’esecuzione musicale, usare la barra di controllo per controllare le operazioni; le funzioni sono mostrate nella Figura 6.9.
il tasto “ENTER” per salvare i parametri, premere il tasto “ESC” per chiudere il menu (senza salvare i parametri). Figura 6.10 Premere il tasto “ESC” o STOP per tornare all’interfaccia Selezione funzione.
z Menu Film Per accedere a questo menu, scegliere l’icona Film e confermare premendo il tasto ENTER. Il sistema cercherà i file video nel corrente dispositivo d'archiviazione e li eseguirà automaticamente. Durante l’esecuzione del filmato, premere il tasto di navigazione (su) per aprire il menu Volume (le operazioni sono uguali a quelle del punto 1-1). Premere il tasto “ENTER/ESC” per aprire/chiudere la barra di controllo video (Figura 6.11). Figura 6.
z Gestione file La penultima voce è la gestione file. Dopo avere usato il tasto di navigazione (destra) per scegliere il dispositivo d’archiviazione, premere il tasto “ENTER” o il tasto di navigazione(destra) per visualizzate i contenuti (Figura 6.14), i file immagine possono essere visualizzati in anteprima sul lato destro. Se una cartella contiene sia immagini sia musica, quando si visualizza l’immagine la musica sarà eseguita. Figura 6.
Selezione dei file: Usare il tasto di navigazione (su e giù) per spostare il cursore, premere il tasto di navigazione (destra) sulla sinistra del nome apparirà il simbolo di selezione “ ” (Figura 6.15), premere di nuovo il tasto di navigazione (destra) per annullare la selezione. Si può eseguire la selezione multipla di file. (Figura 6.16) Figura 6.16 Eliminazione: Dopo avere selezionato il file, premere a lungo il tasto “ENTER” per aprire il menu operativo (Figura 6.17).
Figura 6.17 Figura 6.18 Copia dei file: dopo avere selezionato il file, portarsi alla cartella di destinazione e premere il tasto “ENTER” per aprire il menu di gestione dei file; premere a lungo il tasto “ENTER” per aprire il menu operativo. Premere il tasto di navigazione (su e , i file selezionati saranno copiati nella giù) e portare il cursore sull’icona cartella di destinazione (Figura 6.19).
Dati tecnici / Specifiche Codice modello Display LCD Riproduzione foto Funzioni Riproduzione video Riproduzione audio Memoria supportata Alimentazione elettrica Interfaccia Display LCD TFT LCD 8 pollici, 158 x 99,36 mm Risoluzione RGB 800 x 480 Rapporto proporzioni 16:9 Formato JPEG (codice YUV) Risoluzione massima 12M Presentazione automatica Sì Funzioni Ora, calendario e sveglia Allarme Si può usare la musica MP3 per la configurazione (in May FW) Immagine calendario Può essere cam
Prólogo Gracias por comprar este producto. Hemos invertido mucho tiempo y esfuerzo en su desarrollo para que pueda disfrutar durante muchos años del marco digital para fotografías sin ningún problema. Aviso de seguridad 1. No deje caer, perfore ni desmonte el marco fotográfico digital; si lo hace, la garantía quedará invalidada. 2. Evite que entre en contacto con el agua y séquese las manos antes de utilizar el producto. 3.
Procedimientos iniciales Monet es un marco digital para fotografías de uso sencillo. Con él puede mostrar películas y fotografías de alta resolución, reproducir archivos MP3 como música de fondo y combinar diferentes fotografías como una presentación de diapositivas. Admite unidades flash USB y tarjetas CF, SD, MMC, MS y MS PRO.
Panel frontal 1. 2. 3. 4. 5. Pantalla Marco decorativo Marco frontal Pie Botón para desmontar o cambiar del marco Panel posterior 6. 7. 8. 9. Botón Escape Botón Aceptar Altavoz Botón de control de desplazamiento 10. LED de encendido 11. Conmutador de LED/alimentación Panel inferior 12. Puerto USB 13. Conector de 5 VCC 14. Puerto para tarjetas CF 15.
Después del encendido Antes de poner en marca la unidad, asegúrese de que el adaptador de alimentación está correctamente enchufado y que el marco para fotografías está enchufado. Después de encender la unidad, la interfaz de inicio mostrada en la pantalla responde a la opción definida en el parámetro “Configuración de inicio”. El usuario puede elegir las opciones de calendario, imágenes, música, películas y lista de archivos, en la interfaz de inicio. La configuración predeterminada de fábrica es "Imagen".
Figura 6.
Funciones del marco digital para fotografías En las páginas siguientes se presentan las diferentes funciones y menús del marco para fotografías. Cuando elija una tarjeta de memoria o una memoria USB o NAND y presione “ACEPTAR”, aparecerá la pantalla Elegir función. (1) Imagen (2) Música (3) Filme (4) Administrador de archivos (5) Configuración Utilice el botón de desplazamiento y el botón ACEPTAR para recorrer los elementos y seleccionarlos.
z Configuración Debe familiarizarse con las distintas configuraciones. Seleccione el elemento "Conf." y confirme la selección con el botón ACEPTAR. Aparecerá la siguiente ventana y podrá ver las opciones mencionadas a continuación. En la interfaz Elegir función, presione el botón de desplazamiento (izquierda) para seleccionar el elemento Config. y presione el botón “ACEPTAR” para entrar en el menú de configuración del sistema (figura 6.20). Figura 6.
puede establecer la velocidad de la presentación de diapositivas. Las opciones disponibles son “Rápido” “Medio” y “Lento”. El elemento “Modo reproducción imágenes” incluye 13 efectos de presentación de diapositivas. Configuración del reloj: use el botón de desplazamiento (izquierda y derecha) para cambiar de campo; use el mismo botón (arriba y abajo) para cambiar los dígitos. Configuración del despertador: el marco para fotografías tiene 3 tonos en el sistema.
z El menú Imagen Cuando seleccione Imagen y presione "Aceptar" aparecerá información general sobre las fotografías disponibles. Con los botones de desplazamiento y ACEPTAR puede seleccionar cualquier foto para iniciar la presentación de diapositivas a tamaño completo de la pantalla. Cuando esté listo, presione “Aceptar”. Durante la visualización de imágenes, use el botón de desplazamiento (izquierda y derecha) para mostrar la imagen anterior o siguiente.
Las funciones de la barra de control de imágenes se muestran en la figura 6.7 siguiente. Girar Estado Zoom Detener Anterior Información de archivo Resolución de la imagen Siguiente Vista 3×3 Figura 6.7 Presione el botón DETENER para volver a la interfaz Elegir función. Presione el botón “ESCAPE” en el menú de visualización de imágenes para volver a la vista de 9 imágenes en miniatura.
z El menú Música El icono siguiente que ve corresponde a la parte musical. Para escuchar su música favorita en un reproductor multimedia, seleccione el icono con el botón de desplazamiento y confirme la selección con el botón ACEPTAR. Aparecerá la ventana que se muestra a continuación. El sistema buscará los archivos de música en el medio de memoria actual y los reproducirá automáticamente. Durante la reproducción de música, utilice la barra de control para realizar la operación de control.
Presione el botón de desplazamiento (abajo) para abrir el menú de volumen (figura 6.10). Use el botón de desplazamiento (izquierda y derecha) para ajustar el volumen. Presione el botón “ACEPTAR” para guardar los parámetros. Presione el botón “ESCAPE” para cerrar el menú sin guardar los parámetros. Figura 6.10 Presione el botón “ESCAPE” o DETENER de la barra de control para volver a la interfaz Elegir función.
z El menú Filme Para abrir este menú, elija el icono de película y confirme la selección con el botón ACEPTAR. El sistema buscará los archivos de vídeo en el medio de memoria actual y los reproducirá automáticamente. Durante la reproducción de la película, presione el botón de desplazamiento (arriba) para abrir el menú de volumen (el mismo funcionamiento que el descrito en 1-1). Presione el botón “ACEPTAR/ESCAPE” para abrir o cerrar la barra de control de vídeo (figura 6.11). Figura 6.
z El administrador de archivos El penúltimo elemento es el administrador de archivos. Después de elegir el medio de memoria mediante el botón de desplazamiento (derecha), presione el botón “ACEPTAR”. Vuelva a presionar el botón de desplazamiento (derecha) para ver el contenido (figura 6.14). En el lado derecho se puede obtener una vista previa de los archivos de imagen. Si una carpeta tiene tanto archivos de imagen como de música, la música se reproducirá cuando se muestren las imágenes. Figura 6.
Seleccionar archivos: Utilice el botón de desplazamiento (arriba y abajo) para colocar el cursor en el archivo de destino. Presione el botón de desplazamiento (derecha); a la izquierda " (figura 6.15). del nombre del archivo aparecerá el símbolo de selección“ Presione el botón de desplazamiento (derecha) de nuevo para cancelar la selección. El usuario puede elegir varios archivos con los que trabajar. (Figura 6.16) Figura 6.
Figura 6.17 Figure 6.18 Copiar archivo: después de seleccionar el archivo, pase a la carpeta de destino y presione el botón “ACEPTAR” para abrir el menú del administrador de archivos. Presione durante unos instantes el botón “ACEPTAR” para abrir el menú de operaciones. Presione el botón de desplazamiento (arriba y abajo) para colocar el . El archivos seleccionado se copiará en la carpeta de destino cursor en el icono (figura 6.19).
Especificaciones técnicas Código del modelo Pantalla LCD Reproducción de fotografías Funciones Reproducción de vídeos Reproducción de audio Memorias compatibles Pantalla LCD Pantalla LCD TFT de 8 pulgadas y 158 x 99,36 mm Resolución 800 x 480 RGB Relación de aspecto 16:9 Formato JPEG (código YUV) Resolución máxima 12 M Presentación de diapositivas automática Sí Funciones Hora, calendario y despertador Alarma Puede utilizar la música MP3 para la configuración (FW) Imagen del calendario
Voorwoord Hartelijk bedankt voor uw aankoop van dit product. Wij hebben bij de ontwikkeling tijd noch inspanningen gespaard zodat u jarenlang probleemloos kunt genieten van uw digitale fotolijst Veiligheidsrichtlijnen 1. Laat de digitale fotolijst niet vallen, prik er geen gaten in of demonteer het apparaat niet, anders vervalt de garantie. 2. Vermijd elk contact met water en droog uw handen voordat u het apparaat gebruikt. 3. Stel de fotolijst niet bloot aan hoge temperaturen of direct zonlicht.
Aan de slag De Monet is een gebruiksvriendelijke digitale fotolijst. U kunt foto's en films met een hoge resolutie weergeven, MP3 afspelen als stemmingsmuziek en verschillende foto's combineren in een diavoorstelling. Monet ondersteunt USB-flashstation, CF, SD, MMC en MS PRO.
Voorpaneel 1. 2. 3. 4. 5. Scherm Decoratieve lijst Voorkant lijst Voetstuk Lijstontgrendelingsknop Achterpaneel 6. Esc-knop 7. Enter-knop 8. Luidspreker 9. Cirkelknop 10. Voedings-LED 11. Voeding/LED-schakelaar Onderpaneel 12. USB-poort 13. DC 5V-aansluiting 14. CF-kaartsleuf 15.
Na het inschakelen Controleer voordat u de voeding inschakelt, of de voedingsadapter correct is aangesloten en of de fotolijst is ingeschakeld. Na het inschalen is de opstartinterface die op het scherm wordt weergegeven, afhankelijk van de instelling "Start instellen". U kunt ook een kalender, foto, muziek, film of bestandslijst selecteren in de opstartinterface. De standaardinstelling is “Foto”.
Figuur 6.
Functies van de digitale fotolijst Op de volgende pagina's worden de verschillende functies en menu's van de fotolijst voorgesteld. Wanneer u een geheugenkaart, USB of NAND-geheugen kiest en op "ENTER" drukt, wordt het scherm voor de functieselectie weergegeven. (1) Foto (2) Muziek (3) Film (4) Bestandsbeheer (5) Instelling Gebruik de Cirkelknop en ENTER om te navigeren door de items (en ze te selecteren). Gebruik de ESC-knop om de automatische diavoorstelling te stoppen.
z De instelling Vervolgens moet u kennismaken met de mogelijke instellingen. Selecteer het item "Instelling" en bevestig uw keuze door op de knop ENTER te drukken. Het volgende venster verschijnt waarin u de hieronder vermelde opties kunt zien. In de functieselectie-interface gebruikt u de Cirkelknop (omhoog & omlaag) om te schakelen tussen items. Duw de Cirkelknop naar links om uw selectie te bevestigen en druk op de knop Enter om het systeeminstellingsmenu te openen (figuur 6.20). Figuur 6.
"Snel", "Gem." of "Traag". In de "fotoweergavemodus" zijn er 13 effecten voor de diavoorstelling voorzien. : Klok instellen: Cirkelknop (links & rechts) om te schakelen, Cirkelknop (omhoog & omlaag) om de cijfers te wijzigen. : Wekker instellen: de fotolijst heeft 3 tonen in het systeem. In de alarminstelling zijn er twee modi: "eenmaal" en "dagelijks" : Start instellen: Opstartinterface. U kunt een foto, muziek, film, bestandslijst en kalender instellen als de opstartinterface.
z Het menu Afbeelding Wanneer u Afbeelding selecteert en op "Enter" drukt, krijgt u een overzicht van de beschikbare foto's. Met de cirkelknop en de ENTER-knop kunt u elke foto selecteren om de diavoorstelling te starten op het complete formaat van het display. Tijdens de weergave kunt u met de cirkelknop (links & rechts) de vorige of volgende foto weergeven. De cirkelknop (omhoog) opent het menu om de helderheid van het scherm in te stellen (figuur 6.5a).
De functies van de beeldbesturingsbalk worden weergegeven zoals in de onderstaande figuur 6.7. Draaien Zoom Stop Status Vorige Bestandsinfo tonen Beeldresolutie Volgende 3×3 weergeven Figuur 6.7 Druk op de STOP-toets in de besturingsbalk om de interface voor de functieselectie weer te geven. Druk op de knop "ESC" om het beeldweergavemenu te openen en 9 miniatuurafbeeldingen weer te geven.
z Het menu Muziek Het volgende pictogram dat u ziet, is het muziekgedeelte. Om uw favoriete muziek te beluisteren via een mediaspeler. Selecteer het pictogram met de cirkelknop en bevestig uw selectie met de ENTER-knop. U ziet het volgende venster. Het systeem zoekt muziekbestanden in de huidige geheugenmedia en speelt ze automatisch af. Tijdens de muziekweergave kunt u de besturingsbalk gebruiken om de functies die in figuur 6.9 worden weergegeven, te bedienen.
Druk op de cirkelknop (omlaag) om het menu Volume te openen (figuur 6.10). Druk op de cirkelknop (omlaag) om het menu Volume te openen. Gebruik de cirkelknop (links en rechts) om het volume te regelen. Druk op de "ENTER"-knop om de parameters op te slaan of druk op knop "ESC" om het menu te sluiten (en de parameters niet op te slaan). Figuur 6.10 Druk op de knop "ESC" of druk op STOP om terug te keren naar de interface van de functieselectie met de besturingsbalk.
z Het menu Film Om dit menu te openen, selecteert u het filmpictogram en bevestigt u met de ENTER-knop. Het systeem zal de videobestanden op de huidige geheugenmedia zoeken en ze automatisch afspelen. Druk tijdens het afspelen van een film op de cirkelknop (omhoog) om het menu Volume te openen (gebruik zoals 1-1). Druk op de knop "ENTER/ESC" om de videobesturingsbalk te openen/sluiten (figuur 6.11). Figuur 6.11 De functies van de videobesturingsbalk worden weergegeven zoals in de onderstaande figuur 6.
z Het bestandsbeheer Het voorlaatste item is het Bestandsbeheer. Nadat u de cirkelknop (rechts) hebt gebruikt om het geheugenmedium te kiezen, drukt op de "ENTER"-knop of de cirkelknop (rechts) om de inhoud te bekijken (figuur 6.14). Een voorbeeld van de fotobestanden wordt rechts weergegeven. Als een map zowel foto's als muziek bevat, wordt de muziek afgespeeld wanneer de foto wordt weergegeven. Figuur 6.14 U kunt bestanden selecteren in de lijst om ze te verwijderen of te kopiëren.
Bestanden selecteren: Gebruik de cirkelknop (omhoog & omlaag) om de cursor te verplaatsen naar het doelbestand. Druk op de cirkelknop (rechts) links van de bestandsnaam. Het pictogram ” verschijnt (figuur 6.15). Druk opnieuw op de cirkelknop (rechts) om de selectie te “ annuleren. U kunt meerdere bestanden selecteren om ze te gebruiken. (Figuur 6.16) Figuur 6.16 Verwijderen: Houd de knop "ENTER" lang ingedrukt nadat u een bestand hebt geselecteerd om het bedieningsmenu te openen (Figuur 6.17).
Figuur 6.17 Figuur 6.18 Bestand kopiëren: nadat u een bestand hebt geselecteerd, gaat u naar de doelmap en drukt u op de "ENTER"-knop om het menu Bestandsbeheer te openen. Houd de "ENTER"-knop lang ingedrukt om het bedieningsmenu te openen en druk op de cirkelknop (omhoog & omlaag) om de cursor te verplaatsen naar het pictogram . Het geselecteerde bestand wordt gekopieerd naar de doelmap (figuur 6.19).
Technische gegevens/ specificaties Modelcode LCD-scherm Fotoweergave functie Videoweergave Audioweergave Geheugenondersteuning LCD-scherm 8" TFT LCD, 158 x 99.36 mm Resolutie 800RGB x 480 Breedte/hoogte-verhouding 16:9 Indeling JPEG (YUV-code) Max. resolutie 12M Auto diavoorstelling Ja functie Met tijd, kalender en wekker Spraakalarm Kan MP3-muziek gebruiken voor instelling (in May FW) Kalenderfoto Kan worden gewijzigd door gebruiker (in May FW) Indeling MJPEG, MPEG-1 (*.mpg,*.
Introdução Obrigado por ter comprado este produto. Investimos muito tempo e esforço no seu desenvolvimento para que possa desfrutar da sua moldura digital por muitos anos e sem problemas. Normas de segurança 1. Não deixe a moldura digital cair e não a fure ou desmonte; caso contrário a garantia perde a validade. 2. Evite todo o contacto com a água e seque as mãos antes de utilizar o dispositivo. 3. Não exponha a moldura digital a temperaturas elevadas e não a deixe exposta à luz solar directa.
Introdução A moldura digital Monet é muito fácil de utilizar. Com esta moldura digital pode ver fotos e filmes de alta resolução, reproduzir ficheiros de música MP3 e ainda combinar várias fotos para as ver como uma apresentação de diapositivos. A moldura digital Monet é compatível com unidades flash USB e com cartões de memória, CF, SD, MMC e MS PRO. Conteúdo da embalagem Moldura digital de 8” Suporte para a moldura Transformador a.c./d.c.
Painel frontal 1. 2. 3. 4. 5. Ecrã Moldura decorativa Moldura frontal Suporte Botão da moldura Painel traseiro 6. Botão Esc 7. Botão Enter 8. Altifalante 9. Botão de navegação 10. LED de alimentação 11. Botão de alimentação/LED Painel inferior 12. Porta USB 13. Tomada de entrada d.c. de 5 V 14. Porta para cartão de memória CF 15.
Depois de ligar a moldura digital Antes de ligar a moldura digital, certifique-se de que o transformador está devidamente ligado e de que a moldura foi activada. Depois de ligar a moldura digital, a interface mostrada depende da opção que tenha escolhido na definição “Configurar arranque”. Pode também definir a interface que quer ver aquando do arranque podendo optar entre o calendário, ficheiros de imagem, de música, de vídeo ou ver a lista de ficheiros.
Figura 6.
Funções da moldura digital Nas páginas seguintes, iremos apresentar-lhe as várias funções e menus desta moldura digital. Depois de escolher um cartão de memória ou uma unidade USB ou NAND, prima “ENTER”. O ecrã Escolher função é apresentado. (1) Imagem (2) Música (3) Filme (4) Gestor de ficheiros (5) Configurar Com a ajuda do botão de navegação e do botão ENTER pode navegar pelos (e seleccionar) vários itens do menu respectivo. Se tiver uma apresentação de diapositivos em curso pode pará-la com o botão ESC.
z O menu Configurar Familiarize-se com as várias definições da sua moldura digital. Seleccione a opção “Configurar” e confirme premindo o botão ENTER. A janela seguinte é apresentada e nela poderá ver as opções descritas a seguir. No ecrã Escolher função, utilize o botão de navegação (para a esquerda) para escolher o item “Configurar”. Prima o botão “ENTER” para aceder ao menu de configuração do sistema. (Figura 6.20). Figura 6.20 No ecrã Configurar, utilize os botões da forma abaixo descrita.
da imagem”, existem 13 efeitos de transição que podem ser aplicados à apresentação de diapositivos. : Acertar relógio: Utilize o botão de navegação (para a esquerda e para a direita) para aceder aos vários campos. Utilize o botão de navegação (para cima e para baixo) para alterar os dígitos. : Programar alarme: A moldura digital inclui 3 toques enquanto que a opção Programar alarme apenas inclui duas opções, “Uma” e “Todos os dias” : Configurar arranque: Para configurar a interface de arranque.
z O menu Imagem Seleccione a opção Imagem e prima o botão “Enter” para ver as imagens disponíveis. Utilize o botão de navegação e o botão ENTER para seleccionar a foto pretendida e dar início à apresentação de diapositivos em ecrã inteiro premindo novamente o botão “Enter”. Durante a apresentação das imagens, utilize o botão de navegação (para a esquerda e para a direita) para ver a imagem anterior ou seguinte. Utilize o botão de navegação (para cima) para aceder ao menu de ajuste do brilho (figura 6.
As funções existentes na barra de controlo da imagem são mostradas na figura 6.7. Rodar Estado Zoom Anterior Parar Mostrar info do ficheiro Resolução da imagem Seguinte Ver 3×3 Figura 6.7 Prima o botão PARAR na barra de controlo para voltar ao ecrã Escolher função; Prima o botão “ESC” para voltar ao ecrã de miniaturas onde poderá ver 9 imagens em miniatura.
z O menu Música O ícone seguinte é o ícone da opção Música. Esta função permite-lhe ouvir os seus ficheiros de música favoritos através do Media Player. Utilize o botão de navegação para seleccionar o ícone desta opção e confirme com o botão ENTER. Será apresentada a janela seguinte. O sistema irá procurar os ficheiros de música guardados na memória e reproduzi-los automaticamente. Durante a reprodução dos ficheiros de música, o utilizador pode usar a barra de controlo para controlar a reprodução.
novamente a barra de controlo. Prima o botão de navegação (para baixo) para aceder ao menu Volume (Figura 6.10). Prima o botão de navegação (para baixo) para aceder ao menu Volume (Volume). Utilize o botão de navegação (para a esquerda e para a direita) para ajustar o volume, prima o botão “ENTER” para guardar a definição e prima o botão “ESC” para fechar o menu (o botão “ESC” não guarda as definições). Figura 6.
z O menu Filme Para aceder a este menu escolha o ícone respectivo e confirme premindo o botão ENTER. O sistema irá procurar os ficheiros de vídeo guardados na memória e reproduzi-los automaticamente. Durante a reprodução dos ficheiros de vídeo, prima o botão de navegação (para cima) para aceder ao menu Volume (O procedimento a seguir é igual ao descrito na secção 1-1) . Prima o botão “ENTER/ESC” para abrir/fechar a barra de controlo da função de reprodução de vídeo (Figura 6.11) . Figura 6.
z O menu Gestor de ficheiros O penúltimo item é o Gestor de ficheiros. Utilize o botão de navegação (para a direita) para escolher o tipo de memória e depois prima o botão “ENTER” ou utilize o botão de navegação (para a direita) para ver o conteúdo da mesma (Figura 6.14). Os ficheiros de imagem podem ser pré-visualizados no lado direito do ecrã. Se uma pasta incluir ficheiros de imagem e de música, durante a reprodução dos ficheiros de imagem poderá ouvir também os ficheiros de música. Figura 6.
Na lista de ficheiros, pode seleccionar ficheiros para eliminar ou copiar. Para seleccionar ficheiros: Utilize o botão de navegação (para cima e para baixo) para deslocar o cursor para o ficheiro pretendido. Prima o botão de navegação (para a direita), à esquerda do ” (Figura 6.15), Prima novamente o botão de nome do ficheiro verá o ícone “ navegação (para a direita) para cancelar a selecção. O utilizador pode seleccionar vários ficheiros em simultâneo. (Figura 6.16) Figura 6.
Figura 6.17 Figura 6.18 Copiar ficheiros: Depois de ter seleccionado o ficheiro pretendido, escolha a pasta de destino e prima o botão “ENTER” para abrir o menu Gestor de ficheiros. Prima demoradamente o botão “ENTER” para aceder ao menu e prima o botão de navegação (para cima e para baixo) para deslocar o cursor para o ícone .O ficheiro seleccionado é assim copiado para a pasta de destino. (Figura 6.19).
Especificações Código do modelo Ecrã LCD Reprodução de fotos Funções Reprodução de vídeo Reprodução de áudio Memória suportada Fonte de alimentação Interface Ecrã LCD LCD TFT de 8" (158 x 99,36 mm) Resolução 800RGB x 480 Relação de aspecto 16:9 Formato JPEG (código YUV) Resolução máxima 12 M Apresentação automática de diapositivos Sim Funções Apresentação da hora, do calendário e do alarme Alarme por voz Ficheiros de música MP3 (no firmware de Maio) Imagem do calendário Definida pe
Wstęp Dziękujemy za zakupienie tego produktu. Poświęciliśmy wiele czasu i wysiłku w opracowanie ramki do zdjęć cyfrowych, która może służyć bezawaryjnie przez wiele lat. Uwaga dotycząca bezpieczeństwa 1. Nie należy upuszczać, nakłuwać lub rozbierać ramki do zdjęć cyfrowych, w przeciwnym razie nastąpi unieważnienie gwarancji. 2. Należy unikać kontaktu z wodą i przed użyciem należy wysuszyć ręce. 3. Nie należy narażać ramki do zdjęć na wysoką temperaturę lub pozostawiać ją bezpośrednio na słońcu.
Wprowadzenie Monet to łatwa w użyciu ramka do zdjęć cyfrowych. Ramka umożliwia pokazywanie wysokiej rozdzielczości zdjęć i filmów, odtwarzanie MP3 jako nastrojowej muzyki oraz łączenia różnych zdjęć w formie pokazu slajdów. Urządzenie obsługuje napęd USB flash, CF, SD, MMC, MS i MS PRO.
Panel przedni 1. 2. 3. 4. 5. Ekran Ramka ozdobna Ramka przednia Podstawa Przycisk odblokowania ramki przedniej Panel tylny 6. Przycisk Esc 7. Przycisk Enter 8. Głośnik 9. Okrągły przycisk 10. Dioda LED zasilania 11. Przełącznik zasilania/LED Panel dolny 12. Port USB 13. Gniazdo prądu stałego 5V 14. Port karty CF 15.
Zawsze włączone Przed włączeniem zasilania, upewnij się, że prawidłowo podłączony adapter jest zasilania oraz, że włączona jest ramka do zdjęć. Interfejs widoczny na ekranie po włączeniu zasilania zależy od ustawień “Ustawienia StartUp”. Po uruchomieniu można wybrać wyświetlanie w interfejsie startowym kalendarz, obraz, muzykę, film, listę plików. Domyślne ustawienie fabryczne to “Obraz”.
Rysunek 6.
Funkcje ramki do zdjęć cyfrowych Na następujących stronach pokazane są różne funkcje i menu ramki do zdjęć. Po wybraniu karty pamięci lub pamięci USB albo NAND i naciśnięciu “ENTER”, wyświetlony zostanie ekran wyboru funkcji. (1) Obraz (2) Muzyka (3) Film (4) Menedżer plików (5) Ustawienia Okrągły przycisk i przycisk ENTER, umożliwiają nawigację pomiędzy wyświetlanymi elementami menu. Przycisk ESC umożliwia zatrzymanie automatycznego pokazu slajdów.
z Ustawienia Następnie należy poznać możliwości ustawień. Wybierz element "Ustawienia" i potwierdź wybór przyciskiem ENTER. Pojawi się następujące okno z wymienionymi poniżej opcjami. Naciśnij okrągły przycisk w lewo, aby wybrać element „Ustawienia” i naciśnij “ENTER” w celu przejścia do menu ustawień systemu. (rysunek 6.20). Rysunek 6.20 Użyj do działania pokazanych poniżej definicji przycisków w interfejsie Ustawienia. Przycisk okrągły (w górę i w dół) : przełączanie elementów lub wybór parametrów.
ustawić szybkość pokazu slajdów, obejmuje ona opcje “Szybki” “Średni” i “Wolny”. Pozycja “tryb odtwarzania obrazu”, obejmuje 13 efektów pokazu slajdów. : Ustawienie zegara. Przełączanie przyciskiem okrągłym (w lewo i w prawo) pomiędzy elementami; Zmiana wartości przyciskiem okrągłym (w górę i w dół). : Ustawienie alarmu: W ustawieniach alarmu systemu ramki zdjęć znajdują się 3 dzwonki dostępne w dwóch trybach, “jednorazowe” i “codzienne” : Start Up Set (Ustawienia Start Up): Uruchomienie interfejsu.
z Menu obrazu Po wybraniu Obraz i naciśnięciu “Enter” pojawi się opis dostępnych zdjęć. Przyciskiem okrągłym i przyciskiem ENTER można wybrać dowolne zdjęcie, aby uruchomić pokaz slajdów w pełnym rozmiarze, poprzez naciśnięcie “Enter”. Podczas wyświetlania obrazu, przycisk okrągły (w lewo i w prawo) umożliwia wyświetlenie poprzedniego lub następnego obrazu; przycisk okrągły (w górę) otwiera menu jasności ekranu (rysunek 6.5a), przycisk okrągły (w dół) otwiera menu głośności (rysunek 6.
Funkcje paska sterowania obrazem, są pokazane poniżej na rysunku 6.7. Obrót Stan Zoom Zatrzymanie Poprzedni Pokaż informacje o pliku Następny Rozdzielczość obrazu Widok 3×3 Rysunek 6.7 Naciśnij przycisk ZATRZYMAJ na pasku sterowania w celu wyboru interfejsu; Naciśnij przycisk “ESC” w menu widoku obrazu, aby powrócić do widoku 9-miniaturek.
z Menu muzyki Następna wyświetlana ikona dotyczy części muzycznej. Słuchanie ulubionych utworów muzycznych w odtwarzaczu multimediów. Wybierz ikonę przyciskiem okrągłym i potwierdź wybór przyciskiem ENTER. Pojawi się następujące okno. System wyszuka pliki z muzyką w aktualnie wykorzystywanej pamięci i automatycznie je odtworzy. Podczas odtwarzania muzyki, do sterownia służy pasek sterowania, funkcje są pokazane na rysunku 6.9.
Naciśnij przycisk okrągły (w dół), aby otworzyć menu Volume (Głośność). Wyreguluj okrągłym przyciskiem głośność (w lewo i w prawo), naciśnij przycisk “ENTER”, aby zapisać parametry, naciśnij przycisk “ESC”, aby zamknąć menu (bez zapisywania parametrów). Rysunek 6.10 Naciśnij przycisk “ESC” lub naciśnij przycisk ZATRZYMAJ, aby powrócić do interfejsu wyboru funkcji na pasku sterowania.
z Menu filmu Aby wyświetlić to menu wybierz ikonę filmu i potwierdź przyciskiem ENTER. System wyszuka pliki video w aktualnie wykorzystywanej pamięci i odtworzy je automatycznie. Podczas odtwarzania filmu, naciśnij okrągły przycisk (W górę), aby otworzyć menu głośności (Te same czynności co w części 1-1). Naciśnij przycisk “ENTER/ESC”, aby otworzyć/zamknąć pasek sterowania video (rysunek 6.11). Rysunek 6.11 Pasek sterowania video jest pokazany na rysunku 6.12.
z Menedżer plików Element przedostatni jest elementem menedżera plików. Po użyciu przycisku okrągłego (w prawo) do wyboru pamięci, naciśnij przycisk “ENTER” lub przycisk okrągły (w prawo) dla uzyskania widoku zawartości (rysunek 6.14), pliki z obrazami są wyświetlane po prawej. Jeśli folder zawiera obrazy i muzykę, podczas wyświetlania obrazu odtwarzana jest muzyka. Rysunek 6.14 Użytkownik może wybrać z listy pliki do usunięcia lub do skopiowania.
naciśnij przycisk okrągły (w prawo), z lewej strony nazwy pliku pojawi się wybrany symbol ” ” (rysunek 6.15), naciśnij ponownie przycisk okrągły (w prawo), aby anulować wybór. Użytkownik może wybrać wiele plików. (Rysunek 6.16) Rysunek 6.16 Delete (Usuń): Po wybraniu pliku, naciśnij dłużej przycisk “ENTER”, aby otworzyć menu operacji. (Rysunek 6.17). Naciśnij przycisk okrągły (w górę i w dół) i przesuń kursor na ikonę , naciśnij przycisk “ENTER” w celu potwierdzenia, wybrane pliki zostaną usunięte.
Rysunek 6.17 Rysunek 6.18 Kopiuj plik : Po wybraniu pliku, przełącz na docelowy folder i naciśnij przycisk “ENTER”, aby otworzyć menu zarządzania plikami, naciśnij długo przycisk “ENTER”, aby otworzyć menu operacji i naciśnij przycisk okrągły (w górę i w dół) w , wybrany plik zostanie skopiowany do celu przeniesienia kursora do ikony foldera docelowego (rysunek 6.19). Przy braku miejsca w pamięci urządzenia, pojawi się informacja o błędzie, a operacja kopiowania zostanie zakończona niepowodzeniem.
Dane techniczne / Specyfikacja Kod modelu Wyświetlacz LCD Odtwarzanie zdjęć Wyświetlacz LCD 8-calowy TFT LCD, 158 x 99,36mm Rozdzielczość 800RGB x 480 Współczynnik proporcji 16:9 Format JPEG (kod YUV) Maksymalna rozdzielczość 12M Automatyczny pokaz slajdów Tak funkcja Z czasem, kalendarzem i alarmem Głos alarmu Możliwość używania do ustawień MP3 ( w opcji May FW) Obraz kalendarza Możliwość zmiany przez użytkownika (w opcji May FW) Format MJPEG, MPEG-1(*.mpg,*.mpeg,*.dat)MPEG-2 (*.mpg,*.