Welcome: Dear user, thank you for purchasing this product. Much investment in time and effort has gone into its development, and it is our hope that it will give you many years of trouble-free service. FCC Compliance Statement: This device complies with Part 15 of the FCC Rules. Operation is subjected to the following two conditions: (1) this device may not cause harmful interference, and (2) this device must accept any interference received, including interference that may cause undesired operation.
Safety Notice: 1. Do not drop, puncture or disassemble the camcorder; otherwise the warranty will be voided. 2. Avoid all contact with water, and dry hands before using. 3. Do not expose the camcorder to high temperature or leave it in direct sunlight. Doing so may damage the camcorder. 4. Use the camcorder with care. Avoid pressing hard on the camcorder body. 5. For your own safety, avoid using the camcorder when there is a storm or lightning. 6. Do not use batteries of different specifications.
Table of Contents Getting Started................................................................. 1 Product overview................................................................................... 1 Loading the battery................................................................................ 2 Charging the battery.............................................................................. 2 Powering on or off / Using a memory card............................................ 3 Setting language...
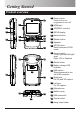
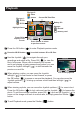
Getting Started Product overview 7 4 1 Power button - Press to turn on; long-press to turn off 2 HDMI port 1 3 SD/SDHC card slot 2 4 2D/3D display 5 3 6 8 5 Record button 9 10 6 Shutter button 11 7 Speaker 8 2D/3D button - Switch between 2D/3D mode 9 5-way joystick 13 14 5-way: up/down/left/right/ enter Enter: OK or Playback 10 Delete button 11 Battery charge LED indicator 12 USB switch - 15 Slide downward to use the USB connector 12 16 13 Right lens - For 2D and 3D capture 14 Le
Loading the battery 1.1 2 Place the battery into the compartment. Align the + and - metallic ends carefully. 1.2 1 Press the “3D” mark and then, while pressing, pull the battery cover to remove it. 3 Replace the battery cover. Note that the + and - metallic contacts must be aligned with the corresponding contacts in the compartment. Charging the battery Before charge: Power off the unit first and make sure the Li-ion battery is installed. Make sure your PC is powered on during the charge.
Powering on or off / Using a memory card Press the power button to power on the unit. Press and hold down for 2 seconds to turn off the unit. Insert a SD/SDHC card (sold separately) into the slot until it clicks into place. To remove the card, push the card to release it and then pull it out gently. If the unit cannot be powered on, please check the followings: 1) The battery is correctly loaded; 2) The loaded battery has enough power.
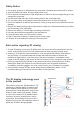
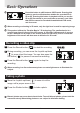
Basic Operations Press this button to shift between 2D/3D mode. Pressing this button in preview will determine whether the recorded file is 2D or 3D. Pressing this button in playback will let you see the 2D or 3D files stored in your camcorder or memory card. Note that 3D files cannot be recorded/viewed/deleted in 2D mode, and vice versa. When recording or shooting in 2D mode, only the right lens is used for capturing image. This product utilizes the “Parallax Barrier” 3D technology.
Playback File type 1: : 2D file : 3D file File type 2: : video : picture Current file/Total files 0001/0010 Battery life Storage: : internal : memory card Highlight frame Press OK to display in full screen 1 Press the OK button ( Press the 2D/3D button ( Press Shutter to return to previous screen ) to enter Playback preview mode. ) to switch between 2D or 3D files. 2 Use the Joystick ( ) to navigate through your recordings and select a file. Press OK ( ) to view the file in full screen.
Deleting files 1 Press the OK button ( use the Joystick ( ) to enter Playback mode and ) to select a file. 2 Press the Delete button ( ) and 3 options will be available: Option 1 Description 2 Yes Delete the selected file No Exit menu without deleting the file All Delete all video and image files in the same folder (3D or 2D) Menu operations 1 Push the Joystick to the right ( 2 Move the Joystick up/down ( and Press OK ( ) to enter. ) to bring up menu.
* Flicker table: Region England Germany France Italy Spain Netherlands Setting 50Hz 50Hz 50Hz 50Hz 50Hz 50Hz 50Hz Region Portugal America Taiwan China Japan Korea Thailand Setting 50Hz 60Hz 60Hz 50Hz 50/60Hz 60Hz 50Hz Russia Note: The flicker setting is based on the frequency standard of your local power supply. File management on PC Connect the USB connector of the camcorder to your PC. Power on the camcorder and the LED will turn green.
Connecting to HDTV 4 3 2 HDMI port 1 1 Turn on your HDTV. 2 Connect the HDMI-in connector (the larger end) of the HDMI cable to the HDTV. 3 Connect the other end of the HDMI cable to your camcorder. 4 Turn on the camcorder. 5 On your HDTV, select the HDMI input port where the HDMI cable is connected. 6 Switch your camcorder to Playback mode and start to play a file. For operation details please refer to the “Playback” section.
Appendix Battery life / Capacity table Battery Life Table Still picture Number of shots 1000 * The unit is set to 3D mode. Video clip Recording time (minute) 60 Note: This table is for your reference only. The actual battery life depends on your battery quality and recharge level. Capacity Table Memory (SD/SDHC) 2GB 4GB 8GB 16GB Video clip (min.
Specifications Item Specification Image Sensor 5 Mega-pixels CMOS (2592 x 1944) x 2 Resolution Camcorder: HD 720p 30f (1280 x 720) Camera: 5M File Format MP4 (H.264), JPEG Video Frame Rate 30 frames per second Internal Memory Yes External Memory SD card slot (supports 256MB up to 32GB SDHC) LCD Display 2.4” 3D TFT supports 3D and 2D mode display 3D/2D capture Yes, switchable Lens Fixed focus lens x 2 Focus Range 1m~∞ Aperture Range F3.0 Shutter Speed 1 ~ 1/2000 sec.