
User's Manual

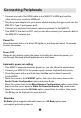


Connecting Peripherals
Power On
Power OFF
Reminder
Automatic power-on setting
* Connect one end of the HDMI cable to the MINI PC's HDMI port and the
other end to your monitor's HDMI port.
* Plug the power adapter into your power socket and plug the type-c port into the
MINI PC's Type-C port (power port).
* Connect your keyboard and mouse (wired or wireless) to this MINI PC.
* This MINI PC has built-in WIFI, and you can also connect your network cable to
the MINI PC's network port.
Press the power button, the blue LED lights up, and then wait about 15 seconds
to enter the system
Please do not directly unplug the power to forcibly shut down the power, you
can through Windows internal applications to shut down.
* This MINI PC supports automatic power-on, you can follow the steps below.
* Connect your MINI PC to the power supply, monitor, keyboard and mouse.
* Press the power button and hold down the Esc key for about 5 seconds
to enter BIOS.
* Move the cursor to the CHIPSET option, then move the cursor down to the
South Cluster Configuration option and press Enter.
* Move the cursor down to the Miscellaneous Configuration option, press Enter,
then move the cursor down to Wake On Power(Automatic On), press enter.
* Move the cursor up to the S0 State option, press Enter to confirm, then press
the F4 key on the keyboard to save and exit.
S0 State option supports automatic power-on, S5 State option does
not support automatic power-on
4