
User's Manual


WARNING: Ensure that the weapon is not loaded and that the safety
selector is in the ”safe” position before attempting to install, remove
or perform maintenance.
CAUTION: Check that the O-ring is in good condition and in position to
ensure that there will be no water leakage into the battery compartment.
CAUTION: Do not overtighten.
7
2
2.1 ASSEMBLY AND PREPARATION
OPERATION UNDER NORMAL CONDITIONS
2.1.1 Install Battery
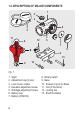
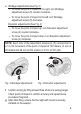
a Remove Battery cap (6) using the Tool (11B).
b Insert Battery (7) with the positive end (+) toward Battery cap (6)
as can be seen in Fig 1.
c Turn to the Rotary switch (8) to intensity setting 12 (max.) and
tighten the Battery cap (6) with the Tool (11B). When resistance
is encountered, proceed to tighten until the Battery cap (6) comes
to a stop.
d Verify that the red dot is present and that there is zero gap
between the Battery cap (6) and the battery compartment.
2.1.2 Install the Aimpoint
®
Micro series sight on a weapon
a Loosen the Shaft (13) with the Tool (11C), to clamp the Locking
bar (12) around the Picatinny/Weaver rail
b With the Shaft (13) (=recoil stop) positioned in a groove on the
Picatinny/weaver rail, push the sight with mount forward and
tighten the Shaft (13) using the Tool (11C).
c Tighten the Shaft (13) until a light resistance is encountered.
Proceed with another 1/4 to 1/2 turn until fully tightened
(2 Nm / 1.5 ft·lb).
d Complete zeroing according to 2.2.1.