
User`s manual

Biasing
Biasing is very easy, and doesn't require removing the chassis from the cabinet. You simply use
a voltmeter (any inexpensive digital multimeter will do), set it for the smallest DC voltage range
(typically 200mV). Then:
(1) Unplug any guitar cords going into the input jack. Turn the two volume controls all the way
down (other control positions don’t matter). Unscrew the lock nut on the bias pot on the rear
panel, and turn the bias control all the way down (counterclockwise). Turn the Power switch on,
wait a minute or so until the tubes have warmed up, then turn on the Glory switch. Wait a few
more minutes for the tubes to reach their stable operating point.
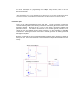
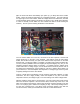
(2) Put the negative probe lead into the black tip jack (leaving the positive probe in one of the red
tip jacks - it doesn't matter which one), and adjust the bias pot for a maximum of 45mVDC (that's
45 millivolts, not 45V!). See note below for more information on the acceptable and
recommended bias value.
(3) Put the red meter probe leads into the other red tip jack and check for a maximum of
45mVDC. If the reading is higher than 45mV, adjust the bias pot down until the meter reads
45mVDC. If it is lower than 45mVDC, leave it set where it was. Note: if the two readings differ by
more than 5mV to 10mV, this indicates that the two tubes are too far out of match, and they
probably should be replaced with another set that are better balanced. However, it will not harm
the amplifier to use unbalanced tubes, as long as the bias pot is set for 45mV on the highest
current side. Check the voltage from the black tip jack to the left red tip jack and then to the right
red tip jack, and adjust the bias for 45mV on the highest reading side. An imbalance can
sometimes even sound good! Too high an imbalance, however, can cause high levels of hum in
the output and loss of low end response.
(4) Once the bias is set, tighten down the lock nuts on the bias trimpot and you're ready to play.
Note: The 45mV setting given above should be considered a maximum setting. It is perfectly
acceptable to bias at a lower setting. This will result in longer tube life, lower background noise,
and a cleaner tone, although if you go too low the increased crossover distortion may become
objectionable. You may prefer the tone with the tubes biased colder, so feel free to experiment, it
won’t hurt anything as long as you don’t bias the tubes too much hotter than the recommended
setting. Our “optimum” bias point we set the amp to at the factory before shipping is around
35mV - 40mV.
Note: It is normal for tubes to drift a bit, particularly when new, until they have had several hours
of playing time on them. The bias will also vary a bit with variations in AC line voltage (a Variac is
used to set the AC line voltage to 120V at the factory before biasing the tubes). Small variations
like this shouldn't cause any problems, so don't worry about constantly checking the bias and
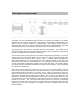
driving yourself crazy trying to keep it at exactly the setting you chose. If a tube is biased too
hot, the plate will glow a dull red color. The plate is the large grey metal "box" structure seen
inside the tube. Don't confuse normal filament glow with plate glow. Plate glow can usually be
seen as a "hot spot" near the center of the plate, sometimes accompanied by a "hot" smell and
some "ticking" noises as the metal expands. Continued operation with glowing plates will soon
result in failure of the tubes, possibly damaging screen grid resistors or other amplifier
components. The HT fuse should prevent any major damage to output or power transformers, or
other expensive components.