
Installation & Assembly

• Existing solid hardwood flooring that exceeds 6″ (15 mm) in width must be covered with 3/8″ (9.5 mm) approved
underlayment and fastened as required. Do not install over solid flooring attached directly to the concrete.
Vinyl, Resilient Tile, Cork Flooring and Linoleum
• Make sure the floor covering materials are well bonded to the subfloor/underlayment with full-spread adhesive, and
are no more than two layers thick, not to exceed 3/16″ (5 mm).
• With approved wood/wood composite subfloors, if vinyl or tiles are loose, broken or in poor condition, install a 3/8″
(9.5 mm) approved underlayment directly over the flooring materials.
• Clean the flooring materials, as necessary, to create a good adhesive bond using abrasive materials.
If a maintenance material is present on the floor covering, or a gloss is present, de-gloss with a flooring pad and a
commercially available stripper, then rinse completely. Allow ample drying time. (NOTE: Do not sand any resilient
products, for they may contain asbestos fibers, which may be harmful.)
• Cork floors must have all sealers and surface treatments removed before installation begins. Always check for
adequate adhesive bond.
IV. INSTALLING THE FLOOR
General Installation Tips
NOTE: When installing UNFINISHED SOLID OAK PARQUET flooring, allow a minimum of 72 hours adhesive curing time
before applying sealers, stains and finishes to unfinished flooring. Trowel filling and fillers are required to reduce the
possibility of panelization caused by the finish "gluing" the slats together. Test the moisture content of the wood in
accordance with the stain/finish manufacturer's recommendations. Avoid installing from the surface of the flooring. If
necessary distribute weight using a kneeler board.
• Floor should be installed from several cartons at the same time to ensure good color and shade mixture.
• When possible, preselect and set aside boards that blend best with all horizontally mounted moldings used to assure
a uniform final appearance. Install these boards adjoining the moldings.
• Be attentive to staggering the ends of the boards at least 4″–6″ (10–15 cm) when possible, in adjacent rows. This will
help ensure a more favorable overall appearance of the floor.
• When installing engineered products of uniform length, begin the rows with starter boards cut to various lengths.
Avoid staggering the rows uniformly to prevent stair-stepping. Boards cut from the opposite end of the row may be
used for the next starter boards.
General Information for Glue-Down Installations
• Maximum adhesive working times: Urethane adhesive - 60 minutes; Armstrong ProConnect Professional Hardwood
Flooring Adhesive - 60 minutes. When not in use, keep the adhesive container tightly closed to prevent thickening.
Thickening will cause difficulty in spreading the adhesive.
• Open times and curing times of ALL adhesives vary dependent upon subfloor porosity, air movement, humidity and
room temperature. Urethane adhesive has a shortened working time in high humidity environments, whereas the
working time for ProConnect and polymeric resin adhesives will be lengthened. In areas of low humidity, open time
will be longer with urethane adhesives and shorter with ProConnect. Adjust the amount of adhesive spread on the
subfloor accordingly. The adhesive should not be applied if subfloor or room temperature is below 60°F (16°C).
WORKING TIME WILL VARY.
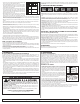
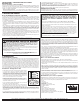
• Spread sufficient amounts of recommended adhesive with the recommended trowel (Figure 2) in an area that can be
covered in 60 minutes.
• Hold the trowel at a minimum 45° angle (Figure 4) firmly against the subfloor to
obtain a 40–60 ft.
2
(4–5.5 m
2
) per gallon spread rate.
• When not in use, keep the adhesive container tightly closed to prevent thickening.
Thickening of the adhesive will cause difficulty in spreading the adhesive.
• Proper ventilation within the room must be provided. An electric fan is helpful.
• The floor should be installed from several cartons at the same time to ensure good
color and shade mixture.
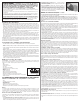
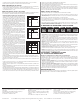
STEP 1: Doorway and Wall Preparation
Undercut door casings and jambs. Remove any existing base, shoe mold
or doorway thresholds. These items can be replaced after installation. All
door casings and jambs should be undercut to avoid difficult scribe cuts
(Figure 5).
STEP 2: Establish a Starting Point
(All Installation Methods)
• If the room dimensions allow, in at least two places 18″ (46 cm) from
the corner, measure out and establish a chalk line parallel to, and
24-1/2″ (62 cm) away from, the starting wall opposite the entrance
doorway. The 1/2″ (13 mm) is for expansion space (Figure 6).
• Snap a second chalk line 90° to the first chalk line, 24-1/2″ (62 cm)
away from the right angle wall (Figure 6). The 1/2″ (13 mm) is for
expansion space. Check accuracy with a builder’s square.
• Or balance the tiles at the perimeter of the room to allow a minimum of
a 9″ (23 cm) tile.
• Make any necessary adjustments to allow for crooked walls before
proceeding.
STEP 3: Spread the Adhesive
• After both chalk lines [at 90° to each other and 24-1/2″ (62 cm) from
the wall] have been snapped, start spreading the adhesive in the 24-1/2″
(62 cm) wide area next to the starting wall.
• Continue spreading the adhesive along the entire length of the starting
wall. Be careful not to spread adhesive beyond the 24-1/2″ (62 cm)
chalk line.
STEP 4: Installing the Parquet Flooring
NOTE: Clean adhesive from the surface of the floor frequently using the
recommended adhesive cleaner. Use a clean towel, changed frequently to
prevent haze and adhesive residue.
• Immediately lay the floor tiles on the newly spread adhesive. DO NOT lay
the floor tiles on dry adhesive. (Always lay the floor tiles on wet
adhesive.) If the adhesive becomes too dry, scrape up the old adhesive
and spread more. Installing on wet adhesive eliminates rolling the floor
with a heavy roller. The working time for the adhesive is 60 minutes.
Working time will vary depending on the job-site conditions.
IMPORTANT: Stand or kneel on the subfloor during the installation to
avoid shifting the tiles.
• PROPER PLACEMENT OF THE FIRST FLOOR TILE IS THE KEY TO THE
ENTIRE INSTALLATION. Carefully place a 12″ x 12″ (30.5 cm x 30.5 cm)
parquet tile at the intersection of the two chalk lines (Figure 7). Do not
use the edge of the tongue for aligning the tile on the chalk lines.
• Lay the second floor tile ahead of the first tile to fit 1/2″ (13 mm) from
the starting wall. Gently lock in the tongue-and-groove between the first
and second floor tiles (Figure 8).
Concrete
The flooring can be glued directly to concrete with a minimum compressive strength of 3,000 PSI. Do not install over
a concrete sealer or painted concrete; if present, remove by grinding or sanding. Do not install over slick, heavily
troweled or burnished concrete. Roughen the surface as necessary by sanding or grinding. Use an appropriate NIOSH-
designated dust mask.
Concrete Moisture Tests
All concrete subfloors should be tested and results documented for moisture content. Visual checks may not be reliable.
Test several areas, especially near exterior walls and walls containing plumbing. Acceptable test methods for subfloor
moisture content include:
•
A 3% Phenolphthalein in Anhydrous Alcohol Solution:
Chip the concrete
at least 1/4″ (6 mm) deep (do not apply directly to the concrete surface) and
apply several drops of the solution to the chipped area. If any color change
occurs, further testing is required.
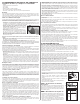
•
Tramex Concrete Moisture Encounter Meter
(Figure 3)
:
Moisture readings
should not exceed 4.5 on the upper scale. (Figure 3 shows an unacceptable
reading of over 4.5.)
•
Polyfiilm Test:
Apply 3′×3′ (1 m × 1 m) pieces of polyethylene film to the
subfloor and leave in place for 24 hours. Assure all edges are completely
sealed with water-resistant tape. Darkened concrete or condensation on film
indicates presence of moisture and requires additional measurements with the Tramex Meter, Calcium Chloride or RH
test.
NOTE: The following tests are required in commercial applications. Either or both tests are acceptable.
•
Calcium Chloride Test (ASTM F 1869):
The maximum moisture transfer must not exceed 3 lbs./1,000 ft.
2
in 24 hrs.
with this test.
•
RH Levels in Concrete Using In-situ Probes (ASTM F 2170-02)
should not exceed 75%.
“DRY” CONCRETE, AS DEFINED BY THESE TESTS CAN BE WET AT OTHER TIMES OF THE YEAR. THESE TESTS DO
NOT GUARANTEE A DRY SLAB. ALL NEW CONSTRUCTION CONCRETE SLABS SHOULD HAVE A MINIMUM OF 10 MIL
POLY FILM MOISTURE BARRIER BETWEEN THE GROUND AND THE CONCRETE.
Moisture Retardant Systems
If excessive moisture is present or anticipated, use Armstrong
®
VapArrest™ S-135 Professional Moisture Retardant
System or inexpensive sheet vinyl to reduce vapor intrusion.
NOTE: DO NOT use Armstrong ProConnect™ Professional Hardwood Flooring Adhesive when using Armstrong
VapArrest S-135 Professional Moisture Retardant System or sheet vinyl as a moisture retardant. Use only
Armstrong 57 or Armstrong EverLAST™ Premium Urethane Adhesive.
•
Armstrong VapArrest S-135:
Apply the materials after all subfloor preparation is complete. Follow the instructions on
the Armstrong VapArrest S-135 label. Allow 8–24 hours curing time before application of the hardwood flooring.
•
Sheet vinyl:
An inexpensive sheet vinyl or “slip-sheet” (felt-backed with vinyl wear layer) may be installed. Use a
premium grade, alkali-resistant adhesive and a full-spread application system to properly bond the vinyl to the
subfloor. Follow the sheet vinyl manufacturer’s instructions for installation procedures. A bond test may be required
as an adhesion test. Install several small areas [3′ x 3′ (1 m x 1 m)] and allow the vinyl to set for 72 hours. Remove
the vinyl. If the backing remains attached to the concrete, the subfloor should be acceptable for sheet vinyl installation.
Install the sheet vinyl and allow the adhesive to cure for 24 hours prior to beginning installation. Degloss as necessary
to create an adequate adhesive bond. Always check for adequate adhesive bond.
Acoustic Concrete
Acoustic concrete normally contains large quantities of gypsum that may inhibit the adhesive’s capability to properly
bond. Acoustic concrete must be primed with the concrete manufacturer’s recommended primer/surface hardener. Test
the concrete by scraping the surface with a nail or other sharp object. If the concrete powders or crumbles, it is not
sound and suitable for direct application of hardwood flooring and may require the use of a floating subfloor system.
Always check for adequate adhesive bond. The concrete must have a minimum compressive strength of 2,000 PSI.
Ceramic, Terrazzo, Slate & Marble
All grout joints and broken corners that exceed 3/16″ (5 mm) must be filled with a cementitous leveling compound such
as Armstrong S-194 Patch, Underlayment & Embossing Leveler with S-195 Underlayment Additive. The surface should
be cleaned and abraded to create a good bonding surface for the adhesive. Loose tiles must be re-adhered to the
subfloor or filled as above. Remove all sealers and surface treatments. Always check for adequate adhesive bond.
Acoustic Cork Underlayment
The flooring can be glued over full-spread, permanently bonded acoustic cork. The cork should have a density of no
less than 11.4 lb./ft. The cork, in general, should be pure cork combined with a polyurethane or resin binder. Install cork
in accordance with cork manufacturer’s recommendations. Always check for adequate adhesive bond.
Wood Subfloors and Underlayment
General: The wood subflooring materials must not exceed 13% moisture content. Using a realiable wood moisture
meter, measure moisture content of both the subfloor and the hardwood flooring to determine proper moisture content.
The difference between the moisture content of the wood subfloor and the hardwood flooring must not exceed 4%.
When installing parallel to the floor joists it may be necessary to stiffen the subfloor system by installing an additional
minimum of 3/8″ (9.5 mm) approved underlayment. Applicable standards and recommendations of the construction
and materials industries must be met or exceeded.
NOTE: As flooring manufacturers, we are unable to evaluate each engineered system. Spacing and spans, as well as
their engineering methods, are the responsibility of the builder, engineer, architect or consumer who is better able to
evaluate the expected result based on site-related conditions and performance. The general information provided below
describes common, non-engineered joist/subfloor systems. Engineered flooring systems may allow for wider joist
spacing and thinner subflooring materials.
Wood Structural Panel Subfloors and Underlayment
Structural panels/underlayment must be installed sealed side down. When used as a subfloor allow 1/8″ (3 mm)
expansion space between each panel. If spacing is inadequate, cut in with a circular saw. Do not cut in expansion space
on tongue-and-groove panels.
•
Plywood:
Must be minimum CDX grade (exposure 1) and meet US Voluntary Product Standard PS1 performance
standard or Canadian performance standard CAN/CSA 0325-0-92. The preferred thickness is 3/4″ (19 mm) as a
subfloor [minimum 5/8″ (16 mm)] or 3/8″ (9.5 mm) as underlayment.
•
Oriented Strand Board (OSB):
Conforming to US Voluntary Product Standard PS2 or Canadian performance
standard CAN/CSA 0325-0-92 construction sheathing. Check the underside of panel for codes. When used as a
subfloor, the panels must be tongue-and-groove and installed sealed side down. Minimum thickness to be 23/32″
(18.25 mm) thick when used as a subfloor, or 3/8″ (9.5 mm) as an underlayment.
•
Waferboard and Chipboard:
Conforming to US Voluntary Product Standard PS2 or Canadian performance standard
CAN/CSA 0325-0-92. Must be 3/4″ (19 mm) thick when used as a subfloor and 3/8″ (9.5 mm) thick when used as
an underlayment.
•
Particleboard:
Must be a minimum 40-lb. density, stamped underlayment grade and 3/4″ (19 mm) thick.
Solid Wood Subfloors
• Minimum 3/4″ (19 mm) thick with a maximum width of 6″ (15 cm) installed at a 45° angle to the floor joists.
• Group 1 dense softwood (Pine, Larch, Douglas Fir, etc.) No. 2 common, kiln dried with all board ends bearing on joists.
• Add 3/8″ (9.5 mm) approved underlayment to create a smooth surface for application of the glue.
Existing Wood Flooring
• Existing engineered flooring must be well bonded/fastened. When gluing over existing hardwood flooring of any
thickness the finishing materials must be abraded or removed to foster an adequate adhesive bond.
2
Figure 3
Figure 5
Figure 6
24-1/2˝
▼
▼
chalk line
chalk line
24-1/2˝
▼
▼
wall
wall
90˚
45
˚
-90
˚
Figure 4
Figure 7
24-1/2˝
▼
▼
chalk line
chalk line
24-1/2˝
▼
▼
wall
wall
1
Figure 8
24-1/2˝
▼
▼
chalk line
chalk line
24-1/2˝
▼
▼
wall
wall
1
2