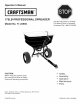
Operator's IVlanuai CRRFTSMRH ° 175LB PROFESSIONAL SPREADER DO NOT RETURN Model No. 71-24594 CAUTION: Before using this product, read this manual and follow all Safety Rules and Operating Instructions. TO STORE For Missing Parts or Assembly Questions Call 1-866-576-8388 ,, ,, ,, ,, ,, Safety Assembly Operation Maintenance Parts Sears, Roebuck and Co., Hoffman Estates, IL 60179 U.S.A. www.sears.com/craftsman PRINTED IN USA FORM NO.
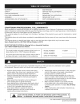
WARRANTY .................................................................... 2 MAINTENANCE .............................................................. 9 SAFETY ........................................................................... 2 SERVICE ANDADJUSTMENTS ..................................... 9 CARTON CONTENTS ..................................................... 3 STORAGE ....................................................................... 9 FULLSIZEHARDWARE CHART ..............................
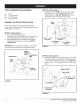
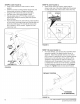
6 4 _J 5 J REF DESCRIPTION REF J DESCRIPTION 1 2 Hopper Cover Hitch Tube 4 5 i Hopper Assembly Screen 3 Wheels (2) 6 i Flow Control Mounting Tube q E jB J / J I J I J J f J J J J / J KEY A B C D E NOT SHOWN FULL SIZE QTY 2 2 2 2 2 DESCRIPTION Hex Bolt, 5/16"x 1-3/4" Hex Bolt, 1/4" x 1-3/4" Nylock Hex Nut, 1/4" Nylock Hex Nut, 5/16" Cotter Pin, 1/8 x 1-1/2" Call 1-866-576-8388 for missing parts or assembly help DO NOT RETURN TO STORE KEY F G H QTY 1 4 1 I J 2 1 DESCRIPTION Hair
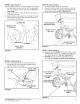
TOOLS REQUIRED FOR ASSEMBLY STEP 2: (SEE FIGURE 2) 4. (!) (2) (2) (2) tube using a 1/4" x 1-3/4" (B) hex bolt and a 1/4" nylock hex nut (C). DO NOTTIGHTEN YET. Do not assemble the inner hitch braces at this time. Pliers 7/16" Wrenches 1/2" Wrenches 9/16" Wrenches REMOVAL Assemble the two OUTER hitch braces to the hitch HITCH OF PARTS FROM CARTON Remove all parts and hardware packages from the carton. Lay out all parts and hardware and identify using the illustrations on page 3.
STEP 4: (SEE FIGURE 4) STEP 6: (SEE FIGURE 6) 10. Assemble a spacer (I), a 3/4" fiat washer (G), a wheel (air valve facing out) and another 3/4" fiat washer (G) onto the end of the axle that has both the large and small holes. 7. 8. Turn the spreader upright on its wheels. Assemble the flow control mounting tube to the hitch tube using two 5/16"x 1-3/4" he× bolts (A) and 5/16" nylock hex nuts (D). DO NOTTIGHTEN YET. 11. install a 3/8" × 1-1/2" cotter pin (E) into the small hole in the end of the axle.
STEP 8: (SEE FIGURE 8) STEP 9: (SEE FIGURE 9) * * * * * * * Push on flow control arm until it locks in "OFF" position. Slide flow control mounting bracket along tube until closure plate in bottom of hopper just closes. Snug the 5/16" nylock hex nuts just enough to hold flow control mounting bracket in place. Set adjustable stop at "5". Pull flow control arm against stop. Verify that closure plate has opened about half way.
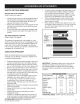
HOW TO USE YOUR SPREADER SETTING THE FLOW CONTROL (Refer to figure 8 on page 6.) • Loosen the nylon wing nut, set the adjustable stop to the desired flow rate setting and retighten the wing nut. The higher the setting number, the wider the opening in the bottom of the hopper. Refer to the application chart on this page and to the instructions on the fertilizer bag to select the proper flow rate setting.
CHECK FOR LOOSE FASTENERS • Before each use make a thorough visual check of the spreader for any bolts and nuts which may have loosened. Retighten any loose bolts and nuts. CHECK FOR WORN OF DAMAGED PARTS Check for worn or damaged parts before each use. Repair or replace parts if necessary. LUBRICATE (See figure 12) Lightly apply automotive grease as needed to the sprocket and gear. Oil the nylon bushings on the vertical sprocket shaft and on the axle at least once a year, or more often as needed.
• Rinse inside of hopper and exterior of spreader and dry off before storing. Call 1-866-576-8388 for missing parts or assembly help DO NOT RETURN TO STORE • Store in a clean, dry area.
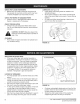
47_ 44 J 42 65 45 54 \ \ 39 \ \ 37 54 9 37 35 35 53 .................... 30 .......... _ 40 ............ 39 63 37 9 9 40 49 15 5 ....... 50 24 23 36 F 55 29 _l / 7 13 24 9 14 \ 23 \ 21 19 @ i \\ 20 21 22 17 / / / 37 16 35 / 50 50 10 56 37 Call 1-866-576-8388 for missing parts or assembly help DO NOT RETURN TO STORE
REF. PART NO. QTY. DESCRIPTION REF. PART NO. QTY. 1 2 44480 43882 1 6 Hopper Rivet, Stainless 34 35 48586 23525 1 4 3 4 5 6 65129 44462 23753 23758 1 1 1 1 Ass'y, Guide Closure Tube, Frame Slide Gate Angle Bracket Slide Gate Bracket 36 37 38 39 23762 1509-69 47441 1543-69 1 8 1 12 7 8 HA21362 24857 6 1 Nut, Nylock Hex 3/8-16 Thd.* Flow Control Link 40 41 43088 24858 15 1 9 10 11 12 47189 43808 43084 44180 18 1 2 2 Nut, Nylock Hex 1/4-20 Thd.
Your Home For expert troubleshooting and home solutions advice: www.managemyhome.com For repair - in your home - of all major brand appliances, lawn and garden equipment, or heating and cooling systems, no matter who made it, no matter who sold it! For the replacement parts, accessories and owner's manuals that you need to do-it-yourself. For Sears professional installation of home appliances and items like garage door openers and water heaters.