
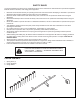
De-Thatcher Instruction Manual


5
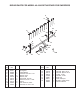
FIGURE 5
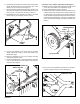
9. Connect the sweeper to the tractor. Set the sweeper
height adjustment handle to about the middle of it's
adjustment range.
10. Place the dethatcher in front of the sweeper housing,
underneath the hitch tubes.
11. Connect the dethatcher to the conduit clamp using two
5/16" x 1-3/8" clevis pins, 5/16" washers and 3/32" hair
cotterpins.Seegure4.
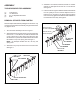
CONDUIT
CLAMP
TRANSPORT
HOOK
FIGURE 3
6. Assemble a conduit clamp onto each end of the sweeper
height adjustment tube so that the straight part of the
clampisontopofthetube.Seegure3.
7. Remove the hitch brackets and the bolts, if present, from
the ends of the sweeper's hitch tubes. Slide the transport
hookontotheL.H.hitchtubeasshowningure3.
8. Reassemble the hitch brackets and bolts to the hitch
tubes. Refer to your sweeper owner's manual.
If you have a 30" sweeper, skip steps 12 through 14.
12. Make sure the sweeper height adjustment handle is still
set to about the middle of it's adjustment range.
13. Center the dethatcher with the sweeper.
14. Assemble the keeper brackets (bend to the inside) to the
sweeper's hitch tube, outside of the conduit clamps. Use
a u-bolt and two 1/4" nylock nuts per bracket. Position the
keeper brackets against the sides of the conduit clamps,
approximately perpendicular to the ground. Tighten the
nylock nuts without bending the keeper brackets. See
gure5.
KEEPER BRACKET
U-BOLT
1/4" NYLOCK NUT
FIGURE 4
FIGURE 6
15. Lift the front of the dethatcher and secure it in transport
positionusingthetransporthook.Seegure6.
3/32" HAIR
COTTER PIN
5/16" WASHER
5/16" x 1-3/8"
CLEVIS PIN
HEIGHT ADJUSTMENT
MIDDLE SETTING
TRANSPORT HOOK