
Use and Care Manual


9
SNAP
FLAP
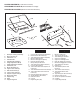
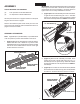
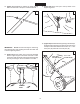
8. (Figure 16)Securethebagcornersaroundthelower
frametubesbysnappingthebagapstothebagbottom
onbothsides.
16
ENGLISH
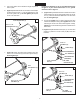
9. (Figure 17)Feelalongthestitchedaponthehopper
bagtolocatethelowestholeineachupperframetube.
Pierceaholethroughbothsidesofthestitchedapsin
alignmentwiththelowesthole.
17
18
UPPER HOLES
LOWEST HOLE
UPPER FRAME TUBE
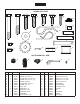
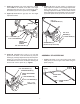
10. (Figure 18)Inserta 3/8" x2"clevispin (R) through
thelowestholeineachupperhoppersidetube.Next,
assembleabagarmtube(pointingindirectionshown)
ontoeachclevispinandsecureitwitha3/32"haircotter
pin (N).
11. (Figure 18)Assembleavinylcap(V)ontotheendof
eachbagarmtube.
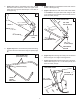
12. (Figure 19)Slidethepivotrodthroughtheupperholes
intheupperframetubeandthroughthestichedsleeve
onthewindscreen.
19
LOWEST HOLE
3/32" HAIR
COTTER PIN (N)
3/8" x 2"
CLEVIS PIN (R)
BAG ARM TUBE
VINYL CAP (V)
PIVOT ROD
UPPER HOLE
MOUNTING CLAMP
MOUNTING CLAMP