™ owners manual Manuel de l’utilisateur MANUAL DEL USUARIO Model No. Modèle n° Modelo n° 45-0472 CAUTION: Read Rules for Safe Operation and Instructions Carefully ATTENTION: Avant d’utiliser ce produit, lisez ce manuel et respectez toutes les règles de sécurité et instructions d'utilisation. PRECAUCIÓN: Antes de usar este producto, lea el manual y siga todas las reglas de seguridad y las instrucciones de operación.
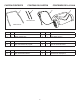
CARTON CONTENTS CONTENU DU CARTON 1 CONTENIDO DE LA CAJA 3 2 MDL8.253.0126 MDL8.253.0128 ref 1 2 qty 1 2 RÉF. 1 2 QTÉ. description 1 Tube inférieur de poignée 2 Tube intermédiaire de poignée ref 1 2 description Lower Handle Tube Middle Handle Tube CANT. DESCRIPCIÓN 1 Tubo inferior del manubrio 2 Tubo central del manubrio 2 ref 3 4 qty 1 1 description Upper Handle Tube Power Rake Housing RÉF. 3 4 QTÉ. description 1 Tube supérieur de poignée 1 Carter de la déchaumeuse ref 3 4 CANT.
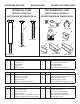
hardware package QUINCAILLERIE PAQUETE DE TORNILLERÍA SHOWN FULL SIZE NOT SHOWN FULL SIZE PIÈCES À L’ÉCHELLE PIÈCES NON À L’ÉCHELLE MOSTRADOS EN TAMAÑO REAL NO MOSTRADOS EN TAMAÑO REAL D A B C MDL8.253.129 E MDL8.486.054 G F GB14 M8X45 MDL8.101.011 MDL8.486.016 J I H GB14 M8x60 MDL8.100.017 MDL8.919.005 ref A B C D E qty 1 1 4 6 3 RÉF. A B C D E QTÉ. 1 1 4 6 3 ref A B C D E F CANT. 1 1 4 6 3 1 description MDL8.101.028 MDL8.100.
SAFETY Remember, any power equipment can cause injury if operated improperly or if the user does not understand how to operate the equipment. Exercise caution at all times when using power equipment. • • • • • • • • • • • • • • • • Read this owners manual carefully and know how to operate your Electric Dethatcher. Be familiar with the controls and the proper use of the Electric Dethatcher. Never allow children to use the Electric Dethatcher. Do not allow adults to operate without proper instructions.
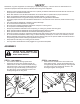
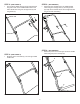
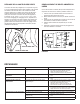
STEP 3: (SEE FIGURE 3) • STEP 5: (SEE FIGURE 5) Turn the Power Rake housing upright and attach the long end of each of the middle handle tubes to the lower handle tube using two carriage bolts (C) and wing knobs (D). SHORT END • Attach the upper handle tube to the middle handle tubes using two carriage bolts (C) and wing knobs (D). Keep the cord holder above the carriage bolt and wing knob while assembling.
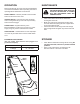
operation maintenance Become familiar with all of the controls and adjustments on the Electric Dethatcher before operating. Controls for operating Electric Dethatcher are as follows: CAUTION: before performing any maintenance, make sure the Electric Dethatcher is turned off and unplugged from any power source. SAFETY SWITCH - Must be pressed in before handle switch can be used to start motor. • HANDLE SWITCH - Pull and hold to start and keep motor running.
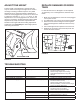
adjust tine height Replace damaged or worn tines The tine height is pre-adjusted for average lawn and may not need to be changed. Changes can be made to tine height if working conditions require it. Only make adjustments to tine height when Electric Dethatcher is turned off and unplugged from a power source. There are 5 positions for the tines (.7", .9", 1.1", 1.4" and 1.7"). Pull adjustment arm out from engagement hole, move it and then let it re-engage in the desired height position.
SÉCURITÉ Un matériel motorisé risque de causer des blessures s’il est utilisé de manière incorrecte ou si son l'utilisateur ne comprend pas comment le faire fonctionner. Agissez avec précaution en permanence quand vous utiliser un matériel motorisé. • • • • • • • • • • • • • • • • Lisez ce manuel de l'utilisateur avec précaution et sachez vous servir de votre déchaumeuse. Connaissez les commandes et l'utilisation correcte de la déchaumeuse. Ne laissez jamais des enfants se servir de la déchaumeuse.
FONCTIONNEMENT ENTRETIEN ATTENTION : AVANT TOUTE INTERVENTION D’ENTRETIEN, ASSUREZ-VOUS QUE LA DÉCHAUMEUSE EST HORS TENSION ET QU’ELLE EST DÉBRANCHÉE DE TOUTE PRISE DE COURANT. Familiarisez-vous avec toutes les commandes et les réglages de la déchaumeuse avant de vous en servir. Les commandes de fonctionnement de la déchaumeuse sont: INTERRUPTEUR DE SÉCURITÉ - il doit obligatoirement être enfoncé avant que l’interrupteur à la poignée puisse démarrer le moteur.
RÉGLAGE DE LA HAUTEUR DES DENTS REMPLACEMENT DE DENTS ABIMÉES OU USÉES La hauteur des dents est préréglée pour une pelouse moyenne, et n’a pas nécessairement besoin d’être modifiée. Il est possible de modifier la hauteur des dents si les conditions de travail l’exigent. N’effectuez un réglage de la hauteur des dents que quand la déchaumeuse est hors-tension et débranchée de toute prise de courant. La hauteur des dents est réglable en 5 positions (0,7 po., 0,9 po., 1,1 po., 1,4 po. et 1,7 po.).
SEGURIDAD Cualquier equipo eléctrico puede causar lesiones si se usa incorrectamente o si el usuario no sabe cómo usar el equipo. Tenga mucho cuidado en todo momento cuando use equipos eléctricos. • • • • • • • • • • • • • • • • Lea atentamente este manual del propietario y conozca cómo usar su despajadora eléctrica. Familiarícese con los controles y el uso correcto de la despajadora. No permita nunca que los niños usen la despajadora.
OPERACIÓN MANTENIMIENTO PRECAUCIÓN: ANTES DE REALIZAR CUALQUIER TAREA DE MANTENIMIENTO, ASEGÚRESE DE QUE LA DESPAJADORA ESTÉ APAGADA Y DESCONECTADA DE TODA FUENTE DE ALIMENTACIÓN ELÉCTRICA. Familiarícese con todos los controles y los ajustes de la despajadora antes de usarla. Los controles para operar la despajadora son los siguientes: INTERRUPTOR DE SEGURIDAD - Debe presionarse antes de usar el interruptor del manubrio para arrancar el motor.
AJUSTE LA ALTURA DE LAS PÚAS REEMPLACE LAS PÚAS DAÑADAS O DESGASTADAS La altura de las púas ha sido previamente ajustada para el césped común y no necesita cambiarse. Puede hacer cambios en la altura de las púas si las condiciones del trabajo lo requieren. Sólo ajuste el tamaño de las púas cuando la despajadora esté apagada y desconectada de la fuente de alimentación eléctrica. Las púas tienen 5 posiciones (0.7 pulg., 0.9 pulg., 1.1 pulg., 1.4 pulg. y 1.7 pulg.).
repair parts for 45-0472 Electric Dethatcher 3 2 8 7 1 10 9 11 12 13 12 6 16 4 10 12 5 35 12 15 17 14 34 20 19 28 18 21 29 22 12 26 27 25 24 27 33 23 32 31 37 30 35 34 36 18 27 17 ref part no qty description 1 MDL8.224.017 1 Pulley (small) 2 MDL6.113.025 1 Motor Assembly 3 MDL8.268.009 1 Motor Base 4 MDL8.211.052 1 Air Intake Housing 2 5 MDL8.211.051 1 Air Intake Housing 1 6 MDL8.306.030 1 Rear Flap 7 MDL8.306.028 1 Housing 8 MDL8.271.008 2 Hinge Bracket 9 MDL8.281.
repair parts for 45-0472 Electric Dethatcher 1 2 4 5 4 3 4 6 15 16 4 17 18 7 19 27 21 20 13 26 28 23 ref 1 2 3 4 5 6 7 8 9 10 11 12 13 14 part no MDL8.212.026 MDL8.253.0128 MDL8.486.054 GB14 M8X45 MDL8.253.0126 MDL8.253.127 MDL8.486.016 MDL8.253.129 MDL8.462.001 MDL8.100.017 MDL8.919.005 GB14 M8x60 MDL8.100.013 MDL8.101.
the fastest way to purchase parts www.speedepart.com © 2009 Agri-Fab, Inc. REPAIR PARTS Agri-Fab, Inc. 809 South Hamilton Sullivan, IL. 61951 217-728-8388 www.agri-fab.