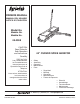
™ owners manual MANUAL DEL USUARIO NOTICE D’UTILISATION Model No. Modelo No. Modèle No. 45-0369 CAUTION: Read Rules for Safe Operation and Instructions Carefully PRECAUCION: Lea cuidadosamente los Procedimientos e Instrucciones para la Operación Segura de la Máquina. ATTENTION: Lire et suivre attentivement les instructions et consignes de sécurité de cette notice.
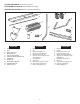
CARTON CONTENTS (Loose Parts in Carton) CONTENIDO DE LA CAJA (Partes Sueltas en la Caja) CONTENU DU CARTON (Pièces en Vrac Dans le Carton) 8 1 2 9 3 7 4 5 Tray Axle Spike Disks (12) End Plates (2) Axle Support Bracket Hitch Arm Mount Brackets (3) Lift Handle Wheels (2) Wheel Mount Bracket Hitch Brackets (2) Hitch Arms (2) 6 11 ESPAÑOL ENGLISH 1. 2. 3. 4. 5. 6. 7. 8. 9. 10. 11. 10 1. 2. 3. 4. 5. 6.
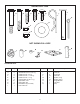
SHOWN FULL SIZE A B C D E J I K H F G NOT SHOWN FULL SIZE Q L M N P O HARDWARE PACK Key Qty. A B C D E F G H I 2 2 2 23 4 31 2 10 1 Description Shoulder Bolt, 2"x 2-5/16" Lg. Hex Bolt, 5/16" x 2" Lg. Hex Bolt, 5/16" x 1-1/4" Lg. Hex Bolt, 5/16" x 1" Lg. Carriage Bolt, 5/16" x 1"Lg. Nylock Nut, 5/16" Nylock Nut, 3/8" Flat Washer (6 pcs. extra) Hair Cotter Pin Key Qty.
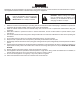
ENGLISH SAFETY RULES Remember, any power equipment can cause injury if operated improperly or if the user does not understand how to operate the equipment. Exercise caution at all times when using power equipment. CAUTION: Vehicle braking and stability may be affected with the addition of an accessory or an attachment. Be aware of changing conditions on slopes. Look for this symbol to point out important safety precautions. It means – Attention! Become alert! Your safety is involved. 1.
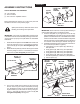
ENGLISH ASSEMBLY INSTRUCTIONS TOOLS REQUIRED FOR ASSEMBLY HITCH ARM MOUNT BRACKET (G) 5/16" NYLOCK NUT (2) 1/2" wrenches (1) 9/16" wrenches (1) 3/4" wrench or adjustable wrench Before assembling the aerator, lay out all of the parts and hardware as shown on the previous pages. REAR OF TRAY (D) 5/16" x 1" HEX BOLT FIGURE 2 Spike points are sharp. Exercise caution when handling and working near spike disks.
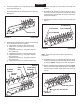
ENGLISH 6. Pivot the end plate on your right side up onto the end of the axle. See figure 4. 9. Pivot the end plate up onto the end of the axle. See figure 6. 7. Pivot the end plate on your left side down out of the way. See figure 4. 10. Assemble a flat washer(s) (H) and a cotter pin (K) to one end of the axle. Use as many washers as needed to eliminate any gaps between the parts on that end of the axle. See figure 6. 11. Repeat the procedure for the other end of the axle. See figure 6.
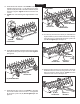
ENGLISH 14. Assemble the axle bracket to the outside of the angle brackets using two 5/16" x 1" hex bolts (D) and 5/16" nylock nuts (G). The ends of the axle bracket must point as shown in figure 8. Tighten and then loosen the nuts 1/4 turn. 15. Tighten the nuts fastening the angle brackets to the tray. HITCH ARMS HITCH ARM MOUNT BRACKET (G) 5/16" NYLOCK NUT (E) 5/16" x 1" CARRIAGE BOLT FIGURE 10 (G) 5/16" NYLOCK NUT 18. Turn the tray so that the front faces you.
ENGLISH 20. Turn the aerator right side up and assemble the front ends of the hitch arms together using two 5/16" x 1-1/4" hex bolts (C) and 5/16" nylock nuts (G). Do not tighten yet. See figure 13. 21. Assemble the two hitch brackets to the top and bottom of the hitch arms using two 5/16" x 2" hex bolts (B) and 5/16" nylock nuts (G). Do not tighten yet. See figure 13. 22. Assemble the 3/8" hitch pin (J) through the hitch brackets and secure it with a 1/8" hair cotter pin (I). See figure 13. 25.
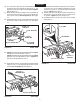
ENGLISH OPERATION 9. To prevent damage to lawn, do not make sharp turns while spike points are engaged in ground. 10. Aerate in an up and down direction on slopes. 11. To increase depth of spike point penetration, add weight to the tray as necessary. The tray holds concrete blocks or patio blocks at approximately 35 lbs. each. Secure the weights with straps or wire using the holes in the tray flange. See figure 17. 12.
ESPAÑOL NORMAS DE SEGURIDAD Cualquier equipo movido por motor puede causar lesiones si se opera inadecuadamente o si el usuario no entiende cómo debe operarlo. Manténgase atento y cauteloso siempre que opere el equipo. PRECAUCION: La estabilidad del vehiculo y su capacidad de frenado pueden afectarse al remolcar un accesorio o un vehiculo adicional. Tenga cuidado con este cambio de condiciones debido a la pendiente. Este simbolo indica precauciones importantes de seguridad.
ESPAÑOL IMPORTANTE: Asegúrese de que la parte posterior de la bandeja quede hacia usted y de que los discos escarpiadores apunten en la dirección mostrada. 4. Gire la placa del extremo a su derecha hacia abajo y fuera del camino. Coloque el extremo largo del eje dentro de la otra placa de pivote. (Mida desde el agujero ciego en la mitad del eje. Si hay dos agujeros ciegos, use el agujero que esté en alineamiento con los agujeros de los extremos.
ESPAÑOL OPERACION 7. 8. El proceso de aireación requiere abrir un número de agujeros pequeños en el terreno para crear pequeños depósitos que lleven oxígeno, fertilizante y agua hacia la zona de la raíz. Para un mejor rendimiento del accesorio aireador, se recomienda la siguiente preparación del terreno y operación del aireador. 9. 10. 11. Las puntas de las espigas son afiladas.
FRANÇAIS SÉCURITÉ Tout appareil mécanique utilisé incorrectement peut être la cause de blessures. L’utilisateur doit bien en maîtriser le fonctionnement. Observez en tout temps la plus grande prudence lorsque vous utilisez un appareil mécanique. Attention: La stabilité et la capacité de freinage d’un véhicule peut être diminuée par l’ajout d’un accessoire. Soyez vigilant dans les pentes. Ce symbole attire l’attention sur des mesures de sécurité importantes.
FRANÇAIS IMPORTANT: veiller à ce que l’arrière du plateau soit tourné vers soi et que les disques à crampons pointent dans la direction indiquée 13. Aligner l’attache de support d’essieu avec le plateau. Serrer les quatre boulons et écrous montés à la figure 1 et fixant l’attache de support d’essieu et la plaque de soulèvement au centre du plateau. 14. Monter l’attache d’essieu à l’extérieur des cornières d’assemblage à l’aide de deux boulons à six pans (D) et écrous de blocage à six pans (G).
FRANÇAIS FONCTIONNEMENT 7. 8. L’aération consiste à percer de petits trous dans le sol pour créer de petits réservoirs qui amèneront l’oxygène, l’engrais et l’eau dans la zone des racines. Pour obtenir la meilleure performance de l’accessoire d’aérateur à crampons, il est recommandé d’effectuer la préparation du gazon et de faire marcher l’aérateur comme indiqué ci-dessous. 9. 10. 11. Les pointes des crampons sont aiguës.
SPIKE AERATOR MODEL 45-0369 REPAIR PARTS 27 10 2 10 1 10 10 8 10 8 16 12 11 21 28 10 22 11 4 6 12 19 24597 24594 25429 45148 23708 46838 24598 24599 43501 43063 47810 43009 24600 23981 24595 24596 6 6 4 25 6 B 12 A 19 1 2 3 4 5 6 7 8 9 10 11 12 13 14 15 16 14 5 3 4 PART 4 13 11 22 REF. NO. 24 11 11 18 15 20 17 10 20 11 26 14 11 11 21 12 9 21 10 21 23 17 11 A 9 B 18 28 18 11 7 QTY.
the fastest way to purchase parts www.speedepart.com REPAIR PARTS Agri-Fab, Inc. 303 West Raymond Sullivan, IL. 61951 217-728-8388 www.agri-fab.com This document (or manual) is protected under the U.S. Copyright Laws and the copyright laws of foreign countries, pursuant to the Universal Copyright Convention and the Berne convention.