
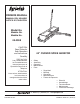
Installation Guide


6
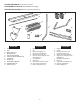
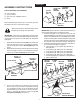
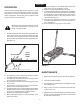
6. Pivottheendplateonyourrightsideupontotheend
oftheaxle.Seegure4.
7. Pivottheendplateonyourleftsidedownoutoftheway.
Seegure4.
FIGURE 4 REAR VIEW
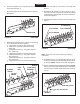
FIGURE 5 REAR VIEW
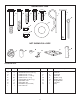
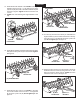
FIGURE 6 REAR VIEW
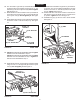
FIGURE 7 REAR VIEW
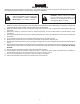
(N) SHORT
SPACER
(M) LONG
SPACER
SPIKE
DISK
(L) DISK HUB
REVERSED
(H) FLAT
WASHER
(L) DISK HUB
1
2
REAR OF TRAY
(H) FLAT WASHER
(K) COTTER PIN
(H) FLAT WASHER
(K) COTTER PIN
(G) 5/16" NYLOCK NUT
(D) 5/16" x 1"
HEX BOLT
TIGHTEN (4) NUTS
8. Assemblethefollowingpartsinsequenceontothelong
endoftheaxle(asshowningure5):
a. Aatwasher(H)andtwoshortspacers(N).
b. Adiskhub(Lreversed),spikediskandlong
spacer (M).
c. Aspikedisk,diskhub(L),longspacer(M)and
shortspacer(N).
d. Aspikedisk,diskhub(L)andlongspacer(M).
e. Aspikedisk,diskhub(L),longspacer(M)and
shortspacer(N).
f. Aspikedisk,diskhub(L),longspacer(M)and
shortspacer(N).
g. Aspikedisk,diskhub(L)andshortspacer(N).
9. Pivottheendplateupontothe endof theaxle.See
gure6.
10. Assembleaatwasher(s)(H)andacotterpin(K)to
oneendoftheaxle.Useasmanywashersasneeded
toeliminateanygapsbetweenthepartsonthatendof
theaxle.Seegure6.
11. Repeattheprocedurefortheotherendoftheaxle.See
gure6.
ENGLISH
HINT:Tipthetrayoverontoit'ssideforthefollowing
instructions.
12. Assemblefour5/16"x1"hexbolts(D)and5/16"nylock
nuts(G)totheholesthatwereleftemptyateachcorner
ofthetray.Tighten alleightcornerbolts.Seegure7.
13. Squareuptheaxlesupportbracketwiththetray. Tighten
thefourboltsandnutsassembledingure1thatfasten
theaxlesupportbracketandliftplatetothecenterof
thetray.